Super Smash Bros. 4

Dr. Mario (SSB4)/Down special/Default: Difference between revisions

From SmashWiki, the Super Smash Bros. wiki
Jump to navigationJump to search
mNo edit summary
Line 17: Line 17:
|id=0
|id=0
|part=0
|part=0
|damage=1.344%
|damage=1.2%
|angle=90
|angle=90
|bk=0
|bk=0
Line 36: Line 36:
|id=1
|id=1
|part=0
|part=0
|damage=1.344%
|damage=1.2%
|angle=90
|angle=90
|bk=0
|bk=0
Line 55: Line 55:
|id=2
|id=2
|part=0
|part=0
|damage=1.344%
|damage=1.2%
|angle=180
|angle=180
|bk=45
|bk=45
Line 74: Line 74:
|id=3
|id=3
|part=0
|part=0
|damage=1.344%
|damage=1.2%
|angle=180
|angle=180
|bk=45
|bk=45
Line 94: Line 94:
|id=0
|id=0
|part=0
|part=0
|damage=3.36%
|damage=3%
|angle=45
|angle=45
|bk=80
|bk=80
Line 114: Line 114:
|id=1
|id=1
|part=0
|part=0
|damage=3.36%
|damage=3%
|angle=45
|angle=45
|bk=80
|bk=80
Line 131: Line 131:
|slvl=L
|slvl=L
}}
}}
{{HitboxTableRowNote|The damage values are untouched before being affected by Dr. Mario's 1.12x damage multiplier.|24}}
|}
|}


Line 140: Line 141:
|id=0
|id=0
|part=0
|part=0
|damage=1.344%
|damage=1.2%
|angle=90
|angle=90
|bk=0
|bk=0
Line 159: Line 160:
|id=1
|id=1
|part=0
|part=0
|damage=1.344%
|damage=1.2%
|angle=90
|angle=90
|bk=0
|bk=0
Line 178: Line 179:
|id=2
|id=2
|part=0
|part=0
|damage=1.344%
|damage=1.2%
|angle=366
|angle=366
|bk=60
|bk=60
Line 197: Line 198:
|id=3
|id=3
|part=0
|part=0
|damage=1.344%
|damage=1.2%
|angle=366
|angle=366
|bk=60
|bk=60
Line 217: Line 218:
|id=0
|id=0
|part=0
|part=0
|damage=3.36%
|damage=3%
|angle=45
|angle=45
|bk=80
|bk=80
Line 236: Line 237:
|id=1
|id=1
|part=0
|part=0
|damage=3.36%
|damage=3%
|angle=45
|angle=45
|bk=80
|bk=80
Line 252: Line 253:
|slvl=L
|slvl=L
}}
}}
{{HitboxTableRowNote|The damage values are untouched before being affected by Dr. Mario's 1.12x damage multiplier.|24}}
|}
|}


Revision as of 05:27, August 6, 2020

This article is about the hitbox visualization in Super Smash Bros. 4. For the move itself, see Dr. Tornado.
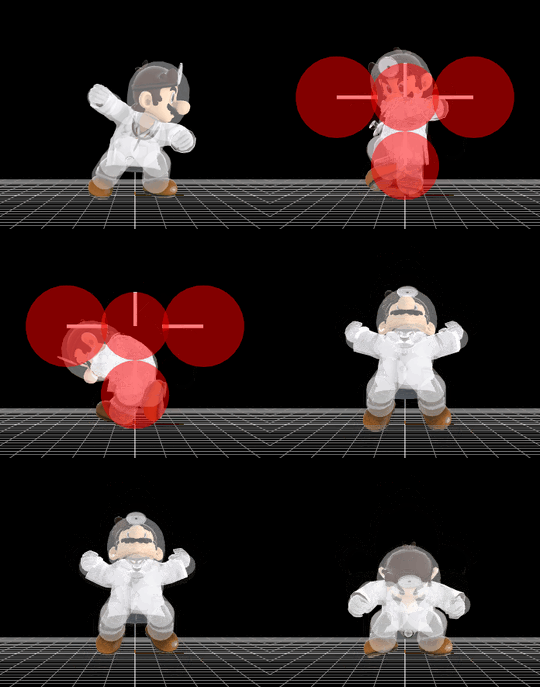
Hitbox visualization showing Dr. Mario's grounded Dr. Tornado.
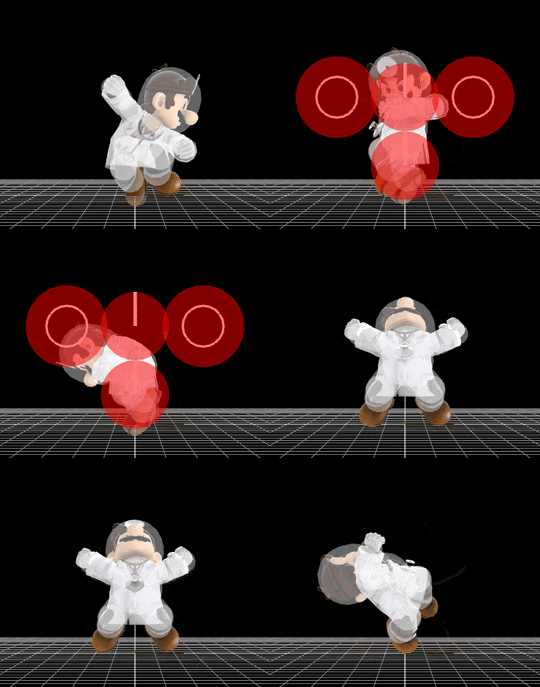
Hitbox visualization showing Dr. Mario's aerial Dr. Tornado.
Competitive.png This article or section may require competitive expertise.
You can discuss this issue on the talk page or edit this page to improve it.
Data.png This article or section may require additional technical data.
You can discuss this issue on the talk page or edit this page to improve it.

Hitboxes

Looping hits rehit every 6 frames.

Ground

ID Part Damage SD Angle BK KS FKV Radius Bone Offset SDIx T% Clang Rebound Type Effect G A Sound Direct
Looping hit
0 0 1.2% 0 AngleIcon90.png 0 60 30 3.5 0 0.0 10.0 0.0 1.0x 1.0x 0% HitboxTableIcon(Clang).png HitboxTableIcon(Rebound).png Spin (type) Normal (effect) HitboxTableIcon(GroundedTrue).png HitboxTableIcon(AerialTrue).png S Kick SpecialsDirect.png
1 0 1.2% 0 AngleIcon90.png 0 60 70 3.5 0 0.0 3.0 0.0 1.0x 1.0x 0% HitboxTableIcon(Clang).png HitboxTableIcon(Rebound).png Spin (type) Normal (effect) HitboxTableIcon(GroundedTrue).png HitboxTableIcon(AerialTrue).png S Kick SpecialsDirect.png
2 0 1.2% 0 AngleIcon180.png 45 20 0 4.2 0 0.0 10.0 -7.0 1.0x 1.0x 0% HitboxTableIcon(Clang).png HitboxTableIcon(Rebound).png Spin (type) Normal (effect) HitboxTableIcon(GroundedTrue).png HitboxTableIcon(AerialTrue).png S Kick SpecialsDirect.png
3 0 1.2% 0 AngleIcon180.png 45 20 0 4.2 0 0.0 10.0 7.0 1.0x 1.0x 0% HitboxTableIcon(Clang).png HitboxTableIcon(Rebound).png Spin (type) Normal (effect) HitboxTableIcon(GroundedTrue).png HitboxTableIcon(AerialTrue).png S Kick SpecialsDirect.png
Final hit
0 0 3% 0 AngleIcon45.png 80 130 0 6.0 0 0.0 11.0 6.0 1.0x 2.0x 0% HitboxTableIcon(Clang).png HitboxTableIcon(Rebound).png Spin (type) Normal (effect) HitboxTableIcon(GroundedTrue).png HitboxTableIcon(AerialTrue).png L Kick SpecialsDirect.png
1 0 3% 0 AngleIcon45.png 80 130 0 6.0 0 0.0 3.0 2.0 1.0x 2.0x 0% HitboxTableIcon(Clang).png HitboxTableIcon(Rebound).png Spin (type) Normal (effect) HitboxTableIcon(GroundedTrue).png HitboxTableIcon(AerialTrue).png L Kick SpecialsDirect.png
The damage values are untouched before being affected by Dr. Mario's 1.12x damage multiplier.

Air

ID Part Damage SD Angle BK KS FKV Radius Bone Offset SDIx T% Clang Rebound Type Effect G A Sound Direct
Looping hit
0 0 1.2% 0 AngleIcon90.png 0 100 50 3.5 0 0.0 10.0 0.0 1.0x 1.0x 0% HitboxTableIcon(Clang).png HitboxTableIcon(Rebound).png Spin (type) Normal (effect) HitboxTableIcon(GroundedTrue).png HitboxTableIcon(AerialTrue).png S Kick SpecialsDirect.png
1 0 1.2% 0 AngleIcon90.png 0 100 50 3.5 0 0.0 3.0 0.0 1.0x 1.0x 0% HitboxTableIcon(Clang).png HitboxTableIcon(Rebound).png Spin (type) Normal (effect) HitboxTableIcon(GroundedTrue).png HitboxTableIcon(AerialTrue).png S Kick SpecialsDirect.png
2 0 1.2% 0 Autolink angle (366) 60 120 0 4.2 0 0.0 10.0 -7.0 1.0x 1.0x 0% HitboxTableIcon(Clang).png HitboxTableIcon(Rebound).png Spin (type) Normal (effect) HitboxTableIcon(GroundedTrue).png HitboxTableIcon(AerialTrue).png S Kick SpecialsDirect.png
3 0 1.2% 0 Autolink angle (366) 60 120 0 4.2 0 0.0 10.0 7.0 1.0x 1.0x 0% HitboxTableIcon(Clang).png HitboxTableIcon(Rebound).png Spin (type) Normal (effect) HitboxTableIcon(GroundedTrue).png HitboxTableIcon(AerialTrue).png S Kick SpecialsDirect.png
Final hit
0 0 3% 0 AngleIcon45.png 80 130 0 6.0 0 0.0 11.0 6.0 1.0x 1.0x 0% HitboxTableIcon(Clang).png HitboxTableIcon(Rebound).png Spin (type) Normal (effect) HitboxTableIcon(GroundedTrue).png HitboxTableIcon(AerialTrue).png L Kick SpecialsDirect.png
1 0 3% 0 AngleIcon45.png 80 130 0 6.0 0 0.0 3.0 2.0 1.0x 1.0x 0% HitboxTableIcon(Clang).png HitboxTableIcon(Rebound).png Spin (type) Normal (effect) HitboxTableIcon(GroundedTrue).png HitboxTableIcon(AerialTrue).png L Kick SpecialsDirect.png
The damage values are untouched before being affected by Dr. Mario's 1.12x damage multiplier.