Captain Falcon (SSB)/Back aerial: Difference between revisions
mNo edit summary |
SuperSqank (talk | contribs) No edit summary |
||
| Line 3: | Line 3: | ||
==Overview== | ==Overview== | ||
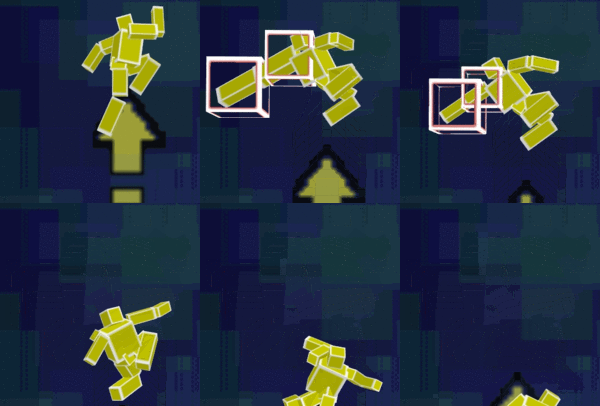
[[File:Captain Falcon Back Aerial Hitbox Smash 64.gif|thumb|Hitboxes of Captain Falcon's back aerial.]] | [[File:Captain Falcon Back Aerial Hitbox Smash 64.gif|thumb|Hitboxes of Captain Falcon's back aerial.]] | ||
Captain Falcon throws a backfist behind him, dealing 16% [[damage]] and reasonable [[knockback]]. | Captain Falcon throws a backfist behind him, dealing 16% [[damage]] and reasonable [[knockback]]. Unlike most other back aerials, it does not have a weaker late hit although its hitboxes do decrease in size after the move's first two active frames. A fairly safe move to use, considering its large [[disjoint]]. It is useful for [[edgeguarding]] and can [[space]] well. While it has somewhat high [[landing lag]] under normal circumstances, this issue can easily be avoided via [[Z-cancel]]ling. It is also very useful in [[combo]]s at low to moderate percentages, being able to lead into another back aerial (a [[wall of pain]] variation), a reverse back aerial, or a {{mvsub|Captain Falcon|SSB|down aerial}} (for a variation of the [[Ken Combo]]) at low to moderate percentages. A down aerial used on a grounded opponent can also combo into a back aerial at percentages around 140%, which is usually enough to KO. The move can also be used during [[soft platform]] landings and drops to mix up Falcon's aerial game on stages such as {{SSB|Dream Land}}. | ||
==Hitboxes== | |||
{{SSB64HitboxTableHeader}} | |||
{{HitboxTableTitle|Clean hit|42}} | |||
{{SSB64HitboxTableRow | |||
|id=0 | |||
|part=0 | |||
|damage=16% | |||
|angle=361 | |||
|bk=10 | |||
|ks=100 | |||
|fkv=0 | |||
|r=140 | |||
|bn=8 | |||
|xpos=180 | |||
|ypos=0 | |||
|zpos=0 | |||
|type=Hand | |||
|sdi=1.0 | |||
|trip=0 | |||
|sfx=Punch | |||
|slvl=L | |||
}} | |||
{{SSB64HitboxTableRow | |||
|id=1 | |||
|part=0 | |||
|damage=16% | |||
|angle=361 | |||
|bk=10 | |||
|ks=100 | |||
|fkv=0 | |||
|r=120 | |||
|bn=8 | |||
|xpos=0 | |||
|ypos=0 | |||
|zpos=0 | |||
|type=Hand | |||
|sdi=1.0 | |||
|trip=0 | |||
|sfx=Punch | |||
|slvl=L | |||
}} | |||
{{HitboxTableTitle|Late hit|42}} | |||
{{SSB64HitboxTableRow | |||
|id=0 | |||
|part=0 | |||
|damage=16% | |||
|angle=361 | |||
|bk=10 | |||
|ks=100 | |||
|fkv=0 | |||
|r=125 | |||
|bn=8 | |||
|xpos=150 | |||
|ypos=0 | |||
|zpos=0 | |||
|type=Hand | |||
|sdi=1.0 | |||
|trip=0 | |||
|sfx=Punch | |||
|slvl=L | |||
}} | |||
{{SSB64HitboxTableRow | |||
|id=1 | |||
|part=0 | |||
|damage=16% | |||
|angle=361 | |||
|bk=10 | |||
|ks=100 | |||
|fkv=0 | |||
|r=100 | |||
|bn=8 | |||
|xpos=0 | |||
|ypos=0 | |||
|zpos=0 | |||
|type=Hand | |||
|sdi=1.0 | |||
|trip=0 | |||
|sfx=Punch | |||
|slvl=L | |||
}} | |||
|} | |||
==Timing== | |||
===Attack=== | |||
{|class="wikitable" | |||
!Initial autocancel | |||
|1-6 | |||
|- | |||
!Clean hit | |||
|7-8 | |||
|- | |||
!Late hit | |||
|9-18 | |||
|- | |||
!Ending autocancel | |||
|28- | |||
|- | |||
!Animation length | |||
|34 | |||
|} | |||
{{FrameStripStart}} | |||
{{FrameStrip|t=Lag|c=6}}{{FrameStrip|t=Hitbox|c=2|e=HitboxChangeS}}{{FrameStrip|t=Hitbox|c=10|s=HitboxChangeE}}{{FrameStrip|t=Lag|c=16}} | |||
|- | |||
{{FrameStrip|t=Autocancel|c=6}}{{FrameStrip|t=Blank|c=21}}{{FrameStrip|t=Autocancel|c=7}} | |||
{{FrameStripEnd}} | |||
===[[Landing lag]]=== | |||
{{technical data}} | {{technical data}} | ||
{{FrameIconLegend|lag=y|hitbox=y|hitboxchange=y|autocancel=y}} | |||
{{MvSubNavCaptainFalcon|g=SSB}} | {{MvSubNavCaptainFalcon|g=SSB}} | ||
Revision as of 09:42, December 6, 2019
Overview
Captain Falcon throws a backfist behind him, dealing 16% damage and reasonable knockback. Unlike most other back aerials, it does not have a weaker late hit although its hitboxes do decrease in size after the move's first two active frames. A fairly safe move to use, considering its large disjoint. It is useful for edgeguarding and can space well. While it has somewhat high landing lag under normal circumstances, this issue can easily be avoided via Z-cancelling. It is also very useful in combos at low to moderate percentages, being able to lead into another back aerial (a wall of pain variation), a reverse back aerial, or a down aerial (for a variation of the Ken Combo) at low to moderate percentages. A down aerial used on a grounded opponent can also combo into a back aerial at percentages around 140%, which is usually enough to KO. The move can also be used during soft platform landings and drops to mix up Falcon's aerial game on stages such as Dream Land.
Hitboxes
Timing
Attack
| Initial autocancel | 1-6 |
|---|---|
| Clean hit | 7-8 |
| Late hit | 9-18 |
| Ending autocancel | 28- |
| Animation length | 34 |
Landing lag
Lag time |
Hitbox |
Hitbox change |
Autocancel |
|

