SSBM Icon.png

Luigi (SSBM)/Up special

From SmashWiki, the Super Smash Bros. wiki
Jump to navigationJump to search
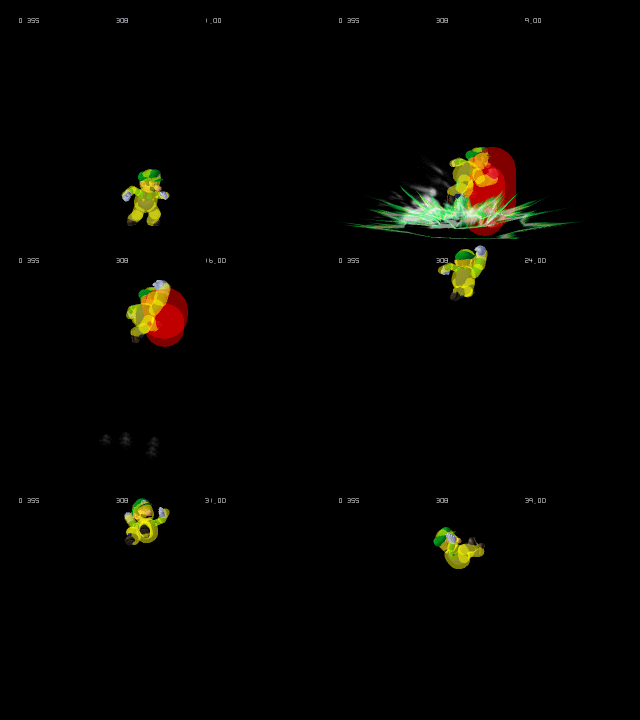
Hitbox visualization showing Luigi's Super Jump Punch.
Hitbox visualization showing the sweet spot.

Overview[edit]

Luigi jumps straight up vertically into the air. The move has a Sweet spot and Sour spot, depending upon whether it hits early or late. The sweet spot, located on Luigi's jaw, is very small and lasts for a single frame, before being followed up by the sour spot, which lasts 18 frames and deals essentially no hitstun. For the first four active frames, Luigi is completely intangible.

Like most characters' up special moves, it can be used to recover when knocked off-stage. However, this is usually seen as a last resort option rather than the recovery move one would actually want to use, for a multitude of a reasons. For one, the move has absolutely no horizontal distance, meaning Luigi must jump to the ledge and is unable to land on stage after performing this move; even then, it must be done directly beneath the ledge in order for Luigi to be close enough to grab it. Should Luigi manage to hit the opponent attempting to edgeguard him, it will almost always be with the sour spot, letting the opponent immediately become actionable and hit him with a counterattack. Even this is unlikely, since the move is extremely telegraphed, letting the opponent ledgehog right before Luigi would be able to grab it, making them take no damage and the Luigi player be KO'd. Even if the opponent is not ledgehogging, the move is easily gimped, especially by moves such as Marth's down tilt. All these factors, combined with Luigi's slow fall speed, make strategies such as double-jumping or air dodging to the ledge, or going for an edge cancelled Green Missile on a platform, much more appealing options.

Once on stage, the move is a completely different story. The strong hit, nicknamed the Shoryuken and known in-game as the Fire Jump Punch, is an extremely powerful KO move when grounded, getting a guaranteed kill when not staled on Fox on Dream Land at 92%, even with perfect Survival DI. Against Jigglypuff, it's possible to get kills at less than 40% on most stages, with the exception of Dream Land. Due to the tiny 1-frame hitbox, however, this is easier said than done. If the move misses, or the weak hit hits the opponent, it leaves Luigi open to a devastating punish, making it a high-risk, high-reward option, similar to Puff's Rest, although this risk can be lessened (but not totally eliminated) by performing the move underneath a platform, thereby landing on it and reducing the end lag.

Despite the aforementioned difficulties in landing the strong hit, there are ways to consistently set it up. Luigi can follow up a wavedash with it when tech-chasing or use it as a combo-finisher when juggling the opponent. It can also be performed immediately following a jab reset or shield break. Against Puff specifically, it can be used to punish a missed Rest or a Rest that kills Luigi off a side blast zone, since the Luigi will usually be able to respawn faster than Puff wakes up. Against Marth, Sheik, Falcon, and Ganon, a reliable setup is to knock them off-stage, force them to land on stage with their up-special by ledgehogging, then punishing their up-B's high landing lag with this move. Against opponents who are pressuring his shield, it also sees occasional use as an out of shield option, thanks to the move's fast start-up, making it Luigi's fastest OoS option in the game. This only works if the opponent is directly on top of Luigi's shield; otherwise, the opponent will be hit by the much larger sour spot.

Hitboxes[edit]

ID Part Damage SD Angle BK KS FKV Radius Bone Offset Clang Rebound Effect G A Sound
Grounded clean hit
0 0 25% 0 AngleIcon90.png 70 73 0 1.953 23 0.0 0.0 0.9765 HitboxTableIcon(Clang).png HitboxTableIcon(Rebound).png EffectIcon(Flame).png HitboxTableIcon(GroundedTrue).png HitboxTableIcon(AerialTrue).png L Bat
Aerial clean hit
0 0 20% 0 AngleIcon90.png 58 72 0 1.953 23 0.0 0.0 0.9765 HitboxTableIcon(Clang).png HitboxTableIcon(Rebound).png EffectIcon(Flame).png HitboxTableIcon(GroundedTrue).png HitboxTableIcon(AerialTrue).png L Burn
Late hit
0 0 1% 0 AngleIcon80.png 1 1 0 6.2496 23 0.0 0.0 3.1248 HitboxTableIcon(Clang).png HitboxTableIcon(Rebound).png EffectIcon(Coin).png HitboxTableIcon(GroundedTrue).png HitboxTableIcon(AerialTrue).png M Coin
1 0 1% 0 AngleIcon80.png 1 1 0 5.0778 4 0.0 0.0 4.6872 HitboxTableIcon(Clang).png HitboxTableIcon(Rebound).png EffectIcon(Coin).png HitboxTableIcon(GroundedTrue).png HitboxTableIcon(AerialTrue).png M Coin

Timing[edit]

Attack[edit]

Intangibility 5-8
Sweetspot 5
Sourspot 6-23
Animation length 39
FrameIcon(Lag).png FrameIcon(Lag).png FrameIcon(Lag).png FrameIcon(Lag).png FrameIcon(HitboxChangeS).png FrameIcon(HitboxChangeE).png FrameIcon(Hitbox).png FrameIcon(Hitbox).png FrameIcon(Hitbox).png FrameIcon(Hitbox).png FrameIcon(Hitbox).png FrameIcon(Hitbox).png FrameIcon(Hitbox).png FrameIcon(Hitbox).png FrameIcon(Hitbox).png FrameIcon(Hitbox).png FrameIcon(Hitbox).png FrameIcon(Hitbox).png FrameIcon(Hitbox).png FrameIcon(Hitbox).png FrameIcon(Hitbox).png FrameIcon(Hitbox).png FrameIcon(Hitbox).png FrameIcon(Lag).png FrameIcon(Lag).png FrameIcon(Lag).png FrameIcon(Lag).png FrameIcon(Lag).png FrameIcon(Lag).png FrameIcon(Lag).png FrameIcon(Lag).png FrameIcon(Lag).png FrameIcon(Lag).png FrameIcon(Lag).png FrameIcon(Lag).png FrameIcon(Lag).png FrameIcon(Lag).png FrameIcon(Lag).png FrameIcon(Lag).png
FrameIcon(Vulnerable).png FrameIcon(Vulnerable).png FrameIcon(Vulnerable).png FrameIcon(Vulnerable).png FrameIcon(Intangible).png FrameIcon(Intangible).png FrameIcon(Intangible).png FrameIcon(Intangible).png FrameIcon(Vulnerable).png FrameIcon(Vulnerable).png FrameIcon(Vulnerable).png FrameIcon(Vulnerable).png FrameIcon(Vulnerable).png FrameIcon(Vulnerable).png FrameIcon(Vulnerable).png FrameIcon(Vulnerable).png FrameIcon(Vulnerable).png FrameIcon(Vulnerable).png FrameIcon(Vulnerable).png FrameIcon(Vulnerable).png FrameIcon(Vulnerable).png FrameIcon(Vulnerable).png FrameIcon(Vulnerable).png FrameIcon(Vulnerable).png FrameIcon(Vulnerable).png FrameIcon(Vulnerable).png FrameIcon(Vulnerable).png FrameIcon(Vulnerable).png FrameIcon(Vulnerable).png FrameIcon(Vulnerable).png FrameIcon(Vulnerable).png FrameIcon(Vulnerable).png FrameIcon(Vulnerable).png FrameIcon(Vulnerable).png FrameIcon(Vulnerable).png FrameIcon(Vulnerable).png FrameIcon(Vulnerable).png FrameIcon(Vulnerable).png FrameIcon(Vulnerable).png

Landing lag[edit]

Animation length 40
FrameIcon(Lag).png FrameIcon(Lag).png FrameIcon(Lag).png FrameIcon(Lag).png FrameIcon(Lag).png FrameIcon(Lag).png FrameIcon(Lag).png FrameIcon(Lag).png FrameIcon(Lag).png FrameIcon(Lag).png FrameIcon(Lag).png FrameIcon(Lag).png FrameIcon(Lag).png FrameIcon(Lag).png FrameIcon(Lag).png FrameIcon(Lag).png FrameIcon(Lag).png FrameIcon(Lag).png FrameIcon(Lag).png FrameIcon(Lag).png FrameIcon(Lag).png FrameIcon(Lag).png FrameIcon(Lag).png FrameIcon(Lag).png FrameIcon(Lag).png FrameIcon(Lag).png FrameIcon(Lag).png FrameIcon(Lag).png FrameIcon(Lag).png FrameIcon(Lag).png FrameIcon(Lag).png FrameIcon(Lag).png FrameIcon(Lag).png FrameIcon(Lag).png FrameIcon(Lag).png FrameIcon(Lag).png FrameIcon(Lag).png FrameIcon(Lag).png FrameIcon(Lag).png FrameIcon(Lag).png
Legend (1 square = 1 frame)
FrameIcon(Lag).png
Lag time
FrameIcon(Hitbox).png
Hitbox
FrameIcon(HitboxChangeS).pngFrameIcon(HitboxChangeE).png
Hitbox change
FrameIcon(Vulnerable).png
Vulnerable
FrameIcon(Intangible).png
Intangible