Zero-to-death combo: Difference between revisions
Omega Tyrant (talk | contribs) m (→In Melee) |
m (→In SSB64) |
||
| Line 11: | Line 11: | ||
==Notable examples== | ==Notable examples== | ||
===In ''SSB64''=== | ===In ''SSB64''=== | ||
*{{SSB|Donkey Kong}}'s grab release chain with his [[forward throw]] (cargo hold) works on most of the cast up to the point where a simple back-throw will KO. | *{{SSB|Donkey Kong}}'s grab release chain with his [[forward throw]] (cargo hold) works on most of the cast up to the point where a simple back-throw will KO. A video demonstrating this with Kirby can be viewed [http://www.youtube.com/watch?v=MgPDFsiQODM here]. | ||
===In ''Melee''=== | ===In ''Melee''=== | ||
Revision as of 19:57, September 15, 2012
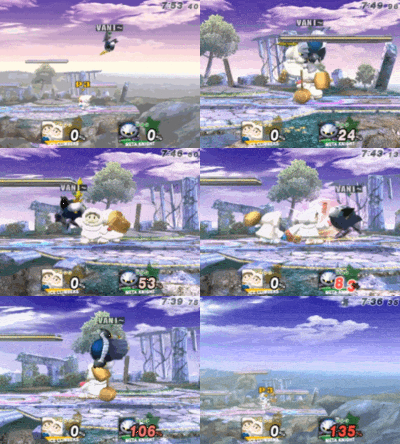
A Zero-to-death combo, commonly referred to as a zero-death for short, is a particularly long and intricate combo that starts on an opponent at 0% damage, and ends with the eventual KO of the character being comboed. Zero-deaths are related to infinites, but are not the same. While an infinite can continue forever regardless of damage percent, a zero-death must come to an end as eventually the opponent will be knocked too far away to continue comboing if they are not finished before then.
While combos of some sort are relatively common in the three games, zero-to-death combos require almost perfect timing and placement in order to properly work, and even a single missed hitbox can ruin a combo; owing to the particularly high hitstun of Super Smash Bros. in comparison with Super Smash Bros. Melee and Super Smash Bros. Brawl, zero-to-death combos are most frequently seen in the first game, though their high need for technical skill makes them rare sights at tournaments and are more often seen in demonstrations or friendlies. Zero-to-death combos also vary in characteristics in the games; whereas the original game focuses on continued aerial combat, particularly with drills and similar attacks, Melee and Brawl rely on continued chain throws and jab locks.
In all three games, zero-to-death combos are a common subject of TAS speedruns; extensions of the zero-to-death combo also exist in these runs, such as having multiple characters perform the combo on one character, or making the combo have a particularly high number of glancing blows.
A rather easy to perform zero-to-death combo in a specific matchup is often responsible for creating hard counters. In Brawl for example, Pikachu hard counters all the space animals, as he possesses a simple chain throw (with his down throw) that can bring each of them from 0% to over 100%, and end with an unavoidable up smash, that if doesn't KO, can then be followed up by a Thunder that will finish them off.
Notable examples
In SSB64
- Donkey Kong's grab release chain with his forward throw (cargo hold) works on most of the cast up to the point where a simple back-throw will KO. A video demonstrating this with Kirby can be viewed here.
In Melee
- In NTSC regions, Sheik's down throw can combo into itself and then flow into her sweetspotted up smash, which is one of the strongest in the game; this combo was notable for being one of the reasons why Sheik was considered the best character in the first five years of Melee's metagame.
In Brawl
- Wario's down throw chain throw on Bowser, where Wario can bring Bowser to KO percent and then follow up with an unavoidable forward smash.
- Meta Knight's down tilt lock on a knocked down opponent, where his down tilt causes a knocked down opponent to flop helplessly a small distance forward. Meta Knight can repeatedly use down tilt in such a situation to keep the opponent down, and when he reaches the end of the stage, he can buffer a forward roll to get behind the opponent and a subsequent d-tilt to continue to lock to the other side of the stage. Meta Knight's d-tilt is weak enough to bring the opponent to KO percent without knocking them up, where Meta Knight can then finish the opponent with an unavoidable forward or down smash.
- The aforementioned Pikachu down throw chain throw and up smash to Thunder followup on the space animals and Captain Falcon.
- Marth's grab release chain grab on Ness and Lucas. While an infinite when done against a wall, Marth must move forward a little distance to continue the chain grab. However, it's possible for him to bring Ness and Lucas to a high enough percentage for his forward and down smash to KO (which are guaranteed follow ups on the grab release) before reaching the end of the stage.
