Peach (SSB4)/Neutral attack/Hit 1: Difference between revisions
From SmashWiki, the Super Smash Bros. wiki
Jump to navigationJump to search
mNo edit summary |
SuperSqank (talk | contribs) No edit summary |
||
| (8 intermediate revisions by 7 users not shown) | |||
| Line 1: | Line 1: | ||
{{ArticleIcons|ssb4=y}} | |||
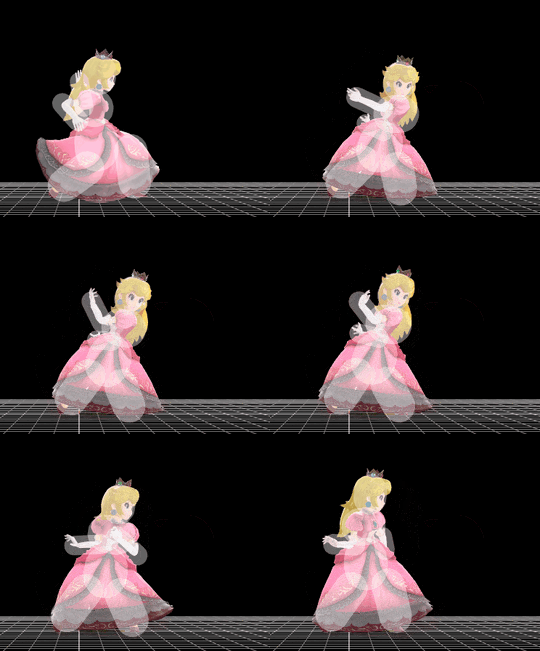
[[File:PeachJab1.gif|thumb|270px|Hitbox visualization showing Peach's first jab.]] | |||
{{competitive expertise}} | {{competitive expertise}} | ||
==Overview== | |||
The first hit of {{SSB4|Peach}}'s [[neutral attack]] is a inward hand slap further from the camera and deals 2% damage. The move comes out very quickly on frame 2, making it a very good move to use in pressure situations. It can act as a setup for the [[down tilt]], [[neutral aerial|neutral air]], [[back aerial|back air]], or a [[grab]] however, the move is very unsafe on hit if Peach does not perform the second neutral attack, so these setups are not guaranteed at all, and Peach can even be punished on hit before being able to attempt them. | |||
==Hitboxes== | ==Hitboxes== | ||
{{SSB4HitboxTableHeader}} | {{SSB4HitboxTableHeader}} | ||
{{SSB4HitboxTableRow | {{SSB4HitboxTableRow | ||
|id=0 | |id=0 | ||
|damage=2% | |damage=2% | ||
|angle=74 | |angle=74 | ||
| Line 14: | Line 16: | ||
|bn=16 | |bn=16 | ||
|xpos=2.5 | |xpos=2.5 | ||
|type=Hand | |type=Hand | ||
|sfx=Slap | |sfx=Slap | ||
|slvl=S | |slvl=S | ||
| Line 24: | Line 22: | ||
{{SSB4HitboxTableRow | {{SSB4HitboxTableRow | ||
|id=1 | |id=1 | ||
|damage=2% | |damage=2% | ||
|angle=78 | |angle=78 | ||
| Line 32: | Line 29: | ||
|r=2.4 | |r=2.4 | ||
|bn=16 | |bn=16 | ||
|type=Hand | |type=Hand | ||
|sfx=Slap | |sfx=Slap | ||
|slvl=S | |slvl=S | ||
| Line 43: | Line 35: | ||
{{SSB4HitboxTableRow | {{SSB4HitboxTableRow | ||
|id=2 | |id=2 | ||
|damage=2% | |damage=2% | ||
|angle=78 | |angle=78 | ||
| Line 51: | Line 42: | ||
|r=2.4 | |r=2.4 | ||
|bn=15 | |bn=15 | ||
|type=Hand | |type=Hand | ||
|sfx=Slap | |sfx=Slap | ||
|slvl=S | |slvl=S | ||
| Line 62: | Line 48: | ||
|} | |} | ||
==Timing== | |||
{|class="wikitable" | |||
!Hitboxes | |||
|2-3 | |||
|- | |||
!Earliest continuable frame | |||
|7 | |||
|- | |||
!Interruptible | |||
|28 | |||
|- | |||
!Animation length | |||
|37 | |||
|} | |||
{{FrameStripStart}} | |||
{{FrameStrip|t=Lag|c=1}}{{FrameStrip|t=Hitbox|c=2}}{{FrameStrip|t=Lag|c=4|e=LagContinuableS}}{{FrameStrip|t=Lag|c=1|s=LagContinuableE}}{{FrameStrip|t=Lag|c=19}}{{FrameStrip|t=Interruptible|c=10}} | |||
{{FrameStripEnd}} | |||
{{FrameIconLegend|lag=y|hitbox=y|earliestcontinuable=y|interruptible=y}} | |||
{{MvSubNavPeach|g=SSB4}} | {{MvSubNavPeach|g=SSB4}} | ||
[[Category:Peach (SSB4)]] | |||
[[Category:Neutral attacks (SSB4)]] | |||
Latest revision as of 16:16, December 9, 2020
Overview[edit]
The first hit of Peach's neutral attack is a inward hand slap further from the camera and deals 2% damage. The move comes out very quickly on frame 2, making it a very good move to use in pressure situations. It can act as a setup for the down tilt, neutral air, back air, or a grab however, the move is very unsafe on hit if Peach does not perform the second neutral attack, so these setups are not guaranteed at all, and Peach can even be punished on hit before being able to attempt them.
Hitboxes[edit]
Timing[edit]
| Hitboxes | 2-3 |
|---|---|
| Earliest continuable frame | 7 |
| Interruptible | 28 |
| Animation length | 37 |
Lag time |
Hitbox |
Earliest continuable point |
Interruptible |
|

