SSBU Icon.png

Luigi (SSBU)/Up tilt: Difference between revisions

From SmashWiki, the Super Smash Bros. wiki
Jump to navigationJump to search
Tag: Mobile edit
m (Text replacement - "{{[Cc]lear}}" to "{{clr}}")
 
(9 intermediate revisions by 7 users not shown)
Line 1: Line 1:
{{ArticleIcons|ssbu=y}}
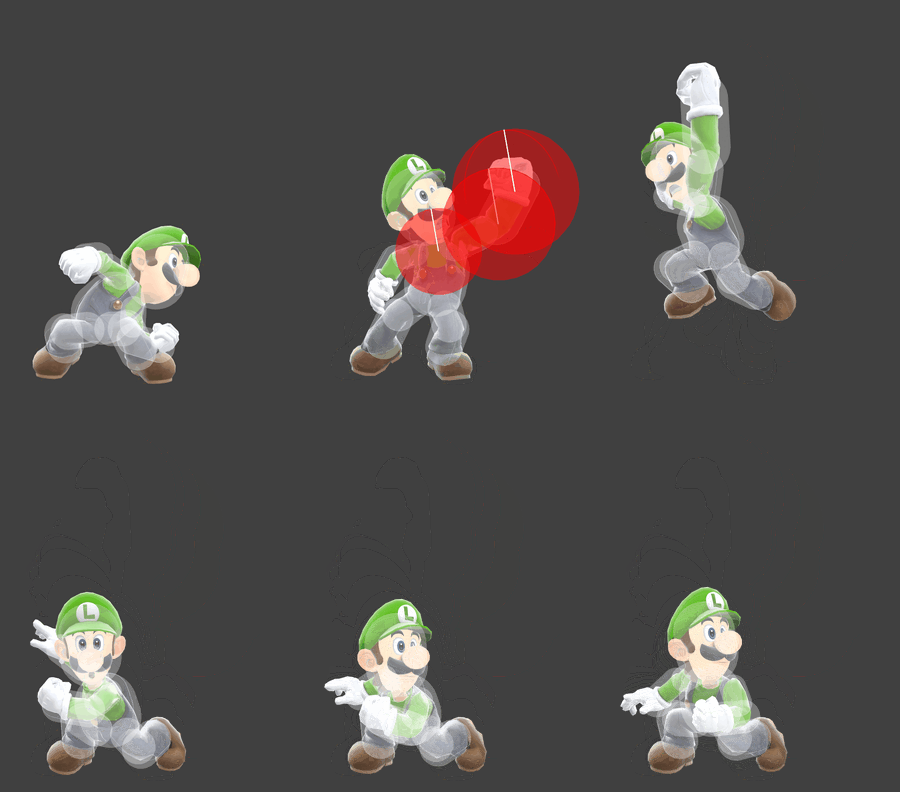
[[File:LuigiUTiltUltimate.gif|thumb|270px|Hitbox visualization showing Luigi's up tilt.]]
[[File:LuigiUTiltSSBU.gif|thumb|300px|Hitbox visualization showing Luigi's up tilt.]]
{{competitive expertise}}
==Overview==
==Overview==
Luigi performs an uppercut while jumping. Compared to his old up tilt, it can't hit behind him, but has more range in front of him and above him, so it's a good anti-air tool, and it has less ending lag too, making it better for combos compared to the previous one. Very similar to Mario's up tilt, but Luigi's version deal slightly more damage, has more range in front of him and less ending lag, but it has less base knockback and more knockback growth, thus making less safe on hit at very low percents. A reliable combo starter that sends the opponents vertically and slightly behind Luigi, and can combo into itself or his aerials even at high percents.
Luigi performs an uppercut while jumping. It is a useful combo starter, however at very early percents, it is unsafe on hit, so its combo potential comes moreso from mid percents. Up tilt can notably lead into most of his aerials, itself (although not reliably), and even Super Jump Punch for a strong KO, or up aerial to back aerial for high damage and a potential kill at ledge. The higher speed of up tilt and being harder to DI can make it a more useful combo tool over down throw in situations where grabs are too slow or when it is possible to DI out of a Super Jump Punch KO. While it can work as an anti-air on shorter ranged landing options, the head intangibility and extra area coverage of up smash is better suited to this over up tilt.


Up tilt is also useful as a way to shark platforms, being safer but less rewarding over up smash. It also hits quite low for an up tilt, allowing it to hit ledgehangs and even two-frame certain characters, allowing for slightly extended combos due to hitting opponents from a lower point. Aside from its confirms into Super Jump Punch, up tilt itself cannot kill well at realistic percents, although can kill earlier than up throw. It also cannot hit behind Luigi very well, if at all.
{{clr}}
==Hitboxes==
==Hitboxes==
{{UltimateHitboxTableHeader}}

Latest revision as of 14:24, September 16, 2022

Hitbox visualization showing Luigi's up tilt.

Overview[edit]

Luigi performs an uppercut while jumping. It is a useful combo starter, however at very early percents, it is unsafe on hit, so its combo potential comes moreso from mid percents. Up tilt can notably lead into most of his aerials, itself (although not reliably), and even Super Jump Punch for a strong KO, or up aerial to back aerial for high damage and a potential kill at ledge. The higher speed of up tilt and being harder to DI can make it a more useful combo tool over down throw in situations where grabs are too slow or when it is possible to DI out of a Super Jump Punch KO. While it can work as an anti-air on shorter ranged landing options, the head intangibility and extra area coverage of up smash is better suited to this over up tilt.

Up tilt is also useful as a way to shark platforms, being safer but less rewarding over up smash. It also hits quite low for an up tilt, allowing it to hit ledgehangs and even two-frame certain characters, allowing for slightly extended combos due to hitting opponents from a lower point. Aside from its confirms into Super Jump Punch, up tilt itself cannot kill well at realistic percents, although can kill earlier than up throw. It also cannot hit behind Luigi very well, if at all.

Hitboxes[edit]

ID Part Rehit rate Damage SD Angle Angle type BK KS FKV Set weight Radius Bone Offset SDI× T% Clang Rebound Effect Type G A Sound Direct Hit bits Hit part Blockable Reflectable Absorbable Flinchless No GFX Heedless
0 0 0 6.0% 0 AngleIcon100.png Standard 8 150 0 HitboxTableIcon(False).png 3.3 neck 0.0 0.0 0.0 1.0× 1.0× 0% HitboxTableIcon(Clang).png HitboxTableIcon(Rebound).png EffectIcon(Normal).png TypeIcon(Hand).png HitboxTableIcon(GroundedTrue).png HitboxTableIcon(AerialTrue).png M Kick SpecialsDirect.png All All HitboxTableIcon(Blockable).png HitboxTableIcon(Unreflectable).png HitboxTableIcon(Unabsorbable).png HitboxTableIcon(False).png HitboxTableIcon(False).png HitboxTableIcon(False).png
1 0 0 6.0% 0 AngleIcon100.png Standard 8 150 0 HitboxTableIcon(False).png 4.3 arml 0.0 0.0 0.0 1.0× 1.0× 0% HitboxTableIcon(Clang).png HitboxTableIcon(Rebound).png EffectIcon(Normal).png TypeIcon(Hand).png HitboxTableIcon(GroundedTrue).png HitboxTableIcon(AerialTrue).png M Kick SpecialsDirect.png All All HitboxTableIcon(Blockable).png HitboxTableIcon(Unreflectable).png HitboxTableIcon(Unabsorbable).png HitboxTableIcon(False).png HitboxTableIcon(False).png HitboxTableIcon(False).png
2 0 0 6.0% 0 AngleIcon100.png Standard 8 150 0 HitboxTableIcon(False).png 4.8 handl 0.0 0.0 0.0 1.0× 1.0× 0% HitboxTableIcon(Clang).png HitboxTableIcon(Rebound).png EffectIcon(Normal).png TypeIcon(Hand).png HitboxTableIcon(GroundedTrue).png HitboxTableIcon(AerialTrue).png M Kick SpecialsDirect.png All All HitboxTableIcon(Blockable).png HitboxTableIcon(Unreflectable).png HitboxTableIcon(Unabsorbable).png HitboxTableIcon(False).png HitboxTableIcon(False).png HitboxTableIcon(False).png

Timing[edit]

Hitboxes 5-10
Interruptible 28
Animation length 39
FrameIcon(Lag).png FrameIcon(Lag).png FrameIcon(Lag).png FrameIcon(Lag).png FrameIcon(Hitbox).png FrameIcon(Hitbox).png FrameIcon(Hitbox).png FrameIcon(Hitbox).png FrameIcon(Hitbox).png FrameIcon(Hitbox).png FrameIcon(Lag).png FrameIcon(Lag).png FrameIcon(Lag).png FrameIcon(Lag).png FrameIcon(Lag).png FrameIcon(Lag).png FrameIcon(Lag).png FrameIcon(Lag).png FrameIcon(Lag).png FrameIcon(Lag).png FrameIcon(Lag).png FrameIcon(Lag).png FrameIcon(Lag).png FrameIcon(Lag).png FrameIcon(Lag).png FrameIcon(Lag).png FrameIcon(Lag).png FrameIcon(Interruptible).png FrameIcon(Interruptible).png FrameIcon(Interruptible).png FrameIcon(Interruptible).png FrameIcon(Interruptible).png FrameIcon(Interruptible).png FrameIcon(Interruptible).png FrameIcon(Interruptible).png FrameIcon(Interruptible).png FrameIcon(Interruptible).png FrameIcon(Interruptible).png FrameIcon(Interruptible).png
Legend (1 square = 1 frame)
FrameIcon(Lag).png
Lag time
FrameIcon(Hitbox).png
Hitbox
FrameIcon(Interruptible).png
Interruptible