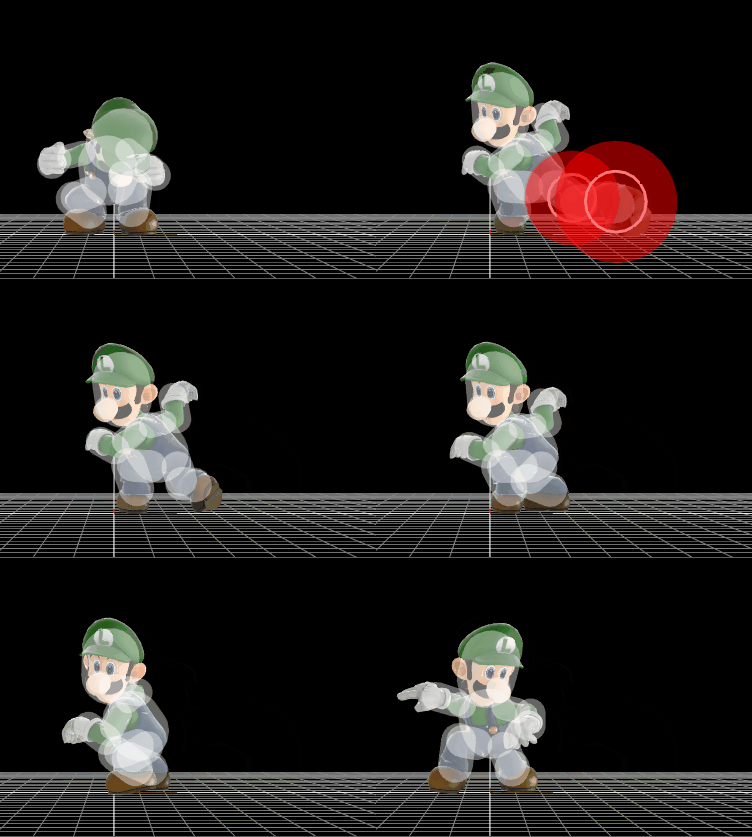
Luigi (SSB4)/Down tilt: Difference between revisions
From SmashWiki, the Super Smash Bros. wiki
Jump to navigationJump to search
BrawlMatt202 (talk | contribs) No edit summary |
SuperSqank (talk | contribs) |
||
| (11 intermediate revisions by 5 users not shown) | |||
| Line 1: | Line 1: | ||
{{ | {{ArticleIcons|ssb4=y}} | ||
[[File:LuigiDTilt.gif|thumb|270px|Hitbox visualization showing Luigi's down tilt.]] | |||
==Overview== | |||
A back shin kick. It can potentially [[trip]] opponents at low percentages, and is able to hit opponents that are trying to grab the edge. | |||
In 1.1.0, it was adjusted substantially. The change to the [[Sakurai angle]] made it much less reliable as a combo starter. At the same time, it became more efficient as way to [[edgeguard]], although only slightly. Sooner interruptibility was a direct buff, while a lowered tripping chance was a nerf. | |||
Its new [[knockback]] angle removed any combo potential aside from [[grab]] if it trips at low [[percent]]. It's new edgeguarding abilities are also overshadowed by Luigi's aerials and [[Luigi Cyclone]]. | |||
Due to this, down tilt is considered Luigi's worst move because everything it does can be done better by another move. | |||
==Update history== | ==Update history== | ||
'''{{GameIcon|ssb4}} [[1.1.0]]''' | '''{{GameIcon|ssb4}} [[1.1.0]]''' | ||
*{{buff| | *{{buff|Ending lag (FAF 30 → 27).}} | ||
*{{change|Angle | *{{change|Angle (74° → 361°).}} | ||
*{{ | **{{nerf|This hinders its combo potential.}} | ||
*{{ | **{{buff|However, this also grants it edgeguarding potential, as well as allowing it trip at lower percents despite its lower trip chance (35% → 25%).}} | ||
*{{change|Knockback (38 (base)/54 (scaling) → 20/65).}} | |||
==Hitboxes== | ==Hitboxes== | ||
| Line 49: | Line 60: | ||
!Interruptible | !Interruptible | ||
|27 | |27 | ||
|- | |||
!Animation length | |||
|39 | |||
|} | |} | ||
{{FrameStripStart}} | {{FrameStripStart}} | ||
{{FrameStrip|t=Lag|c=4}}{{FrameStrip|t=Hitbox|c=4}}{{FrameStrip|t=Lag|c=18}}{{FrameStrip|t=Interruptible|c= | {{FrameStrip|t=Lag|c=4}}{{FrameStrip|t=Hitbox|c=4}}{{FrameStrip|t=Lag|c=18}}{{FrameStrip|t=Interruptible|c=13}} | ||
{{FrameStripEnd}} | {{FrameStripEnd}} | ||
Latest revision as of 11:52, May 1, 2021
Overview[edit]
A back shin kick. It can potentially trip opponents at low percentages, and is able to hit opponents that are trying to grab the edge.
In 1.1.0, it was adjusted substantially. The change to the Sakurai angle made it much less reliable as a combo starter. At the same time, it became more efficient as way to edgeguard, although only slightly. Sooner interruptibility was a direct buff, while a lowered tripping chance was a nerf.
Its new knockback angle removed any combo potential aside from grab if it trips at low percent. It's new edgeguarding abilities are also overshadowed by Luigi's aerials and Luigi Cyclone.
Due to this, down tilt is considered Luigi's worst move because everything it does can be done better by another move.
Update history[edit]
 Ending lag (FAF 30 → 27).
 Angle (74° → 361°).
 This hinders its combo potential.
 However, this also grants it edgeguarding potential, as well as allowing it trip at lower percents despite its lower trip chance (35% → 25%).
 Knockback (38 (base)/54 (scaling) → 20/65).
Hitboxes[edit]
Timing[edit]
| Hitboxes | 5-8 |
|---|---|
| Interruptible | 27 |
| Animation length | 39 |
Lag time |
Hitbox |
Interruptible |
|
