SSBM Icon.png

Ganondorf (SSBM)/Up aerial: Difference between revisions

From SmashWiki, the Super Smash Bros. wiki
Jump to navigationJump to search
Line 3: Line 3:
==Overview==
==Overview==
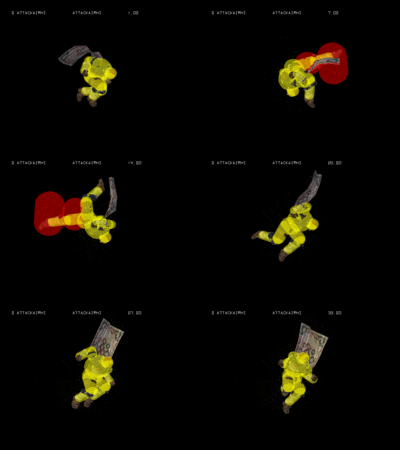
[[File:Ganondorf Up Aerial Hitbox Melee.gif|thumb|The hitbox of Ganondorf's up aerial.]]
[[File:Ganondorf Up Aerial Hitbox Melee.gif|thumb|The hitbox of Ganondorf's up aerial.]]
Ganondorf does a flip kick in the air, where it's knockback is stronger than {{SSBM|Captain Falcon}}'s up aerial. The move is a major part of Ganondorf's deadly [[edgeguarding]] game, with the mid and late hits being low-damage [[semi-spike]]s where he can use to gimp characters with poor recoveries. The move can also be used for [[juggling]] although it won't be too effective. The up aerial can also be used as a [[SHFFL]].
Ganondorf does a flip kick in the air, where it's knockback is stronger than {{SSBM|Captain Falcon}}'s up aerial. The move is a major part of Ganondorf's deadly [[edgeguarding]] game, with the mid and late hits being low-damage [[semi-spike]]s which can be used to [[gimp]] characters with poor [[recover]]ies. The main part of the move at the front is also a decent horizontal edgeguarder due to its power, though usually inferior to {{mvsub|Ganondorf|SSBM|forward aerial}}.


{{competitive expertise}}

Revision as of 12:39, December 19, 2013

Overview

The hitbox of Ganondorf's uair in Melee.
The hitbox of Ganondorf's up aerial.

Ganondorf does a flip kick in the air, where it's knockback is stronger than Captain Falcon's up aerial. The move is a major part of Ganondorf's deadly edgeguarding game, with the mid and late hits being low-damage semi-spikes which can be used to gimp characters with poor recoveries. The main part of the move at the front is also a decent horizontal edgeguarder due to its power, though usually inferior to forward aerial.


Competitive.png This article or section may require competitive expertise.
You can discuss this issue on the talk page or edit this page to improve it.

Hitboxes

ID Part Damage SD Angle BK KS FKV Radius Bone Offset Clang Rebound Effect G A Sound
Clean
0 0 13% 0 Sakurai angle 35 100 0 0.015624 6 0.0124992 0.0 0.0 HitboxTableIcon(Clang).png HitboxTableIcon(Rebound).png EffectIcon(Normal).png HitboxTableIcon(GroundedTrue).png HitboxTableIcon(AerialTrue).png L Kick
1 0 12% 0 Sakurai angle 35 100 0 0.0187488 7 0.023436 0.0 0.0 HitboxTableIcon(Clang).png HitboxTableIcon(Rebound).png EffectIcon(Normal).png HitboxTableIcon(GroundedTrue).png HitboxTableIcon(AerialTrue).png L Kick
Mid
0 0 12% 0 AngleIcon30.png 30 80 0 0.015624 6 0.0124992 0.0 0.0 HitboxTableIcon(Clang).png HitboxTableIcon(Rebound).png EffectIcon(Normal).png HitboxTableIcon(GroundedTrue).png HitboxTableIcon(AerialTrue).png M Kick
1 0 10% 0 AngleIcon30.png 30 80 0 0.0187488 7 0.023436 0.0 0.0 HitboxTableIcon(Clang).png HitboxTableIcon(Rebound).png EffectIcon(Normal).png HitboxTableIcon(GroundedTrue).png HitboxTableIcon(AerialTrue).png M Kick
Late
0 0 8% 0 AngleIcon0.png 20 70 0 0.015624 6 0.0124992 0.0 0.0 HitboxTableIcon(Clang).png HitboxTableIcon(Rebound).png EffectIcon(Normal).png HitboxTableIcon(GroundedTrue).png HitboxTableIcon(AerialTrue).png M Kick
1 0 6% 0 AngleIcon0.png 20 70 0 0.0187488 7 0.023436 0.0 0.0 HitboxTableIcon(Clang).png HitboxTableIcon(Rebound).png EffectIcon(Normal).png HitboxTableIcon(GroundedTrue).png HitboxTableIcon(AerialTrue).png M Kick

Timing

Attack

Clean hit 6-10
Mid hit 11-13
Late hit 14-16
Ending autocancel 22-
Interruptible 30
Animation length 33
FrameIcon(Lag).png FrameIcon(Lag).png FrameIcon(Lag).png FrameIcon(Lag).png FrameIcon(Lag).png FrameIcon(Hitbox).png FrameIcon(Hitbox).png FrameIcon(Hitbox).png FrameIcon(Hitbox).png FrameIcon(HitboxChangeS).png FrameIcon(HitboxChangeE).png FrameIcon(Hitbox).png FrameIcon(HitboxChangeS).png FrameIcon(HitboxChangeE).png FrameIcon(Hitbox).png FrameIcon(Hitbox).png FrameIcon(Lag).png FrameIcon(Lag).png FrameIcon(Lag).png FrameIcon(Lag).png FrameIcon(Lag).png FrameIcon(Lag).png FrameIcon(Lag).png FrameIcon(Lag).png FrameIcon(Lag).png FrameIcon(Lag).png FrameIcon(Lag).png FrameIcon(Lag).png FrameIcon(Lag).png FrameIcon(Interruptible).png FrameIcon(Interruptible).png FrameIcon(Interruptible).png FrameIcon(Interruptible).png
FrameIcon(Blank).png FrameIcon(Blank).png FrameIcon(Blank).png FrameIcon(Blank).png FrameIcon(Blank).png FrameIcon(Blank).png FrameIcon(Blank).png FrameIcon(Blank).png FrameIcon(Blank).png FrameIcon(Blank).png FrameIcon(Blank).png FrameIcon(Blank).png FrameIcon(Blank).png FrameIcon(Blank).png FrameIcon(Blank).png FrameIcon(Blank).png FrameIcon(Blank).png FrameIcon(Blank).png FrameIcon(Blank).png FrameIcon(Blank).png FrameIcon(Blank).png FrameIcon(Autocancel).png FrameIcon(Autocancel).png FrameIcon(Autocancel).png FrameIcon(Autocancel).png FrameIcon(Autocancel).png FrameIcon(Autocancel).png FrameIcon(Autocancel).png FrameIcon(Autocancel).png FrameIcon(Autocancel).png FrameIcon(Autocancel).png FrameIcon(Autocancel).png FrameIcon(Autocancel).png

Landing lag

Animation length 25
L-cancelled animation length 12.5