Dr. Mario (SSB4)/Forward tilt: Difference between revisions
From SmashWiki, the Super Smash Bros. wiki
Jump to navigationJump to search
(New Page: {{ArticleIcons|ssb4=y}} {{competitive expertise}} {{technical data}} ==Hitboxes== This attack can be angled, but all three angles have the same properties. {{SSB4HitboxTableHeader}}...) |
m (Text replacement - "== ([^=])" to "== $1") |
||
| (3 intermediate revisions by 3 users not shown) | |||
| Line 1: | Line 1: | ||
{{ArticleIcons|ssb4=y}} | {{ArticleIcons|ssb4=y}} | ||
{ | {|class="wikitable" style="float:right; margin:4pt;" | ||
{{ | !colspan=2|Dr. Mario forward tilt hitbox visualization | ||
|- | |||
!↗ | |||
|[[File:Dr.MarioFTiltUp.gif|270px]] | |||
|- | |||
!→ | |||
|[[File:Dr.MarioFTilt.gif|270px]] | |||
|- | |||
!↘ | |||
|[[File:Dr.MarioFTiltDown.gif|270px]] | |||
|} | |||
==Overview== | |||
Dr. Mario performs a reverse roundhouse kick from his outside leg, which can be angled, allowing it to have 2-frame potential with the downwards angle, and slight anti-airing potential with the upwards angle. Comparatively, it is almost the exact the same as {{SSB4|Mario}}'s forward tilt, but deals 0.84% more damage. Otherwise, it has similar use, being able to be used in locks due to the [[Sakurai angle]], as an out of shield option, while also staying a punishable move with low kill power. The slight damage increase allows the move to knock away opponents slightly farther, while also having slightly less locking potential. | |||
==Hitboxes== | ==Hitboxes== | ||
{{SSB4HitboxTableHeader}} | {{SSB4HitboxTableHeader}} | ||
{{SSB4HitboxTableRow | {{SSB4HitboxTableRow | ||
|id=0 | |id=0 | ||
|part=0 | |part=0 | ||
|damage=7 | |damage=7% | ||
|angle=361 | |angle=361 | ||
|bk=8 | |bk=8 | ||
| Line 30: | Line 40: | ||
|id=1 | |id=1 | ||
|part=0 | |part=0 | ||
|damage=7 | |damage=7% | ||
|angle=361 | |angle=361 | ||
|bk=8 | |bk=8 | ||
| Line 49: | Line 59: | ||
|id=2 | |id=2 | ||
|part=0 | |part=0 | ||
|damage=7 | |damage=7% | ||
|angle=361 | |angle=361 | ||
|bk=8 | |bk=8 | ||
| Line 65: | Line 75: | ||
|slvl=M | |slvl=M | ||
}} | }} | ||
{{HitboxTableRowNote|The damage values are untouched before being affected by Dr. Mario's 1.12x damage multiplier.|24}} | |||
|} | |} | ||
==Timing== | |||
{|class="wikitable" | |||
|- | |||
!Hitbox | |||
|5-7 | |||
|- | |||
!Interruptible | |||
|31 | |||
|- | |||
!Animation length | |||
|40 | |||
|} | |||
{{FrameStripStart}} | |||
{{FrameStrip|t=Lag|c=4}}{{FrameStrip|t=Hitbox|c=3}}{{FrameStrip|t=Lag|c=23}}{{FrameStrip|t=Interruptible|c=10}} | |||
{{FrameStripEnd}} | |||
{{FrameIconLegend|lag=y|hitbox=y|interruptible=y}} | |||
{{MvSubNavDrMario|g=SSB4}} | {{MvSubNavDrMario|g=SSB4}} | ||
[[Category:Dr. Mario (SSB4)]] | [[Category:Dr. Mario (SSB4)]] | ||
[[Category:Forward tilts (SSB4)]] | [[Category:Forward tilts (SSB4)]] | ||
Latest revision as of 00:04, April 13, 2022
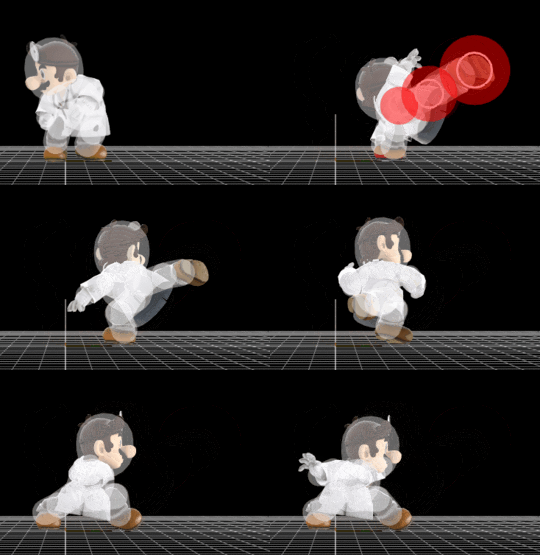
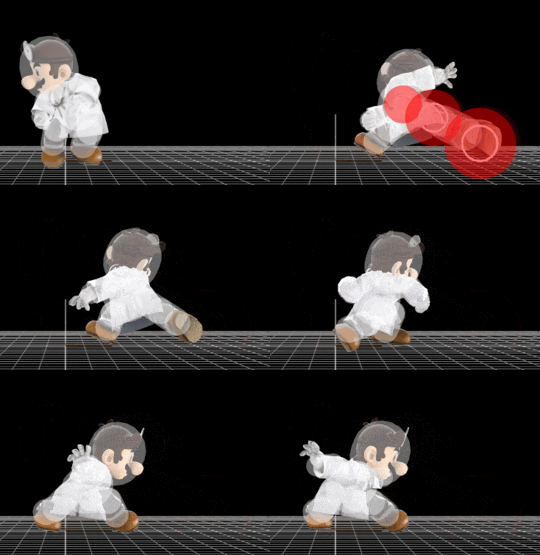
| Dr. Mario forward tilt hitbox visualization | |
|---|---|
| ↗ | 
|
| → | 
|
| ↘ | 
|
Overview[edit]
Dr. Mario performs a reverse roundhouse kick from his outside leg, which can be angled, allowing it to have 2-frame potential with the downwards angle, and slight anti-airing potential with the upwards angle. Comparatively, it is almost the exact the same as Mario's forward tilt, but deals 0.84% more damage. Otherwise, it has similar use, being able to be used in locks due to the Sakurai angle, as an out of shield option, while also staying a punishable move with low kill power. The slight damage increase allows the move to knock away opponents slightly farther, while also having slightly less locking potential.
Hitboxes[edit]
Timing[edit]
| Hitbox | 5-7 |
|---|---|
| Interruptible | 31 |
| Animation length | 40 |
Lag time |
Hitbox |
Interruptible |
|