SSB4 Icon.png

Bowser Jr. (SSB4)/Up special/Default: Difference between revisions

From SmashWiki, the Super Smash Bros. wiki
Jump to navigationJump to search
No edit summary
mNo edit summary
Line 1: Line 1:
{{ArticleIcons|ssb4=y}}
{{disambig2|the hitbox visualization in ''[[Super Smash Bros. 4]]''|the move itself|Abandon Ship!}}
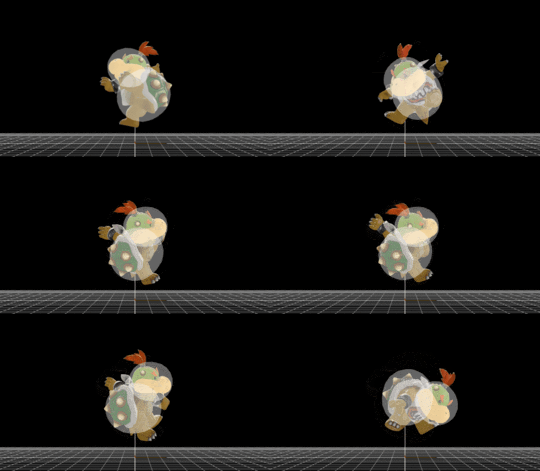
[[File:BowserJrAbandonShip!.gif|thumb|270px|Hitbox visualization showing Bowser Jr.'s Abandon Ship!'s hammer attack.]]
[[File:BowserJrAbandonShip!.gif|thumb|270px|Hitbox visualization showing Bowser Jr.'s Abandon Ship!'s hammer attack.]]
{{competitive expertise}}
Line 140: Line 141:
{{MvSubNavBowserJr|g=SSB4}}
[[Category:Bowser Jr. (SSB4)]]
[[Category:Bowser Jr. (SSB4)]]
[[Category:Special attacks (SSB4)]]
[[Category:Special moves (SSB4)]]
[[Category:Up special moves (SSB4)]]
[[Category:Up special moves (SSB4)]]

Revision as of 16:58, May 17, 2020

This article is about the hitbox visualization in Super Smash Bros. 4. For the move itself, see Abandon Ship!.
Hitbox visualization showing Bowser Jr.'s Abandon Ship!'s hammer attack.
Competitive.png This article or section may require competitive expertise.
You can discuss this issue on the talk page or edit this page to improve it.
Data.png This article or section may require additional technical data.
You can discuss this issue on the talk page or edit this page to improve it.

Hitboxes

ID Part Damage SD Angle BK KS FKV Radius Bone Offset SDIx T% Clang Rebound Type Effect G A Sound Direct
Clown car hit
0 0 5% 0 AngleIcon80.png 50 25 0 6.0 0 0.0 6.0 0.0 1.0x 1.0x 0% HitboxTableIcon(NoClang).png HitboxTableIcon(NoRebound).png TypeIcon(Weapon).png EffectIcon(Normal).png HitboxTableIcon(GroundedTrue).png HitboxTableIcon(AerialTrue).png L Kick SpecialsIndirect.png
Clown car explosion
0 0 13% 0 AngleIcon55.png 85 70 0 14.0 0 0.0 6.0 0.0 1.0x 1.0x 0% HitboxTableIcon(Clang).png HitboxTableIcon(NoRebound).png TypeIcon(Explosive).png EffectIcon(Flame).png HitboxTableIcon(GroundedTrue).png HitboxTableIcon(AerialTrue).png L Explosion SpecialsIndirect.png
Hammer attack (Hit 1)
0 0 15% 0 Sakurai angle 50 90 0 6.5 0 0.0 8.0 -12.0 1.0x 1.2x 0% HitboxTableIcon(Clang).png HitboxTableIcon(Rebound).png TypeIcon(Weapon).png EffectIcon(Normal).png HitboxTableIcon(GroundedTrue).png HitboxTableIcon(AerialTrue).png L Kick SpecialsDirect.png
1 0 10% 0 Sakurai angle 50 90 0 3.0 0 0.0 8.0 -10.0 1.0x 1.2x 0% HitboxTableIcon(Clang).png HitboxTableIcon(Rebound).png TypeIcon(Weapon).png EffectIcon(Normal).png HitboxTableIcon(GroundedTrue).png HitboxTableIcon(AerialTrue).png M Kick SpecialsDirect.png
Hammer attack (Hit 2)
0 0 15% 0 Sakurai angle 50 90 0 6.5 0 0.0 8.0 12.5 1.0x 1.2x 0% HitboxTableIcon(Clang).png HitboxTableIcon(Rebound).png TypeIcon(Weapon).png EffectIcon(Normal).png HitboxTableIcon(GroundedTrue).png HitboxTableIcon(AerialTrue).png L Kick SpecialsDirect.png
1 0 10% 0 Sakurai angle 50 90 0 3.0 0 0.0 8.0 10.0 1.0x 1.2x 0% HitboxTableIcon(Clang).png HitboxTableIcon(Rebound).png TypeIcon(Weapon).png EffectIcon(Normal).png HitboxTableIcon(GroundedTrue).png HitboxTableIcon(AerialTrue).png M Kick SpecialsDirect.png