Fox (SSBM)/Up tilt: Difference between revisions
From SmashWiki, the Super Smash Bros. wiki
Jump to navigationJump to search
MeleeFan98 (talk | contribs) |
No edit summary |
||
| (21 intermediate revisions by 11 users not shown) | |||
| Line 2: | Line 2: | ||
==Overview== | ==Overview== | ||
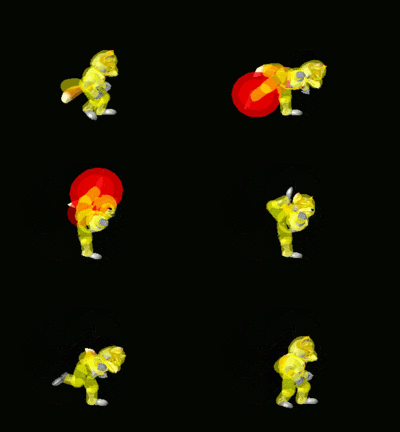
[[File:Fox Up Tilt Hitbox Melee.gif|thumb|The hitbox of Fox's up tilt.]] | |||
Fox does a quick upwards back kick. A good move for [[spacing]] due to its high power, speed, and [[disjointed]] [[range]]. It can [[combo]] into many attacks at low percentages since it has low base knockback. Its very high knockback scaling can allow for low percentage KOs on [[floaty]] characters by around 120%, especially if the ground-only sweetspot hits. In terms of KO percentage, it is the third most powerful [[up tilt]] in the game, only behind {{mvsub|Ganondorf|SSBM|up tilt|alt=Ganondorf's}} and {{mvsub|Bowser|SSBM|up tilt|alt=Bowser's}}. It is also one of Fox's easiest moves to combo into, due to its 5 frame startup, that makes it ideal as a followup after his down air, in [[Waveshine]]s, and as a quick conversion off stray aerials vs floaties. | |||
== | ==Hitboxes== | ||
{{MeleeHitboxTableHeader}} | |||
{{MeleeHitboxTableRow | |||
|id=0 | |||
|damage=12% | |||
|angle=110 | |||
|bk=18 | |||
|ks=140 | |||
|fkv=0 | |||
|r=1300 | |||
|bn=15 | |||
|g=1 | |||
|a=0 | |||
|effect=Normal | |||
|slvl=M | |||
|sfx=Kick | |||
}} | |||
{{MeleeHitboxTableRow | |||
|id=1 | |||
|damage=9% | |||
|angle=84 | |||
|bk=18 | |||
|ks=140 | |||
|fkv=0 | |||
|r=1300 | |||
|bn=15 | |||
|g=0 | |||
|a=1 | |||
|effect=Normal | |||
|slvl=M | |||
|sfx=Kick | |||
}} | |||
{{MeleeHitboxTableRow | |||
|id=2 | |||
|damage=9% | |||
|angle=80 | |||
|bk=18 | |||
|ks=140 | |||
|fkv=0 | |||
|r=900 | |||
|bn=13 | |||
|xpos=680 | |||
|effect=Normal | |||
|slvl=M | |||
|sfx=Kick | |||
}} | |||
{{MeleeHitboxTableRow | |||
|id=3 | |||
|damage=9% | |||
|angle=80 | |||
|bk=18 | |||
|ks=140 | |||
|fkv=0 | |||
|r=800 | |||
|bn=12 | |||
|xpos=170 | |||
|effect=Normal | |||
|slvl=M | |||
|sfx=Kick | |||
}} | |||
|} | |||
== | ==Timing== | ||
[[Falco (SSBM)/Up tilt]] - a weaker version of Fox | {|class="wikitable" | ||
!Hitboxes | |||
|5-11 | |||
|- | |||
!Interruptible | |||
|23 | |||
|- | |||
!Animation length | |||
|23 | |||
|} | |||
{{FrameStripStart}} | |||
{{FrameStrip|t=Lag|c=4}}{{FrameStrip|t=Hitbox|c=7}}{{FrameStrip|t=Lag|c=11}}{{FrameStrip|t=Interruptible|c=1}} | |||
{{FrameStripEnd}} | |||
{{FrameIconLegend|lag=y|hitbox=y|interruptible=y}} | |||
==Similar moves== | |||
*[[Falco (SSBM)/Up tilt]] - a weaker version of Fox's, but it can lead to many more combos. | |||
{{MvSubNavFox|g=SSBM}} | |||
[[Category:Fox (SSBM)]] | |||
[[Category:Up tilts (SSBM)]] | |||
Latest revision as of 10:17, January 22, 2022
Overview[edit]
Fox does a quick upwards back kick. A good move for spacing due to its high power, speed, and disjointed range. It can combo into many attacks at low percentages since it has low base knockback. Its very high knockback scaling can allow for low percentage KOs on floaty characters by around 120%, especially if the ground-only sweetspot hits. In terms of KO percentage, it is the third most powerful up tilt in the game, only behind Ganondorf's and Bowser's. It is also one of Fox's easiest moves to combo into, due to its 5 frame startup, that makes it ideal as a followup after his down air, in Waveshines, and as a quick conversion off stray aerials vs floaties.
Hitboxes[edit]
Timing[edit]
| Hitboxes | 5-11 |
|---|---|
| Interruptible | 23 |
| Animation length | 23 |
Lag time |
Hitbox |
Interruptible |
Similar moves[edit]
- Falco (SSBM)/Up tilt - a weaker version of Fox's, but it can lead to many more combos.
