Snake (SSBB)/Up tilt: Difference between revisions
(stating damage in overview is usually unnecessary if it's in the tables) |
m (Robot: Automated text replacement (-\|rawflags=([0-9A-Fa-f]{8}) +|rawflags={{subst:User:Toomai/Flags template|\1}})) |
||
| Line 30: | Line 30: | ||
|sfx=Thud | |sfx=Thud | ||
|rebound=n | |rebound=n | ||
|rawflags= | |rawflags=00101001100000110001101010000000 | ||
}} | }} | ||
{{BrawlHitboxTableRow | {{BrawlHitboxTableRow | ||
| Line 49: | Line 49: | ||
|sfx=Thud | |sfx=Thud | ||
|rebound=n | |rebound=n | ||
|rawflags= | |rawflags=00101001100000110001101010000000 | ||
}} | }} | ||
{{BrawlHitboxTableRow | {{BrawlHitboxTableRow | ||
| Line 68: | Line 68: | ||
|sfx=Thud | |sfx=Thud | ||
|rebound=n | |rebound=n | ||
|rawflags= | |rawflags=00101001100000110001101010000000 | ||
}} | }} | ||
{{HitboxTableTitle|Late|24}} | {{HitboxTableTitle|Late|24}} | ||
| Line 87: | Line 87: | ||
|sfx=Thud | |sfx=Thud | ||
|rebound=y | |rebound=y | ||
|rawflags= | |rawflags=00111001100000110001101001000000 | ||
}} | }} | ||
{{BrawlHitboxTableRow | {{BrawlHitboxTableRow | ||
| Line 104: | Line 104: | ||
|sfx=Thud | |sfx=Thud | ||
|rebound=y | |rebound=y | ||
|rawflags= | |rawflags=00111001100000110001101001000000 | ||
}} | }} | ||
{{BrawlHitboxTableRow | {{BrawlHitboxTableRow | ||
| Line 121: | Line 121: | ||
|sfx=Thud | |sfx=Thud | ||
|rebound=y | |rebound=y | ||
|rawflags= | |rawflags=00111001100000110001101001000000 | ||
}} | }} | ||
|} | |} | ||
Revision as of 12:37, June 24, 2014
Overview
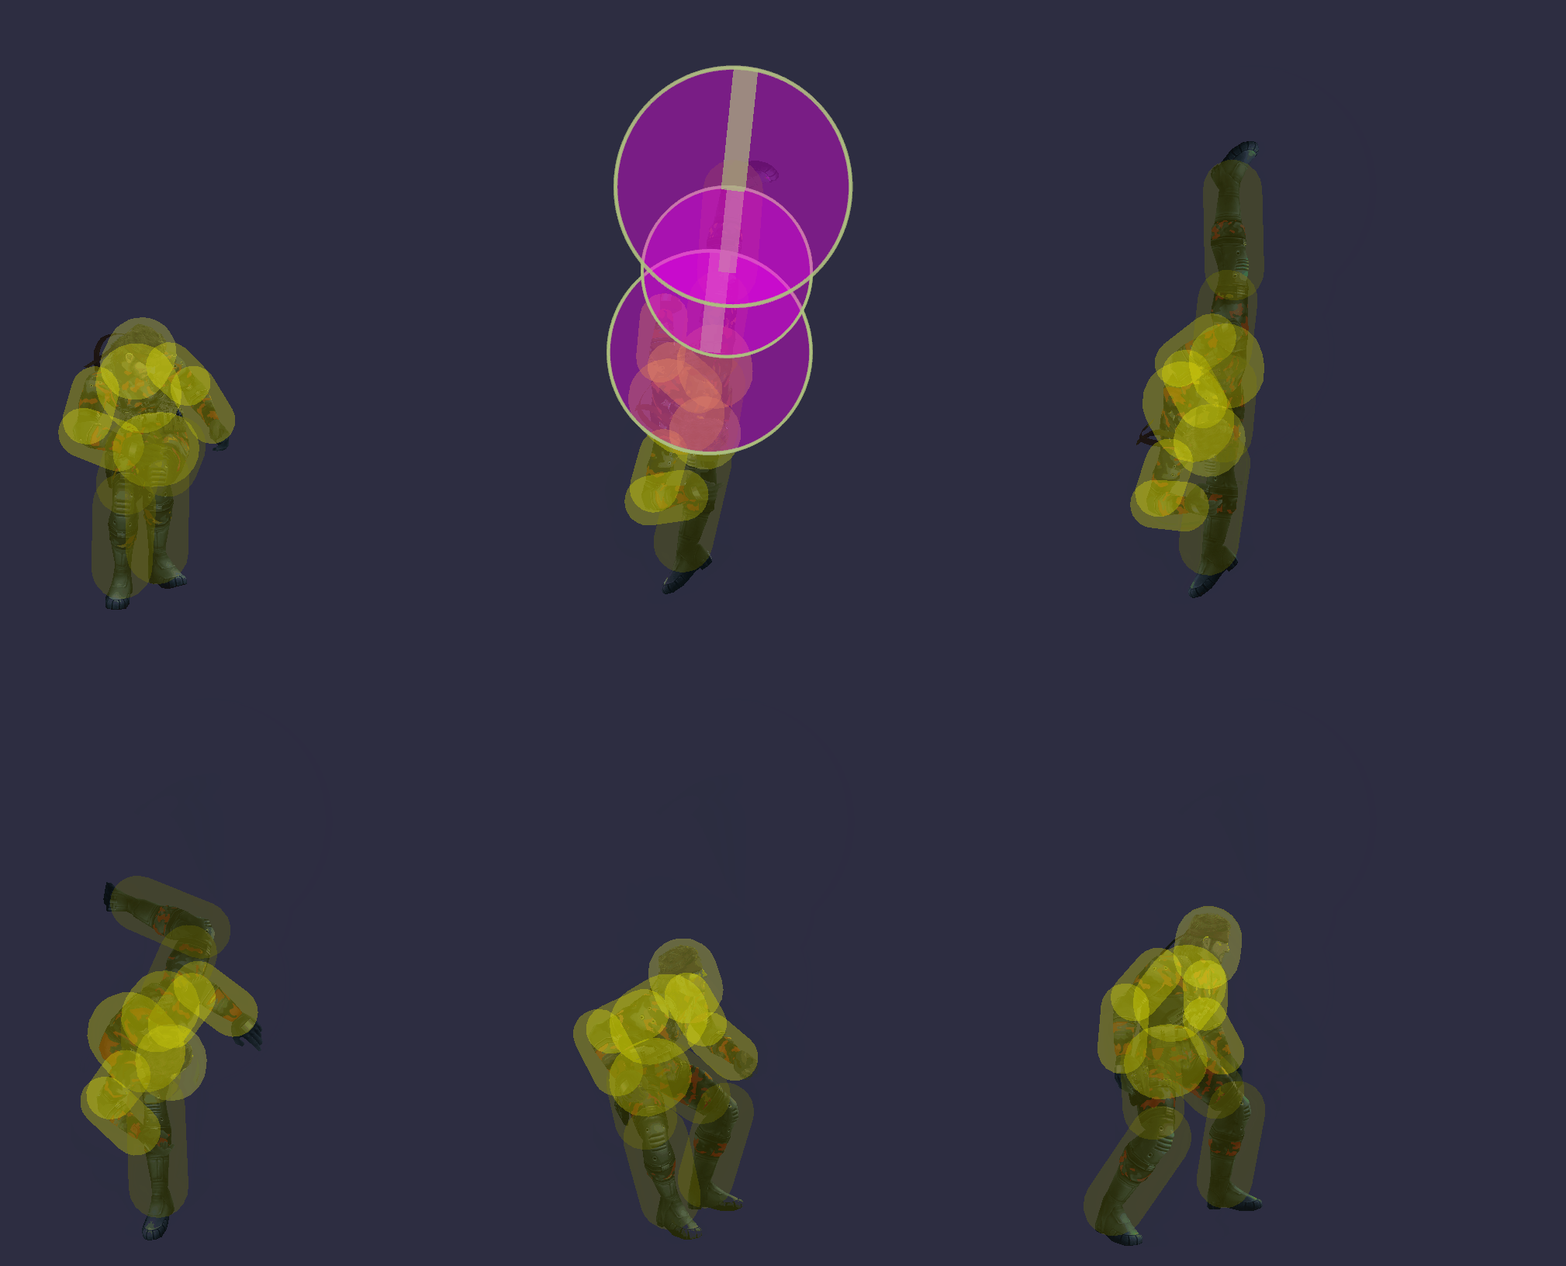
Snake kicks one leg up vertically. Has low start-up, great vertical reach, and notoriously disjointed horizontal reach with an invisible hitbox that appears before Snake's leg is even extended. It is a move with great vertical knockback, and is capable of KOing lightweights at around 100%, middleweights at around 115%, and heavyweights at around 130% with proper DI (when sweetspotted). It has higher knockback when the hit connects earlier on in the attack, though the sourspot will still reliably KO under 150%.
Due to its sheer damage output, speed, knockback, and range, it is considered to be one of the best up tilts in the game, on par with King Dedede's. In any competition or situation, players fear this move when approaching Snake because it is commonly used for its raw KO power. This move has garnered Snake much criticism in the Brawl community due to its nonsensically huge horizontal disjoint, having more safe horizontal reach than most intentionally-disjointed attacks (such as swords) despite the animation suggesting very minimal such reach.
The move is arguably Snake's best KO move, as it complements his already-strong ground game and lets Snake launch even airborne opponents from a safe distance due to its massive range. The up tilt is a common follow-up to an accurate read of the opponent's movements after Snake's down throw, a devastating move that forces opponents into a tech chase. It is also an excellent finisher to Snake's combos or a mixup involving a jab cancel or the first hit of Snake's forward tilt. This move is good for juggling floaties and lightweights, being able to KO the latter most of the time. It is also able to stop most projectiles in their paths before they reach Snake. Most of the time, this attack can hit an enemy who has just jumped up from a ledge if timed correctly.
Hitboxes
Timing
| Clean hit | 6-7 |
|---|---|
| Late hit | 8-13 |
| Animation length | 37 |
Lag time |
Hitbox |
Hitbox change |
|

