SSBU Icon.png

Mii Brawler (SSBU)/Down aerial: Difference between revisions

From SmashWiki, the Super Smash Bros. wiki
Jump to navigationJump to search
No edit summary
mNo edit summary
Line 2: Line 2:
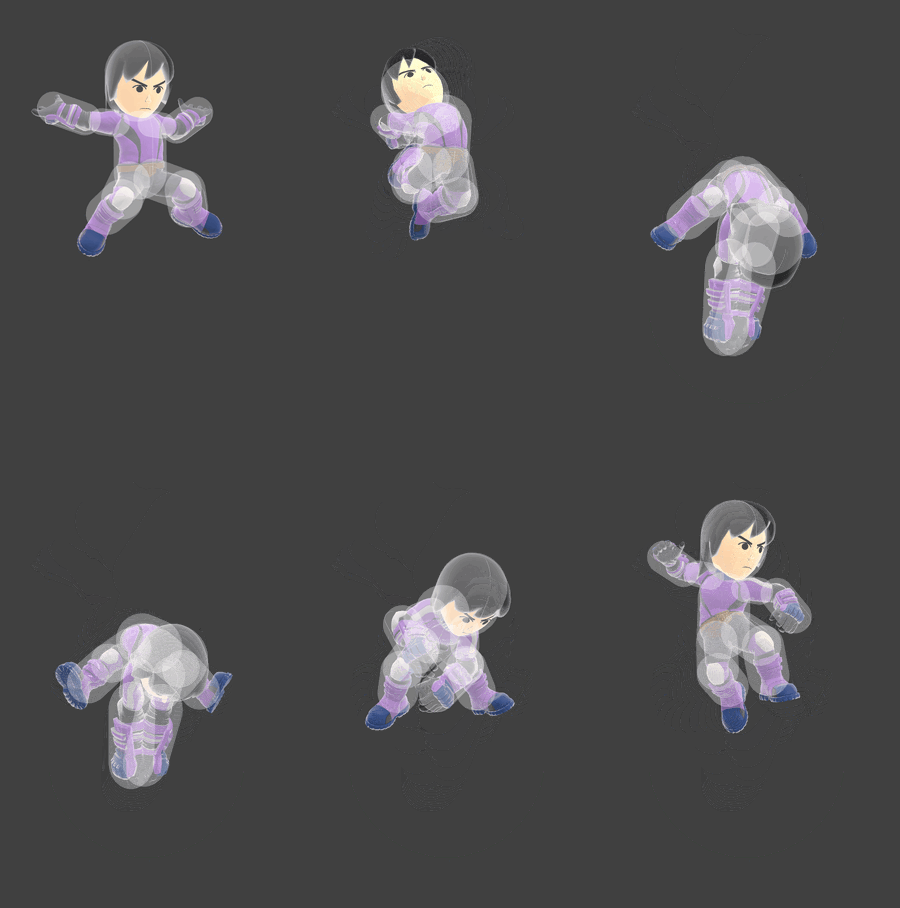
[[File:MiiBrawlerDAirSSBU.gif|thumb|300px|Hitbox visualization showing Mii Brawler's down aerial.]]
[[File:MiiBrawlerDAirSSBU.gif|thumb|300px|Hitbox visualization showing Mii Brawler's down aerial.]]
==Overview==
==Overview==
Mii Brawler swings both hands from over his head to under his torso. The move has 2 frames where it either meteors airborne opponents or launches grounded opponents of a high enough percentage and 1 frame which sends at the Sakurai Angle. Due to its high startup, mediocre endlag and extremely niche combo applications, down aerial is often reserved for offstage and ledgetrapping situations. The size of its hitbox allows down air to hit ledge-hanging opponents without Brawler needing to leave to the stage, and its late hit is immune to teching as long as Brawler faces towards the ledge while using it. Otherwise, the move can be used for reading an opponent's recovery or finishing an opponent whose recovery path is predictable and resources to return to stage are exhausted.
Mii Brawler swings both hands from over their head to under their torso. The move has 2 frames where it either meteors airborne opponents or launches grounded opponents of a high enough percentage and 1 frame which sends at the Sakurai Angle. Due to its high startup, mediocre endlag and extremely niche combo applications, down aerial is often reserved for offstage and ledgetrapping situations. The size of its hitbox allows down air to hit ledge-hanging opponents without Brawler needing to leave to the stage, and its late hit is immune to teching as long as Brawler faces towards the ledge while using it. Otherwise, the move can be used for reading an opponent's recovery or finishing an opponent whose recovery path is predictable and resources to return to stage are exhausted.


==Hitboxes==
==Hitboxes==
Line 9: Line 9:
{{UltimateHitboxTableRow
|id=0
|id=0
|damage=13.0%
|damage={{ShortHopDmgSSBU|13.0}}
|angle=270
|angle=270
|bk=10
|bk=10
Line 16: Line 16:
|r=5.5
|r=5.5
|bn=top
|bn=top
|xpos=0.0
|ypos=-3.7
|ypos=-3.7
|zpos=0.7
|zpos=0.7
|ff=1.3
|ff=1.3
|type=Hand
|type=Hand
|effect=Normal
|sfx=Punch
|sfx=Punch
|slvl=L
|slvl=L
Line 28: Line 26:
{{UltimateHitboxTableRow
|id=1
|id=1
|damage=13.0%
|damage={{ShortHopDmgSSBU|13.0}}
|angle=70
|angle=70
|bk=30
|bk=30
Line 35: Line 33:
|r=7.5
|r=7.5
|bn=top
|bn=top
|xpos=0.0
|ypos=-3.7
|ypos=-3.7
|zpos=0.7
|zpos=0.7
|ff=1.0
|type=Hand
|type=Hand
|effect=Normal
|sfx=Punch
|sfx=Punch
|slvl=M
|slvl=M
Line 48: Line 43:
{{UltimateHitboxTableRow
|id=0
|id=0
|damage=12.0%
|damage={{ShortHopDmgSSBU|12.0}}
|angle=361
|angle=361
|bk=30
|bk=30
Line 55: Line 50:
|r=7.5
|r=7.5
|bn=top
|bn=top
|xpos=0.0
|ypos=-2.7
|ypos=-2.7
|zpos=0.7
|zpos=0.7
|ff=1.0
|type=Hand
|type=Hand
|effect=Normal
|sfx=Punch
|sfx=Punch
|slvl=M
|slvl=M

Revision as of 23:50, March 24, 2022

Hitbox visualization showing Mii Brawler's down aerial.

Overview

Mii Brawler swings both hands from over their head to under their torso. The move has 2 frames where it either meteors airborne opponents or launches grounded opponents of a high enough percentage and 1 frame which sends at the Sakurai Angle. Due to its high startup, mediocre endlag and extremely niche combo applications, down aerial is often reserved for offstage and ledgetrapping situations. The size of its hitbox allows down air to hit ledge-hanging opponents without Brawler needing to leave to the stage, and its late hit is immune to teching as long as Brawler faces towards the ledge while using it. Otherwise, the move can be used for reading an opponent's recovery or finishing an opponent whose recovery path is predictable and resources to return to stage are exhausted.

Hitboxes

ID Part Rehit rate Damage SD Angle Angle type BK KS FKV Set weight Radius Bone Offset SDI× T% Clang Rebound Effect Type G A Sound Direct Hit bits Hit part Blockable Reflectable Absorbable Flinchless No GFX Heedless
Clean hit
0 0 0 13.0% 0 AngleIcon270.png Standard 10 95 0 HitboxTableIcon(False).png 5.5 top 0.0 -3.7 0.7 1.3× 1.0× 0% HitboxTableIcon(Clang).png HitboxTableIcon(Rebound).png EffectIcon(Normal).png TypeIcon(Hand).png HitboxTableIcon(GroundedFalse).png HitboxTableIcon(AerialTrue).png L Punch SpecialsDirect.png All All HitboxTableIcon(Blockable).png HitboxTableIcon(Unreflectable).png HitboxTableIcon(Unabsorbable).png HitboxTableIcon(False).png HitboxTableIcon(False).png HitboxTableIcon(False).png
1 0 0 13.0% 0 AngleIcon70.png Standard 30 100 0 HitboxTableIcon(False).png 7.5 top 0.0 -3.7 0.7 1.0× 1.0× 0% HitboxTableIcon(Clang).png HitboxTableIcon(Rebound).png EffectIcon(Normal).png TypeIcon(Hand).png HitboxTableIcon(GroundedTrue).png HitboxTableIcon(AerialFalse).png M Punch SpecialsDirect.png All All HitboxTableIcon(Blockable).png HitboxTableIcon(Unreflectable).png HitboxTableIcon(Unabsorbable).png HitboxTableIcon(False).png HitboxTableIcon(False).png HitboxTableIcon(False).png
Late hit
0 0 0 12.0% 0 Sakurai angle Standard 30 100 0 HitboxTableIcon(False).png 7.5 top 0.0 -2.7 0.7 1.0× 1.0× 0% HitboxTableIcon(Clang).png HitboxTableIcon(Rebound).png EffectIcon(Normal).png TypeIcon(Hand).png HitboxTableIcon(GroundedTrue).png HitboxTableIcon(AerialTrue).png M Punch SpecialsDirect.png All All HitboxTableIcon(Blockable).png HitboxTableIcon(Unreflectable).png HitboxTableIcon(Unabsorbable).png HitboxTableIcon(False).png HitboxTableIcon(False).png HitboxTableIcon(False).png

Timing

Attack

Initial autocancel 1-4
Clean hit 16-17
Late hit 18
Ending autocancel 37-
Interruptible 50
Animation length 59
FrameIcon(Lag).png FrameIcon(Lag).png FrameIcon(Lag).png FrameIcon(Lag).png FrameIcon(Lag).png FrameIcon(Lag).png FrameIcon(Lag).png FrameIcon(Lag).png FrameIcon(Lag).png FrameIcon(Lag).png FrameIcon(Lag).png FrameIcon(Lag).png FrameIcon(Lag).png FrameIcon(Lag).png FrameIcon(Lag).png FrameIcon(Hitbox).png FrameIcon(HitboxChangeS).png FrameIcon(HitboxChangeE).png FrameIcon(Lag).png FrameIcon(Lag).png FrameIcon(Lag).png FrameIcon(Lag).png FrameIcon(Lag).png FrameIcon(Lag).png FrameIcon(Lag).png FrameIcon(Lag).png FrameIcon(Lag).png FrameIcon(Lag).png FrameIcon(Lag).png FrameIcon(Lag).png FrameIcon(Lag).png FrameIcon(Lag).png FrameIcon(Lag).png FrameIcon(Lag).png FrameIcon(Lag).png FrameIcon(Lag).png FrameIcon(Lag).png FrameIcon(Lag).png FrameIcon(Lag).png FrameIcon(Lag).png FrameIcon(Lag).png FrameIcon(Lag).png FrameIcon(Lag).png FrameIcon(Lag).png FrameIcon(Lag).png FrameIcon(Lag).png FrameIcon(Lag).png FrameIcon(Lag).png FrameIcon(Lag).png FrameIcon(Interruptible).png FrameIcon(Interruptible).png FrameIcon(Interruptible).png FrameIcon(Interruptible).png FrameIcon(Interruptible).png FrameIcon(Interruptible).png FrameIcon(Interruptible).png FrameIcon(Interruptible).png FrameIcon(Interruptible).png FrameIcon(Interruptible).png
FrameIcon(Autocancel).png FrameIcon(Autocancel).png FrameIcon(Autocancel).png FrameIcon(Autocancel).png FrameIcon(Blank).png FrameIcon(Blank).png FrameIcon(Blank).png FrameIcon(Blank).png FrameIcon(Blank).png FrameIcon(Blank).png FrameIcon(Blank).png FrameIcon(Blank).png FrameIcon(Blank).png FrameIcon(Blank).png FrameIcon(Blank).png FrameIcon(Blank).png FrameIcon(Blank).png FrameIcon(Blank).png FrameIcon(Blank).png FrameIcon(Blank).png FrameIcon(Blank).png FrameIcon(Blank).png FrameIcon(Blank).png FrameIcon(Blank).png FrameIcon(Blank).png FrameIcon(Blank).png FrameIcon(Blank).png FrameIcon(Blank).png FrameIcon(Blank).png FrameIcon(Blank).png FrameIcon(Blank).png FrameIcon(Blank).png FrameIcon(Blank).png FrameIcon(Blank).png FrameIcon(Blank).png FrameIcon(Blank).png FrameIcon(Autocancel).png FrameIcon(Autocancel).png FrameIcon(Autocancel).png FrameIcon(Autocancel).png FrameIcon(Autocancel).png FrameIcon(Autocancel).png FrameIcon(Autocancel).png FrameIcon(Autocancel).png FrameIcon(Autocancel).png FrameIcon(Autocancel).png FrameIcon(Autocancel).png FrameIcon(Autocancel).png FrameIcon(Autocancel).png FrameIcon(Autocancel).png FrameIcon(Autocancel).png FrameIcon(Autocancel).png FrameIcon(Autocancel).png FrameIcon(Autocancel).png FrameIcon(Autocancel).png FrameIcon(Autocancel).png FrameIcon(Autocancel).png FrameIcon(Autocancel).png FrameIcon(Autocancel).png

Landing lag

Interruptible 19
Animation length 35
FrameIcon(Lag).png FrameIcon(Lag).png FrameIcon(Lag).png FrameIcon(Lag).png FrameIcon(Lag).png FrameIcon(Lag).png FrameIcon(Lag).png FrameIcon(Lag).png FrameIcon(Lag).png FrameIcon(Lag).png FrameIcon(Lag).png FrameIcon(Lag).png FrameIcon(Lag).png FrameIcon(Lag).png FrameIcon(Lag).png FrameIcon(Lag).png FrameIcon(Lag).png FrameIcon(Lag).png FrameIcon(Interruptible).png FrameIcon(Interruptible).png FrameIcon(Interruptible).png FrameIcon(Interruptible).png FrameIcon(Interruptible).png FrameIcon(Interruptible).png FrameIcon(Interruptible).png FrameIcon(Interruptible).png FrameIcon(Interruptible).png FrameIcon(Interruptible).png FrameIcon(Interruptible).png FrameIcon(Interruptible).png FrameIcon(Interruptible).png FrameIcon(Interruptible).png FrameIcon(Interruptible).png FrameIcon(Interruptible).png FrameIcon(Interruptible).png
Legend (1 square = 1 frame)
FrameIcon(Lag).png
Lag time
FrameIcon(Hitbox).png
Hitbox
FrameIcon(HitboxChangeS).pngFrameIcon(HitboxChangeE).png
Hitbox change
FrameIcon(Autocancel).png
Autocancel
FrameIcon(Interruptible).png
Interruptible