Lucario (SSBU)/Final Smash
Overview[edit]
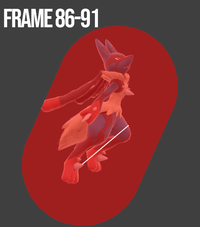
Lucario Mega Evolves into Mega Lucario and flies toward the upper center of the screen in a similar fashion of using Extreme Speed. Lucario then channels its power before unleashing a large aura blast straight down. The angle of the aura can be controlled to go left or right. Like its other moves, Aura Storm scales with aura. However, it is very devastating at just base aura, dealing ~47.8%. At max aura, Lucario deals ~79.8% and can OHKO any character in the game without the use of spirits. Afterward, Mega Lucario reverts back to Lucario. Double jumps and air dodges are refreshed after Aura Storm finishes. Aura Storm can be a way of recovering under desperation to avoid risk with Extreme Speed.
By utilizing moves with high launch angles, Lucario can true combo into Aura Storm with a move that launches the opponent toward the upper center of the blastzone camera. Said move will align with Mega Lucario's path, true comboing into the initial jump before firing the blast. Moves that have high, or favorable launch angles benefiting the jump include:
- Up tilt
- Up smash
- Forward air & Up air
- Double Team's counterattack
- Up throw and down throw
The moves listed above can setup into Aura Storm's jump and into the blast to kill confirm early enough with a decent amount of aura. In case the jump isn't utilized in the combo, Lucario still nets great success setting up the laser by true comboing from moves below such as:
- Neutral attack/Hit 3 (jab3)
- Forward tilt & down tilt
- Dash attack
- Forward smash & down smash
- Neutral air, back, & down air
- Force Palm's projectile and throw
- Extreme Speed
- Forward throw & back throw
- and other misc. moves like Edge attack or a Floor attack
Upon activation, a slowdown effect takes place lasting ~125 frames, so all opponents receive slowdown the entire time Lucario is Mega Evolving into Mega Lucario up to before the Aura blast is unleashed. Even if the jump whiffs, any of the moves listed above will have so much hitstun advantage thanks to the slowdown to ensure success hitting one, or even multiple opponents. Lastly, between frames 92 - 125, angling the beam can be buffered, allowing for aiming in advance. And additionally, tapping the C-stick/R-stick in a sideways direction repeatedly can influence the laser's angle slightly while already guiding the laser with the analog stick. This is reminiscent to Smash DI, but the extra influence helps control the angle of the aura blast to reach its highest angles quicker if necessary.
Update history[edit]
 Aura Storm deals considerably less damage (damage multiplier: 1.3× → 1.15×).
 The Final Smash Meter version of Aura Storm has a higher knockback multiplier (x0.7 → x0.77).
 Lucario's portrait now briefly shows upon activating Final Smash Meter version of Aura Storm.
- Frame-by-frame:
- Aura Storm (Smash Ball)
- Frame 10 is a closeup to the Mega Evolution's shell
- Frame 13 is the first frame Lucario's portrait appears
- Frame 62 instantly pans out to the far screen
- Frame 72 is when Lucario's portrait leaves the screen completely
- Frame 85 to 89 is the camera zooming out as Mega Lucario flies to the top center
- Aura Storm (Final Smash Meter, feat. Version 6.0.0)
- Frame 4 is the first frame Lucario's portrait appears, even before the Mega Evolution's shell
- Frame 33 is when Lucario's portrait leaves the screen completely
- Frame 35 to 84 is a slow zoom-out towards the center between Mega Lucario and the opponent
- Frame 85 to 89 is another moment of the camera zooming out as Mega Lucario flies to the top center
- Aura Storm (Final Smash Meter, feat. Version 6.0.0)
Hitboxes[edit]
Timing[edit]
| Intangible | 1-384 |
|---|---|
| Mega Lucario's Initial Jump | 86-91 |
| Multi hit Aura blast | 126-311 (rehit rate: 5) |
| Final Hit | 313 |
| Interruptible | 378 |
| Animation length | 384 |
| Grabs ledge on | 386 |
Lag time |
Hitbox |
Intangible |
Interruptible |
|

