Dr. Mario (SSB4)/Dash attack: Difference between revisions
(New Page: {{SSB4|Dr. Mario}}'s dash attack is a sliding kick that deals moderate damage and vertical knockback. ==Frame Data== All measurements are in frames. {| class="wik...) |
SuperSqank (talk | contribs) No edit summary |
||
| (10 intermediate revisions by 8 users not shown) | |||
| Line 1: | Line 1: | ||
{{ | {{ArticleIcons|ssb4=y}} | ||
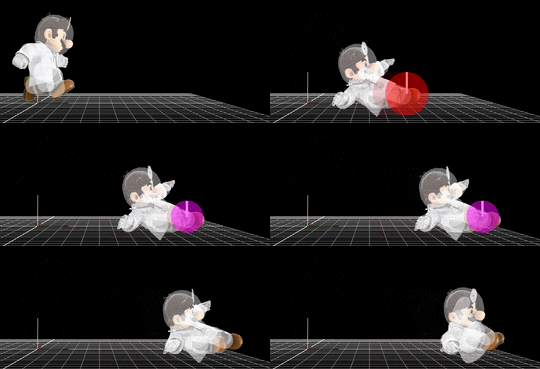
[[File:Dr.MarioDashAttack.gif|thumb|270px|Hitbox visualization showing Dr. Mario's dash attack.]] | |||
== | ==Overview== | ||
{{SSB4|Dr. Mario}}'s [[dash attack]] is a sliding kick that deals moderate [[damage]] and vertical [[knockback]]. While its animation is one to one with {{SSB4|Mario}}'s, it boasts more utility, as it has slight combo potential with the late hit, and the angle puts opponents straight into a juggle situation, rather than knocking them away or behind him. The late hit is able to combo into up aerials at low to mid percents, and can sometimes combo into up tilt if the move hits a ledge hanging opponent at very low percent, although very situational. The move's main use is as a punish tool, when his other punish options normally can't, due to the distance dash attack covers. The overall lag and generally lacking reward of the move makes it bad as an approach option, and combos aren't exactly guaranteed for the most part without the late hit, and even then its combo potential isn't as great as his other moves. | |||
== | ==Hitboxes== | ||
{{SSB4HitboxTableHeader}} | {{SSB4HitboxTableHeader}} | ||
{{HitboxTableTitle|Clean hit|24}} | |||
{{SSB4HitboxTableRow | {{SSB4HitboxTableRow | ||
|id=0 | |id=0 | ||
|damage=8 | |damage=8% | ||
|angle=90 | |angle=90 | ||
|bk=90 | |bk=90 | ||
| Line 29: | Line 22: | ||
|type=Foot | |type=Foot | ||
|effect=Normal | |effect=Normal | ||
| | |rebound=t | ||
|slvl=M | |slvl=M | ||
|sfx=Kick | |sfx=Kick | ||
}} | }} | ||
| | {{HitboxTableTitle|Late hit|24}} | ||
{{SSB4HitboxTableRow | {{SSB4HitboxTableRow | ||
|id=0 | |id=0 | ||
|damage=6 | |damage=6% | ||
|angle=90 | |angle=90 | ||
|bk=90 | |bk=90 | ||
| Line 47: | Line 37: | ||
|bn=0 | |bn=0 | ||
|ypos=1.5 | |ypos=1.5 | ||
|zpos=4 | |zpos=4.0 | ||
|trip=0 | |trip=0 | ||
|type=Foot | |type=Foot | ||
|effect=Normal | |effect=Normal | ||
| | |rebound=t | ||
|slvl= | |slvl=S | ||
|sfx=Kick | |sfx=Kick | ||
}} | }} | ||
{{HitboxTableRowNote|The damage values are untouched before being affected by Dr. Mario's 1.12x damage multiplier.|24}} | |||
|} | |||
==Timing== | |||
{|class="wikitable" | |||
!Clean hit | |||
|6-9 | |||
|- | |||
!Late hit | |||
|10-25 | |||
|- | |||
!Interruptible | |||
|38 | |||
|- | |||
!Animation length | |||
|53 | |||
|} | |} | ||
== | {{FrameStripStart}} | ||
{{FrameStrip|t=Lag|c=5}}{{FrameStrip|t=Hitbox|c=4|e=HitboxChangeS}}{{FrameStrip|t=Hitbox|c=16|s=HitboxChangeE}}{{FrameStrip|t=Lag|c=12}}{{FrameStrip|t=Interruptible|c=16}} | |||
{{FrameStripEnd}} | |||
{{ | {{FrameIconLegend|lag=y|hitbox=y|hitboxchange=y|interruptible=y}} | ||
{{MvSubNavDrMario|g=SSB4}} | {{MvSubNavDrMario|g=SSB4}} | ||
[[Category:Dr. Mario (SSB4)]] | |||
[[Category:Dash attacks (SSB4)]] | |||
Latest revision as of 17:57, August 2, 2020
Overview[edit]
Dr. Mario's dash attack is a sliding kick that deals moderate damage and vertical knockback. While its animation is one to one with Mario's, it boasts more utility, as it has slight combo potential with the late hit, and the angle puts opponents straight into a juggle situation, rather than knocking them away or behind him. The late hit is able to combo into up aerials at low to mid percents, and can sometimes combo into up tilt if the move hits a ledge hanging opponent at very low percent, although very situational. The move's main use is as a punish tool, when his other punish options normally can't, due to the distance dash attack covers. The overall lag and generally lacking reward of the move makes it bad as an approach option, and combos aren't exactly guaranteed for the most part without the late hit, and even then its combo potential isn't as great as his other moves.
Hitboxes[edit]
Timing[edit]
| Clean hit | 6-9 |
|---|---|
| Late hit | 10-25 |
| Interruptible | 38 |
| Animation length | 53 |
Lag time |
Hitbox |
Hitbox change |
Interruptible |
|
