Dr. Mario (SSB4)/Back aerial: Difference between revisions
Iron Warrior (talk | contribs) No edit summary |
m (Text replacement - "== ([^=])" to "== $1") Tag: Mobile edit |
||
| (4 intermediate revisions by 4 users not shown) | |||
| Line 1: | Line 1: | ||
{{ArticleIcons|ssb4=y}} | {{ArticleIcons|ssb4=y}} | ||
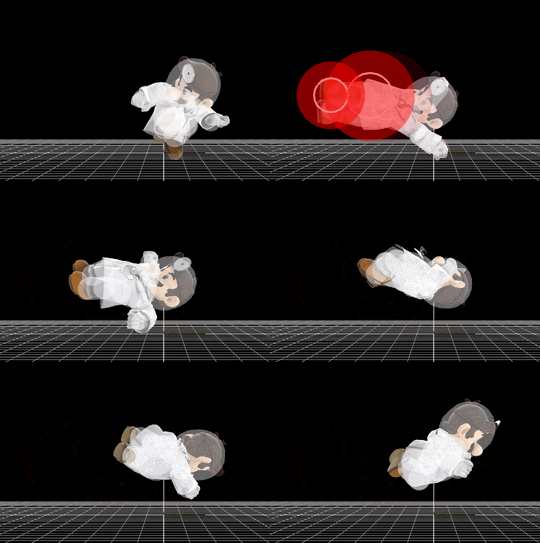
[[File:Dr.MarioBAir.gif|thumb|270px|Hitbox visualization showing Dr. Mario's back aerial.]] | [[File:Dr.MarioBAir.gif|thumb|270px|Hitbox visualization showing Dr. Mario's back aerial.]] | ||
==Overview== | ==Overview== | ||
Dr. Mario performs a backwards dropkick. It has minimal startup, ending and landing lag, as well as a very short amount of time before the move is able to autocancel, making it possible to short hop fast fall the move and autocancel with it. Combined with its decent range, lasting hitbox, and respectable power in both damage and knockback, it is seen as one of the best back aerials in the game. It is able to combo into itself at low percents or slightly higher with the late hit, can kill reasonably well and also is very effective at edgeguarding due to the power and long lasting hitbox. Some of his other moves can combo into back aerial as well, such as the reverse hit of up aerial or down throw. It should be noted that this move has longer lasting hitboxes on both the early and late hits of the move, compared to {{SSB4|Mario}}'s version. | |||
==Hitboxes== | ==Hitboxes== | ||
{{SSB4HitboxTableHeader|special=y}} | |||
{{SSB4HitboxTableHeader}} | |||
{{HitboxTableTitle|Clean hit|42}} | {{HitboxTableTitle|Clean hit|42}} | ||
{{ | {{SSB4SpecialHitboxTableRow | ||
|id=0 | |id=0 | ||
|part=0 | |part=0 | ||
|damage= | |damage=12% | ||
|angle=361 | |angle=361 | ||
|af=4 | |||
|bk=10 | |bk=10 | ||
|ks=95 | |ks=95 | ||
| Line 31: | Line 28: | ||
|slvl=L | |slvl=L | ||
}} | }} | ||
{{ | {{SSB4SpecialHitboxTableRow | ||
|id=1 | |id=1 | ||
|part=0 | |part=0 | ||
|damage= | |damage=12% | ||
|angle=361 | |angle=361 | ||
|af=4 | |||
|bk=10 | |bk=10 | ||
|ks=95 | |ks=95 | ||
| Line 51: | Line 49: | ||
}} | }} | ||
{{HitboxTableTitle|Late hit|42}} | {{HitboxTableTitle|Late hit|42}} | ||
{{ | {{SSB4SpecialHitboxTableRow | ||
|id=0 | |id=0 | ||
|part=0 | |part=0 | ||
|damage=7 | |damage=7% | ||
|angle=361 | |angle=361 | ||
|af=4 | |||
|bk=7 | |bk=7 | ||
|ks=90 | |ks=90 | ||
| Line 70: | Line 69: | ||
|slvl=M | |slvl=M | ||
}} | }} | ||
{{ | {{SSB4SpecialHitboxTableRow | ||
|id=1 | |id=1 | ||
|part=0 | |part=0 | ||
|damage=7 | |damage=7% | ||
|angle=361 | |angle=361 | ||
|af=4 | |||
|bk=7 | |bk=7 | ||
|ks=90 | |ks=90 | ||
| Line 89: | Line 89: | ||
|slvl=M | |slvl=M | ||
}} | }} | ||
{{HitboxTableRowNote|The damage values are untouched before being affected by Dr. Mario's 1.12x damage multiplier.|42}} | |||
|} | |||
==Timing== | |||
===Attack=== | |||
{|class="wikitable" | |||
!Initial autocancel | |||
|1-5 | |||
|- | |||
!Clean hit | |||
|6-8 | |||
|- | |||
!Late hit | |||
|9-13 | |||
|- | |||
!Ending autocancel | |||
|19- | |||
|- | |||
!Interruptible | |||
|34 | |||
|- | |||
!Animation length | |||
|45 | |||
|} | |||
{{FrameStripStart}} | |||
{{FrameStrip|t=Lag|c=5}}{{FrameStrip|t=Hitbox|c=3|e=HitboxChangeS}}{{FrameStrip|t=Hitbox|c=5|s=HitboxChangeE}}{{FrameStrip|t=Lag|c=20}}{{FrameStrip|t=Interruptible|c=12}} | |||
|- | |||
{{FrameStrip|t=Autocancel|c=5}}{{FrameStrip|t=Blank|c=13}}{{FrameStrip|t=Autocancel|c=27}} | |||
{{FrameStripEnd}} | |||
===Landing lag=== | |||
{|class="wikitable" | |||
!Animation length | |||
|16 | |||
|} | |} | ||
{{FrameStripStart}} | |||
{{FrameStrip|t=Lag|c=16}} | |||
{{FrameStripEnd}} | |||
{{FrameIconLegend|lag=y|hitbox=y|hitboxchange=y|autocancel=y|interruptible=y}} | |||
{{MvSubNavDrMario|g=SSB4}} | {{MvSubNavDrMario|g=SSB4}} | ||
[[Category:Dr. Mario (SSB4)]] | [[Category:Dr. Mario (SSB4)]] | ||
[[Category:Back aerials (SSB4)]] | [[Category:Back aerials (SSB4)]] | ||
Latest revision as of 20:52, April 12, 2022
Overview[edit]
Dr. Mario performs a backwards dropkick. It has minimal startup, ending and landing lag, as well as a very short amount of time before the move is able to autocancel, making it possible to short hop fast fall the move and autocancel with it. Combined with its decent range, lasting hitbox, and respectable power in both damage and knockback, it is seen as one of the best back aerials in the game. It is able to combo into itself at low percents or slightly higher with the late hit, can kill reasonably well and also is very effective at edgeguarding due to the power and long lasting hitbox. Some of his other moves can combo into back aerial as well, such as the reverse hit of up aerial or down throw. It should be noted that this move has longer lasting hitboxes on both the early and late hits of the move, compared to Mario's version.
Hitboxes[edit]
Timing[edit]
Attack[edit]
| Initial autocancel | 1-5 |
|---|---|
| Clean hit | 6-8 |
| Late hit | 9-13 |
| Ending autocancel | 19- |
| Interruptible | 34 |
| Animation length | 45 |
Landing lag[edit]
| Animation length | 16 |
|---|
Lag time |
Hitbox |
Hitbox change |
Autocancel |
Interruptible |
|
