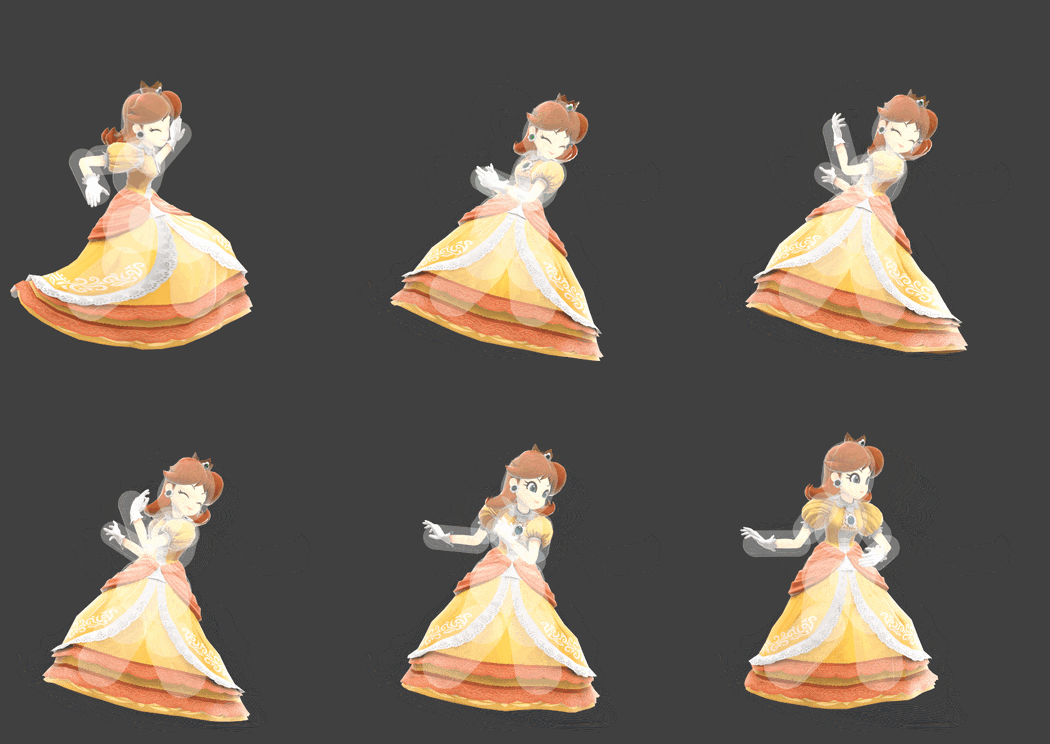
Daisy (SSBU)/Neutral attack/Hit 1: Difference between revisions
From SmashWiki, the Super Smash Bros. wiki
Jump to navigationJump to search
(New Page: {{ArticleIcons|ssbu=y}} thumb|400px|Hitbox visualization showing Daisy's first jab. {{competitive expertise}} ==Overview== ==Hitboxes== {{UltimateHitboxTableHeade...) |
Derekblue1 (talk | contribs) No edit summary |
||
| (8 intermediate revisions by 5 users not shown) | |||
| Line 1: | Line 1: | ||
{{ArticleIcons|ssbu=y}} | {{ArticleIcons|ssbu=y}} | ||
[[File:DaisyJab1.gif|thumb| | [[File:DaisyJab1.gif|thumb|350px|Hitbox visualization showing Daisy's first jab.]] | ||
==Overview== | ==Overview== | ||
{{:Peach (SSBU)/Neutral attack/Hit 1|p=1|Daisy}} | |||
{{:Peach (SSBU)/Neutral attack/Hit 1|p=2|Daisy}} | |||
{{:Peach (SSBU)/Neutral attack/Hit 1|p=3|Daisy}} | |||
==Update History== | |||
'''{{GameIcon|ssbu}} {{SSBU|3.1.0}}''' | |||
*{{buff|Neutral attack 1 connects into neutral attack 2 more reliably.}} | |||
*{{newbug|Introduced a minor bug where neutral attack 1 would no longer produce the correct sound unless Peach is also in the match.}} | |||
'''{{GameIcon|ssbu}} {{SSBU|4.0.0}}''' | |||
*{{bugfix|Neutral attack 1 now makes the correct sound, regardless of whether Peach is present in the match or not.}} | |||
==Hitboxes== | ==Hitboxes== | ||
{{UltimateHitboxTableHeader}} | {{UltimateHitboxTableHeader}} | ||
| Line 9: | Line 22: | ||
|damage=2.0% | |damage=2.0% | ||
|angle=361 | |angle=361 | ||
|af=3 | |||
|bk=30 | |bk=30 | ||
|ks=25 | |ks=25 | ||
| Line 20: | Line 34: | ||
|type=Hand | |type=Hand | ||
|effect=Normal | |effect=Normal | ||
|sfx=Slap | |sfx=Daisy Slap | ||
|slvl=S | |slvl=S | ||
}} | }} | ||
| Line 27: | Line 41: | ||
|damage=2.0% | |damage=2.0% | ||
|angle=180 | |angle=180 | ||
|af=3 | |||
|hitbits=Fighter only | |||
|bk=20 | |bk=20 | ||
|ks=15 | |ks=15 | ||
| Line 38: | Line 54: | ||
|type=Hand | |type=Hand | ||
|effect=Normal | |effect=Normal | ||
|sfx=Slap | |sfx=Daisy Slap | ||
|slvl=S | |slvl=S | ||
}} | }} | ||
| Line 45: | Line 61: | ||
|damage=2.0% | |damage=2.0% | ||
|angle=180 | |angle=180 | ||
|af=3 | |||
|hitbits=Fighter only | |||
|bk=20 | |bk=20 | ||
|ks=15 | |ks=15 | ||
| Line 56: | Line 74: | ||
|type=Hand | |type=Hand | ||
|effect=Normal | |effect=Normal | ||
|sfx=Slap | |sfx=Daisy Slap | ||
|slvl=S | |slvl=S | ||
}} | }} | ||
| Line 63: | Line 81: | ||
|damage=2.0% | |damage=2.0% | ||
|angle=361 | |angle=361 | ||
|af=3 | |||
|bk=30 | |bk=30 | ||
|ks=25 | |ks=25 | ||
| Line 74: | Line 93: | ||
|type=Hand | |type=Hand | ||
|effect=Normal | |effect=Normal | ||
|sfx=Slap | |sfx=Daisy Slap | ||
|slvl=S | |slvl=S | ||
}} | }} | ||
| Line 81: | Line 100: | ||
|damage=2.0% | |damage=2.0% | ||
|angle=361 | |angle=361 | ||
|af=3 | |||
|bk=20 | |bk=20 | ||
|ks=15 | |ks=15 | ||
| Line 92: | Line 112: | ||
|type=Hand | |type=Hand | ||
|effect=Normal | |effect=Normal | ||
|sfx=Slap | |sfx=Daisy Slap | ||
|slvl=S | |slvl=S | ||
}} | }} | ||
|} | |} | ||
==Timing== | ==Timing== | ||
{|class="wikitable" | {|class="wikitable" | ||
!Hitboxes | !colspan=2|Hitboxes | ||
|2 | |2 | ||
|- | |- | ||
! | !rowspan=2|Continuability!!Held on hit or tapped | ||
|7 | |7-30 | ||
|- | |||
!Held without hitting | |||
|14 | |||
|- | |- | ||
!Interruptible | !colspan=2|Interruptible | ||
|28 | |28 | ||
|- | |- | ||
!Animation length | !colspan=2|Animation length | ||
|37 | |37 | ||
|} | |} | ||
{{FrameStripStart}} | {{FrameStripStart}} | ||
{{FrameStrip|t=Lag|c=1}}{{FrameStrip|t=Hitbox|c=1}}{{FrameStrip|t=Lag|c=4|e=LagContinuableS}}{{FrameStrip|t=Lag|c= | {{FrameStrip|t=Lag|c=1}}{{FrameStrip|t=Hitbox|c=1}}{{FrameStrip|t=Lag|c=4|e=LagContinuableS}}{{FrameStrip|t=Lag|c=7|s=LagContinuableE|e=LagContinuableS}}{{FrameStrip|t=Lag|c=14|s=LagContinuableE}}{{FrameStrip|t=Interruptible|c=10}} | ||
|- | |||
{{FrameStrip|t=Blank|c=6}}{{FrameStrip|t=Continuable|c=24}}{{FrameStrip|t=Blank|c=7}} | |||
{{FrameStripEnd}} | {{FrameStripEnd}} | ||
{{FrameIconLegend|lag=y|hitbox=y|earliestcontinuable=y|interruptible=y}} | {{FrameIconLegend|lag=y|hitbox=y|earliestcontinuable=y|continuable=y|interruptible=y}} | ||
{{MvSubNavDaisy|g=SSBU}} | {{MvSubNavDaisy|g=SSBU}} | ||
[[Category:Daisy (SSBU)]] | [[Category:Daisy (SSBU)]] | ||
[[Category:Neutral attacks (SSBU)]] | [[Category:Neutral attacks (SSBU)]] | ||
Latest revision as of 08:41, January 3, 2024
Overview[edit]
Daisy slaps inwards with the leading arm. The first hit of neutral attack deals 2.0% damage.
While pressuring the opponent's shield, neutral attack's first hit can be used to attack the opponent before they act out of shield along with the second hit. However this option can be countered if the opponent continues shield. The first hit of neutral attack is one of Daisy's fastest out of shield options. It can be used after performing a perfect shield. If two attacks collide to each other, Daisy can immediately perform neutral attack. Daisy can perform neutral attack after mashing out of the opponent's grab.
At low percentages, neutral aerial can combo into neutral attack. The move can set up jab resets.
Update History[edit]
 Neutral attack 1 connects into neutral attack 2 more reliably.
Introduced a minor bug where neutral attack 1 would no longer produce the correct sound unless Peach is also in the match.
 Neutral attack 1 now makes the correct sound, regardless of whether Peach is present in the match or not.
Hitboxes[edit]
Timing[edit]
| Hitboxes | 2 | |
|---|---|---|
| Continuability | Held on hit or tapped | 7-30 |
| Held without hitting | 14 | |
| Interruptible | 28 | |
| Animation length | 37 | |
Lag time |
Hitbox |
Continuable |
Earliest continuable point |
Interruptible |
|
