SSBM Icon.png

Captain Falcon (SSBM)/Forward aerial: Difference between revisions

From SmashWiki, the Super Smash Bros. wiki
Jump to navigationJump to search
No edit summary
Tag: Mobile edit
Line 5: Line 5:
Known as the '''[[Knee Smash]]''', Captain Falcon sticks out his knee. If it lands during the initial frames, the opponent is electrocuted and suffers extremely high knockback, with the move being difficult to [[DI]] out of. If it lands any other time, the move is very weak with little knockback, though it can be chained into another Knee, and it can [[gimp]] some recoveries (such as {{SSBM|Falco}}'s) in certain situations. Captain Falcon can also [[SHFFL]] this move so he can effectively follow up with his other great aerials, including itself. Considered one of the best moves in ''Melee'' and the most powerful forward aerial. Can impressively KO as low as 60% off stage.  


It can be utilized in many of Captain Falcon's aerial [[combo]]s, being an excellent combo finisher and versatile part of his combos alike, as well as a generally great KO move and [[edgeguarder]]. At low percentages on grounded opponents, the move can also chain into itself. A clean knee can even be followed up with a aerial [[Falcon Punch]] in the "[[Sacred Combo]]".
It can be utilized in many of Captain Falcon's aerial [[combo]]s, being an excellent combo finisher and versatile part of his combos alike, as well as a generally great KO move and [[edgeguarder]]. At low percentages on grounded opponents, the move can also chain into itself. A clean knee can even be followed up with a aerial [[Falcon Punch]] in the legendary "[[Sacred Combo]]".


{{competitive expertise}}

Revision as of 09:36, April 20, 2015

Overview

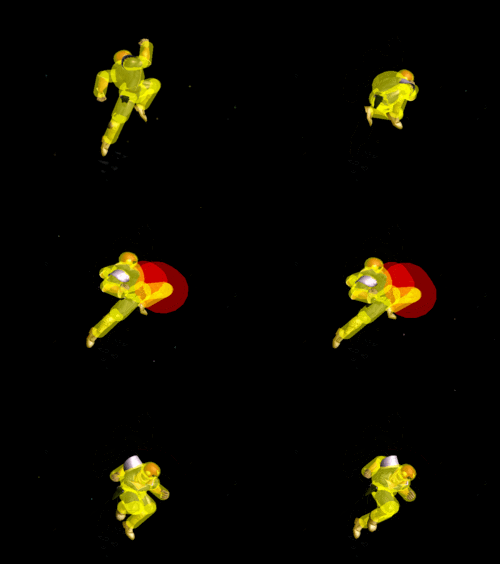
Captain Falcon's Knee Smash hitbox in Melee.
Forward aerial's hitbox duration.

Known as the Knee Smash, Captain Falcon sticks out his knee. If it lands during the initial frames, the opponent is electrocuted and suffers extremely high knockback, with the move being difficult to DI out of. If it lands any other time, the move is very weak with little knockback, though it can be chained into another Knee, and it can gimp some recoveries (such as Falco's) in certain situations. Captain Falcon can also SHFFL this move so he can effectively follow up with his other great aerials, including itself. Considered one of the best moves in Melee and the most powerful forward aerial. Can impressively KO as low as 60% off stage.

It can be utilized in many of Captain Falcon's aerial combos, being an excellent combo finisher and versatile part of his combos alike, as well as a generally great KO move and edgeguarder. At low percentages on grounded opponents, the move can also chain into itself. A clean knee can even be followed up with a aerial Falcon Punch in the legendary "Sacred Combo".


Competitive.png This article or section may require competitive expertise.
You can discuss this issue on the talk page or edit this page to improve it.

Hitboxes

NTSC

ID Part Damage SD Angle BK KS FKV Radius Bone Offset Clang Rebound Effect G A Sound
Clean
0 0 18% 0 AngleIcon32.png 24 100 0 5.0778 7 4.2966 0.0 0.0 HitboxTableIcon(Clang).png HitboxTableIcon(Rebound).png EffectIcon(Electric).png HitboxTableIcon(GroundedTrue).png HitboxTableIcon(AerialTrue).png L Kick
1 0 18% 0 AngleIcon32.png 24 100 0 3.5154 4 4.2966 0.0 0.0 HitboxTableIcon(Clang).png HitboxTableIcon(Rebound).png EffectIcon(Electric).png HitboxTableIcon(GroundedTrue).png HitboxTableIcon(AerialTrue).png L Kick
Late
0 0 6% 0 Sakurai angle 35 80 0 5.0778 7 4.2966 0.0 0.0 HitboxTableIcon(Clang).png HitboxTableIcon(Rebound).png EffectIcon(Normal).png HitboxTableIcon(GroundedTrue).png HitboxTableIcon(AerialTrue).png S Kick
1 0 6% 0 Sakurai angle 35 80 0 3.5154 4 4.2966 0.0 0.0 HitboxTableIcon(Clang).png HitboxTableIcon(Rebound).png EffectIcon(Normal).png HitboxTableIcon(GroundedTrue).png HitboxTableIcon(AerialTrue).png S Kick

PAL

ID Part Damage SD Angle BK KS FKV Radius Bone Offset Clang Rebound Effect G A Sound
Clean
0 0 18% 0 AngleIcon32.png 24 100 0 5.0778 7 4.2966 0.0 0.0 HitboxTableIcon(Clang).png HitboxTableIcon(Rebound).png EffectIcon(Electric).png HitboxTableIcon(GroundedTrue).png HitboxTableIcon(AerialTrue).png L Kick
1 0 18% 0 AngleIcon32.png 24 100 0 3.5154 4 4.2966 0.0 0.0 HitboxTableIcon(Clang).png HitboxTableIcon(Rebound).png EffectIcon(Electric).png HitboxTableIcon(GroundedTrue).png HitboxTableIcon(AerialTrue).png L Kick
Late
0 0 3% 0 Sakurai angle 30 80 0 5.0778 7 4.2966 0.0 0.0 HitboxTableIcon(Clang).png HitboxTableIcon(Rebound).png EffectIcon(Normal).png HitboxTableIcon(GroundedTrue).png HitboxTableIcon(AerialTrue).png S Kick
1 0 3% 0 Sakurai angle 30 80 0 3.5154 4 4.2966 0.0 0.0 HitboxTableIcon(Clang).png HitboxTableIcon(Rebound).png EffectIcon(Normal).png HitboxTableIcon(GroundedTrue).png HitboxTableIcon(AerialTrue).png S Kick

Summary

  • Nerf Late hit does -3% damage and has -5 base knockback.

Timing

Attack

Initial autocancel 1-6
Clean hit 14-16
Late hit 17-30
Ending autocancel 35-
Interruptible 36
Animation length 39
FrameIcon(Lag).png FrameIcon(Lag).png FrameIcon(Lag).png FrameIcon(Lag).png FrameIcon(Lag).png FrameIcon(Lag).png FrameIcon(Lag).png FrameIcon(Lag).png FrameIcon(Lag).png FrameIcon(Lag).png FrameIcon(Lag).png FrameIcon(Lag).png FrameIcon(Lag).png FrameIcon(Hitbox).png FrameIcon(Hitbox).png FrameIcon(HitboxChangeS).png FrameIcon(HitboxChangeE).png FrameIcon(Hitbox).png FrameIcon(Hitbox).png FrameIcon(Hitbox).png FrameIcon(Hitbox).png FrameIcon(Hitbox).png FrameIcon(Hitbox).png FrameIcon(Hitbox).png FrameIcon(Hitbox).png FrameIcon(Hitbox).png FrameIcon(Hitbox).png FrameIcon(Hitbox).png FrameIcon(Hitbox).png FrameIcon(Hitbox).png FrameIcon(Lag).png FrameIcon(Lag).png FrameIcon(Lag).png FrameIcon(Lag).png FrameIcon(Lag).png FrameIcon(Interruptible).png FrameIcon(Interruptible).png FrameIcon(Interruptible).png FrameIcon(Interruptible).png
FrameIcon(Autocancel).png FrameIcon(Autocancel).png FrameIcon(Autocancel).png FrameIcon(Autocancel).png FrameIcon(Autocancel).png FrameIcon(Autocancel).png FrameIcon(Blank).png FrameIcon(Blank).png FrameIcon(Blank).png FrameIcon(Blank).png FrameIcon(Blank).png FrameIcon(Blank).png FrameIcon(Blank).png FrameIcon(Blank).png FrameIcon(Blank).png FrameIcon(Blank).png FrameIcon(Blank).png FrameIcon(Blank).png FrameIcon(Blank).png FrameIcon(Blank).png FrameIcon(Blank).png FrameIcon(Blank).png FrameIcon(Blank).png FrameIcon(Blank).png FrameIcon(Blank).png FrameIcon(Blank).png FrameIcon(Blank).png FrameIcon(Blank).png FrameIcon(Blank).png FrameIcon(Blank).png FrameIcon(Blank).png FrameIcon(Blank).png FrameIcon(Blank).png FrameIcon(Blank).png FrameIcon(Autocancel).png FrameIcon(Autocancel).png FrameIcon(Autocancel).png FrameIcon(Autocancel).png FrameIcon(Autocancel).png

Landing lag

Animation length 19
L-cancelled animation length 9
Normal  FrameIcon(Lag).png FrameIcon(Lag).png FrameIcon(Lag).png FrameIcon(Lag).png FrameIcon(Lag).png FrameIcon(Lag).png FrameIcon(Lag).png FrameIcon(Lag).png FrameIcon(Lag).png FrameIcon(Lag).png FrameIcon(Lag).png FrameIcon(Lag).png FrameIcon(Lag).png FrameIcon(Lag).png FrameIcon(Lag).png FrameIcon(Lag).png FrameIcon(Lag).png FrameIcon(Lag).png FrameIcon(Lag).png
L-cancelled  FrameIcon(Lag).png FrameIcon(Lag).png FrameIcon(Lag).png FrameIcon(Lag).png FrameIcon(Lag).png FrameIcon(Lag).png FrameIcon(Lag).png FrameIcon(Lag).png FrameIcon(Lag).png FrameIcon(Blank).png FrameIcon(Blank).png FrameIcon(Blank).png FrameIcon(Blank).png FrameIcon(Blank).png FrameIcon(Blank).png FrameIcon(Blank).png FrameIcon(Blank).png FrameIcon(Blank).png FrameIcon(Blank).png
Legend (1 square = 1 frame)
FrameIcon(Lag).png
Lag time
FrameIcon(Hitbox).png
Hitbox
FrameIcon(HitboxChangeS).pngFrameIcon(HitboxChangeE).png
Hitbox change
FrameIcon(Autocancel).png
Autocancel
FrameIcon(Interruptible).png
Interruptible

Similar moves