SSBU Icon.png

Luigi (SSBU)/Forward tilt: Difference between revisions

From SmashWiki, the Super Smash Bros. wiki
Jump to navigationJump to search
Line 15: Line 15:
{{competitive expertise}}
==Overview==
==Overview==
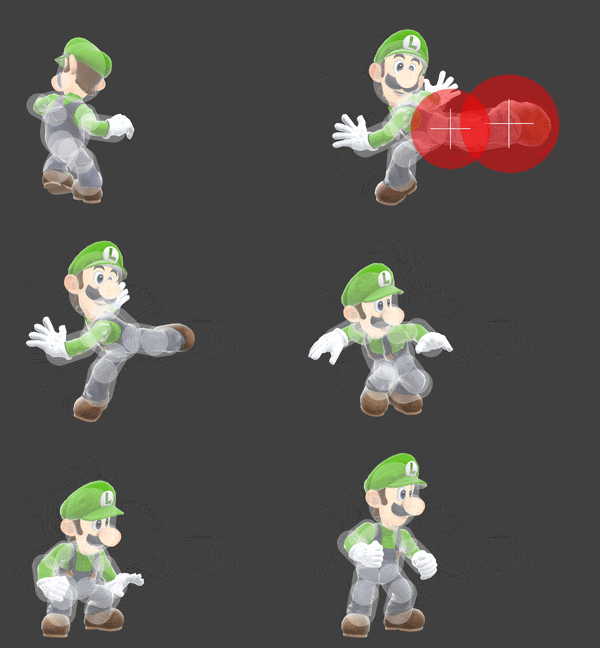
A kick while facing the camera. Compared to Mario it has a different animation, being a side kick instead of a hook kick. Compared to Mario's version, it deals more damage and knockback, giving it KO potential below 200%, and has slighly more range, but has more ending lag due to Luigi's forward tilt not having reduced lag, and worse coverage very close to him. Good spacing options, although it can no longer lock.
A kick while facing the camera. Compared to Mario's version it has a different animation, being a side kick instead of a hook kick, and it deals more damage and knockback, giving it KO potential below 200%, and has slighly more range, but has more ending lag due to Luigi's forward tilt not having reduced lag, and worse coverage very close to him. Good spacing options, although it can no longer lock.


==Hitboxes==
==Hitboxes==

Revision as of 05:48, December 14, 2019

Luigi forward tilt hitbox visualizations
LuigiFTiltUpSSBU.gif
LuigiFTiltSSBU.gif
LuigiFTiltDownSSBU.gif
Competitive.png This article or section may require competitive expertise.
You can discuss this issue on the talk page or edit this page to improve it.

Overview

A kick while facing the camera. Compared to Mario's version it has a different animation, being a side kick instead of a hook kick, and it deals more damage and knockback, giving it KO potential below 200%, and has slighly more range, but has more ending lag due to Luigi's forward tilt not having reduced lag, and worse coverage very close to him. Good spacing options, although it can no longer lock.

Hitboxes

ID Part Rehit rate Damage SD Angle Angle type BK KS FKV Set weight Radius Bone Offset SDI× T% Clang Rebound Effect Type G A Sound Direct Hit bits Hit part Blockable Reflectable Absorbable Flinchless No GFX Heedless
0 0 0 9.0% 0 Sakurai angle Standard 50 75 0 HitboxTableIcon(False).png 4.8 kneel 4.0 0.0 0.0 1.0× 1.0× 0% HitboxTableIcon(Clang).png HitboxTableIcon(Rebound).png EffectIcon(Normal).png TypeIcon(Foot).png HitboxTableIcon(GroundedTrue).png HitboxTableIcon(AerialTrue).png M Kick SpecialsDirect.png All All HitboxTableIcon(Blockable).png HitboxTableIcon(Unreflectable).png HitboxTableIcon(Unabsorbable).png HitboxTableIcon(False).png HitboxTableIcon(False).png HitboxTableIcon(False).png
1 0 0 9.0% 0 Sakurai angle Standard 50 75 0 HitboxTableIcon(False).png 3.8 legl 1.2 0.0 0.0 1.0× 1.0× 0% HitboxTableIcon(Clang).png HitboxTableIcon(Rebound).png EffectIcon(Normal).png TypeIcon(Foot).png HitboxTableIcon(GroundedTrue).png HitboxTableIcon(AerialTrue).png M Kick SpecialsDirect.png All All HitboxTableIcon(Blockable).png HitboxTableIcon(Unreflectable).png HitboxTableIcon(Unabsorbable).png HitboxTableIcon(False).png HitboxTableIcon(False).png HitboxTableIcon(False).png

Timing

Hitboxes 5-7
Interruptible 33
Animation length 38
FrameIcon(Lag).png FrameIcon(Lag).png FrameIcon(Lag).png FrameIcon(Lag).png FrameIcon(Hitbox).png FrameIcon(Hitbox).png FrameIcon(Hitbox).png FrameIcon(Lag).png FrameIcon(Lag).png FrameIcon(Lag).png FrameIcon(Lag).png FrameIcon(Lag).png FrameIcon(Lag).png FrameIcon(Lag).png FrameIcon(Lag).png FrameIcon(Lag).png FrameIcon(Lag).png FrameIcon(Lag).png FrameIcon(Lag).png FrameIcon(Lag).png FrameIcon(Lag).png FrameIcon(Lag).png FrameIcon(Lag).png FrameIcon(Lag).png FrameIcon(Lag).png FrameIcon(Lag).png FrameIcon(Lag).png FrameIcon(Lag).png FrameIcon(Lag).png FrameIcon(Lag).png FrameIcon(Lag).png FrameIcon(Lag).png FrameIcon(Interruptible).png FrameIcon(Interruptible).png FrameIcon(Interruptible).png FrameIcon(Interruptible).png FrameIcon(Interruptible).png FrameIcon(Interruptible).png
Legend (1 square = 1 frame)
FrameIcon(Lag).png
Lag time
FrameIcon(Hitbox).png
Hitbox
FrameIcon(Interruptible).png
Interruptible