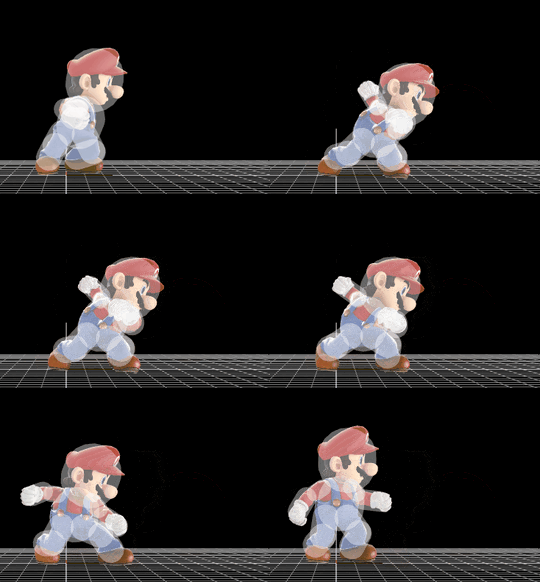
Mario (SSB4)/Neutral attack/Hit 1: Difference between revisions
No edit summary |
No edit summary |
||
| Line 4: | Line 4: | ||
==Overview== | ==Overview== | ||
The first hit of {{SSB4|Mario}}'s [[Neutral attack|neutral attack]] is a simple punch from Mario's arm further from the camera. It does 2.5% [[Damage|damage]] and very little knockback. Jab 1’s entire hitbox, excluding the fist, can lock. It will lock and force a pratfall at any percent. Due to its speed, it can interrupt approaches. If the attack button is held, the first jab will continuously repeat until a character comes into range. The player can cause jab 2 and 3 to happen early by hitting the attack button. Using this, one can trick the opponent into approaching in attempt to punish jab 1, only to be hit by the larger range of the later jabs. Another situational use is holding jab 1 at the ledge. If you manage to land only bab 1 against a recovering character, they will be unable to grab the edge of the stage for one second. Characters with quick up specials such as Marth and Luigi may overshoot the ledge in a panic, leaving themself open to a hard punish. | The first hit of {{SSB4|Mario}}'s [[Neutral attack|neutral attack]] is a simple punch from Mario's arm further from the camera. It does 2.5% [[Damage|damage]] and very little knockback. Jab 1’s entire hitbox, excluding the fist, can lock. It will lock and force a pratfall at any percent. Due to its speed, it can interrupt approaches. If the attack button is held, the first jab will continuously repeat until a character comes into range. The player can cause jab 2 and 3 to happen early by hitting the attack button. Using this, one can trick the opponent into approaching in attempt to punish jab 1, only to be hit by the larger range of the later jabs. Another situational use is holding jab 1 at the ledge. If you manage to land only bab 1 against a recovering character, they will be unable to grab the edge of the stage for one second. Characters with quick up specials such as Marth and Luigi may overshoot the ledge in a panic, leaving themself open to a hard punish. | ||
==Hitboxes== | |||
{{SSB4HitboxTableRow | {{SSB4HitboxTableRow | ||
|id=0 | |id=0 | ||
|damage=2.5% | |damage=2.5% | ||
Revision as of 13:32, January 27, 2018
Overview
The first hit of Mario's neutral attack is a simple punch from Mario's arm further from the camera. It does 2.5% damage and very little knockback. Jab 1’s entire hitbox, excluding the fist, can lock. It will lock and force a pratfall at any percent. Due to its speed, it can interrupt approaches. If the attack button is held, the first jab will continuously repeat until a character comes into range. The player can cause jab 2 and 3 to happen early by hitting the attack button. Using this, one can trick the opponent into approaching in attempt to punish jab 1, only to be hit by the larger range of the later jabs. Another situational use is holding jab 1 at the ledge. If you manage to land only bab 1 against a recovering character, they will be unable to grab the edge of the stage for one second. Characters with quick up specials such as Marth and Luigi may overshoot the ledge in a panic, leaving themself open to a hard punish.
Hitboxes
|-
|0||0||2.5%||0||style=""|![]() ||style=""|0||style=""|100||style=""|0||style=""|3.0||style=""|15||style=""|1.2||style=""|0.0||style=""|0.0||1.0x||1.0x||0%||
||style=""|0||style=""|100||style=""|0||style=""|3.0||style=""|15||style=""|1.2||style=""|0.0||style=""|0.0||1.0x||1.0x||0%||![]() ||
||![]() ||
||![]() ||
||![]() ||
||![]() ||
||![]() ||
||![]() Punch||
Punch||![]()
|-
|1||0||2.5%||0||style=""|![]() ||style=""|0||style=""|100||style=""|0||style=""|1.5||style=""|13||style=""|0.0||style=""|0.0||style=""|0.0||1.0x||1.0x||0%||
||style=""|0||style=""|100||style=""|0||style=""|1.5||style=""|13||style=""|0.0||style=""|0.0||style=""|0.0||1.0x||1.0x||0%||![]() ||
||![]() ||
||![]() ||
||![]() ||
||![]() ||
||![]() ||
||![]() Punch||
Punch||![]()
|-
|2||0||2.5%||0||style=""|![]() ||style=""|0||style=""|80||style=""|0||style=""|4||style=""|16||style=""|0.0||style=""|0.0||style=""|0.0||1.0x||1.0x||0%||
||style=""|0||style=""|80||style=""|0||style=""|4||style=""|16||style=""|0.0||style=""|0.0||style=""|0.0||1.0x||1.0x||0%||![]() ||
||![]() ||
||![]() ||
||![]() ||
||![]() ||
||![]() ||
||![]() Punch||
Punch||![]() |}
|}
Timing
| Hitbox | 2-3 |
|---|---|
| Earliest continuable frame | 7 |
| Interruptible | 20 |
| Animation length | 24 |
Lag time |
Hitbox |
Continuable |
Interruptible |
References
|
