Meta Knight (SSBB)/Up special: Difference between revisions
m (→Ground) |
|||
| (4 intermediate revisions by 2 users not shown) | |||
| Line 1: | Line 1: | ||
{{ArticleIcons|ssbb=y}} | {{ArticleIcons|ssbb=y}} | ||
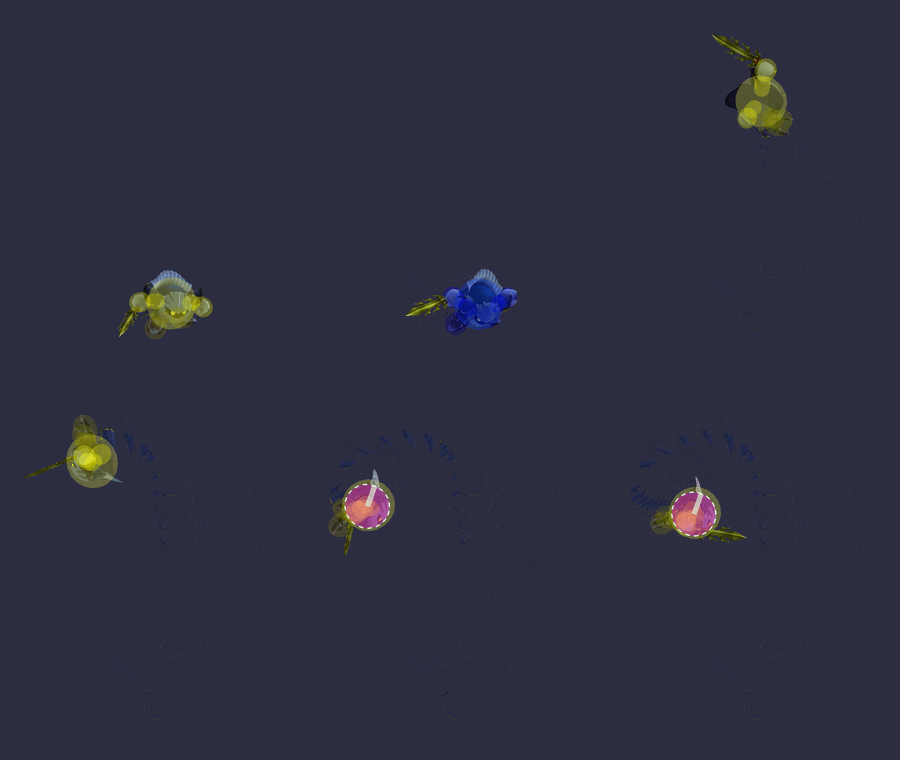
[[File:MetaKnightShuttleLoopGroundSSBB.gif|thumb|300px|Hitbox visualization showing Meta Knight's grounded Shuttle Loop.]] | |||
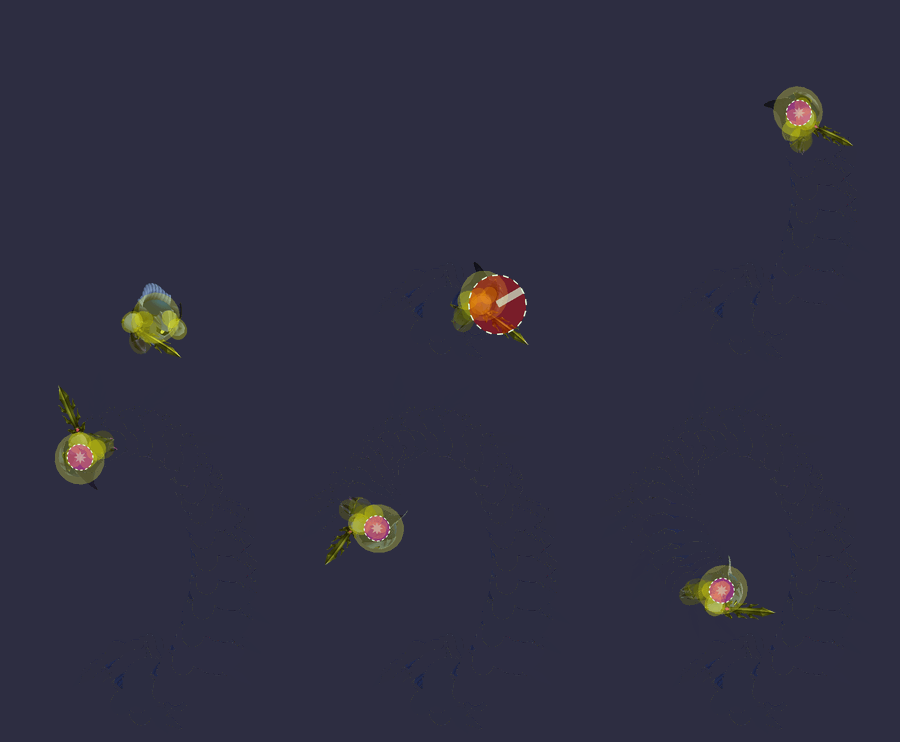
[[File:MetaKnightShuttleLoopAirSSBB.gif|thumb|300px|Hitbox visualization showing Meta Knight's aerial Shuttle Loop.]] | |||
==Overview== | ==Overview== | ||
Meta Knight's up special, '''[[Shuttle Loop]]''', allows him to jump into the air a high vertical distance, go into a loop, and then [[glide]] forward. If he ends the glide early or does a {{mvsub|Meta Knight|SSBB|glide attack}}, it will make him [[helpless]]. This special move makes Meta Knight the only character that can glide twice without touching the ground. The sweetspot (at the startup on the ground) does around 9% and has powerful vertical knockback, making it a good finisher. However, after the initial sweetspot, the hitboxes deal weak knockback. Additionally, when sweetspotted in midair, it sends opponents on a [[semi-spike]] trajectory, and since it has almost no start-up lag and very strong base knockback (higher than his {{mvsub|Meta Knight|SSBB|forward smash}} and {{mvsub|Meta Knight|SSBB|down smash}}, though it has lower knockback scaling), it is very deadly to the opponent, and almost guarantees a KO on some characters with poor horizontal recovery such as {{SSBB|Ike}}. It can also be used to [[stage spike]] characters with slow vertical recoveries, such as {{SSBB|Falco}}. It can even be used in a reverse fashion after an edge jump to hit a recovering opponent behind Meta Knight. However, doing it while not facing the stage is risky as the move makes him helpless, and combined with Meta Knight's poor [[air speed]], it can be difficult to return to the stage safely when performed this way. The initial upswing of the Shuttle Loop is mostly used at the end of Meta Knight's [[combo]]s. | Meta Knight's up special, '''[[Shuttle Loop]]''', allows him to jump into the air a high vertical distance, go into a loop, and then [[glide]] forward. If he ends the glide early or does a {{mvsub|Meta Knight|SSBB|glide attack}}, it will make him [[helpless]]. This special move makes Meta Knight the only character that can glide twice without touching the ground. The sweetspot (at the startup on the ground) does around 9% and has powerful vertical knockback, making it a good finisher. However, after the initial sweetspot, the hitboxes deal weak knockback. Additionally, when sweetspotted in midair, it sends opponents on a [[semi-spike]] trajectory, and since it has almost no start-up lag and very strong base knockback (higher than his {{mvsub|Meta Knight|SSBB|forward smash}} and {{mvsub|Meta Knight|SSBB|down smash}}, though it has lower knockback scaling), it is very deadly to the opponent, and almost guarantees a KO on some characters with poor horizontal recovery such as {{SSBB|Ike}}. It can also be used to [[stage spike]] characters with slow vertical recoveries, such as {{SSBB|Falco}}. It can even be used in a reverse fashion after an edge jump to hit a recovering opponent behind Meta Knight. However, doing it while not facing the stage is risky as the move makes him helpless, and combined with Meta Knight's poor [[air speed]], it can be difficult to return to the stage safely when performed this way. The initial upswing of the Shuttle Loop is mostly used at the end of Meta Knight's [[combo]]s. | ||
| Line 9: | Line 9: | ||
Overall, it is not uncommon for Shuttle Loop to be considered one of the best moves in all of ''Brawl'' as a result of its high power, insane speed, distance, glide, offstage setups, and all-around versatility. | Overall, it is not uncommon for Shuttle Loop to be considered one of the best moves in all of ''Brawl'' as a result of its high power, insane speed, distance, glide, offstage setups, and all-around versatility. | ||
{{ | ==Hitboxes== | ||
===Grounded=== | |||
{{BrawlHitboxTableHeader}} | |||
{{HitboxTableTitle|Clean hit 1|24}} | |||
{{BrawlHitboxTableRow | |||
|id=0 | |||
|damage=9% | |||
|sd=0 | |||
|angle=70 | |||
|bk=90 | |||
|ks=80 | |||
|fkv=0 | |||
|r=408000 | |||
|bn=0 | |||
|ypos=720000 | |||
|zpos=720000 | |||
|ff=90000 | |||
|rawflags=00100010100000110000011010000010 | |||
}} | |||
{{BrawlHitboxTableRow | |||
|id=1 | |||
|damage=9% | |||
|sd=0 | |||
|angle=80 | |||
|bk=90 | |||
|ks=80 | |||
|fkv=0 | |||
|r=408000 | |||
|bn=0 | |||
|zpos=720000 | |||
|ff=90000 | |||
|rawflags=00100010100000110000011010000010 | |||
}} | |||
{{HitboxTableTitle|Late hit 1|24}} | |||
{{BrawlHitboxTableRow | |||
|id=0 | |||
|damage=6% | |||
|sd=0 | |||
|angle=70 | |||
|bk=70 | |||
|ks=30 | |||
|fkv=0 | |||
|r=360000 | |||
|bn=0 | |||
|ypos=720000 | |||
|zpos=720000 | |||
|ff=90000 | |||
|rawflags=00100010100000110000011010000010 | |||
}} | |||
{{BrawlHitboxTableRow | |||
|id=1 | |||
|damage=6% | |||
|sd=0 | |||
|angle=70 | |||
|bk=70 | |||
|ks=30 | |||
|fkv=0 | |||
|r=360000 | |||
|bn=0 | |||
|zpos=720000 | |||
|ff=90000 | |||
|rawflags=00100010100000110000011010000010 | |||
}} | |||
{{HitboxTableTitle|Hit 2|24}} | |||
{{BrawlHitboxTableRow | |||
|id=0 | |||
|damage=6% | |||
|sd=0 | |||
|angle=110 | |||
|bk=0 | |||
|ks=100 | |||
|fkv=0 | |||
|r=300000 | |||
|bn=6 | |||
|ff=90000 | |||
|rawflags=00100000100000110000011010000010 | |||
}} | |||
|} | |||
=== | ===Aerial=== | ||
==== | {{BrawlHitboxTableHeader}} | ||
{{HitboxTableTitle|Clean hit|24}} | |||
{{BrawlHitboxTableRow | |||
|id=0 | |||
|damage=9% | |||
|sd=0 | |||
|angle=30 | |||
|bk=90 | |||
|ks=60 | |||
|fkv=0 | |||
|r=420000 | |||
|bn=6 | |||
|zpos=240000 | |||
|rawflags=00100000100000110000011010000010 | |||
}} | |||
{{HitboxTableTitle|Late hit|24}} | |||
{{BrawlHitboxTableRow | |||
|id=0 | |||
|damage=5% | |||
|sd=0 | |||
|angle=361 | |||
|bk=30 | |||
|ks=80 | |||
|fkv=0 | |||
|r=180000 | |||
|bn=6 | |||
|rawflags=00100000100000110000011001000010 | |||
}} | |||
|} | |||
==== | ==Timing== | ||
===Ground=== | |||
{|class="wikitable" | |||
!Intangible | |||
|5-8 | |||
|- | |||
!Hit 1 (clean) | |||
|8-9 | |||
|- | |||
!Hit 1 (late) | |||
|10-12 | |||
|- | |||
!Hit 2 | |||
|22-31 | |||
|- | |||
!Animation length | |||
|31 | |||
|} | |||
{{FrameStripStart}} | |||
|{{FrameStrip|t=Lag|c=7}}{{FrameStrip|t=Hitbox|c=2|e=HitboxChangeS}}{{FrameStrip|t=Hitbox|c=3|s=HitboxChangeE}}{{FrameStrip|t=Lag|c=9}}{{FrameStrip|t=Hitbox|c=10}} | |||
|- | |||
|{{FrameStrip|t=Vulnerable|c=4}}{{FrameStrip|t=Intangible|c=4}}{{FrameStrip|t=Vulnerable|c=23}} | |||
{{FrameStripEnd}} | |||
===Air=== | |||
{|class="wikitable" | |||
!Clean hit | |||
|8-14 | |||
|- | |||
!Late hit | |||
|15-37 | |||
|- | |||
!Animation length | |||
|37 | |||
|} | |||
{{FrameStripStart}} | |||
{{FrameStrip|t=Lag|c=7}}{{FrameStrip|t=Hitbox|c=7|e=HitboxChangeS}}{{FrameStrip|t=Hitbox|c=23|s=HitboxChangeE}} | |||
{{FrameStripEnd}} | |||
{{FrameIconLegend|lag=y|hitbox=y|hitboxchange=y}} | |||
{{MvSubNavMetaKnight|g=SSBB}} | {{MvSubNavMetaKnight|g=SSBB}} | ||
Latest revision as of 15:31, June 6, 2024
Overview[edit]
Meta Knight's up special, Shuttle Loop, allows him to jump into the air a high vertical distance, go into a loop, and then glide forward. If he ends the glide early or does a glide attack, it will make him helpless. This special move makes Meta Knight the only character that can glide twice without touching the ground. The sweetspot (at the startup on the ground) does around 9% and has powerful vertical knockback, making it a good finisher. However, after the initial sweetspot, the hitboxes deal weak knockback. Additionally, when sweetspotted in midair, it sends opponents on a semi-spike trajectory, and since it has almost no start-up lag and very strong base knockback (higher than his forward smash and down smash, though it has lower knockback scaling), it is very deadly to the opponent, and almost guarantees a KO on some characters with poor horizontal recovery such as Ike. It can also be used to stage spike characters with slow vertical recoveries, such as Falco. It can even be used in a reverse fashion after an edge jump to hit a recovering opponent behind Meta Knight. However, doing it while not facing the stage is risky as the move makes him helpless, and combined with Meta Knight's poor air speed, it can be difficult to return to the stage safely when performed this way. The initial upswing of the Shuttle Loop is mostly used at the end of Meta Knight's combos.
When the move is used as an edgeguarding move just above the edge, it is recommended to cancel the move with a jump button. Using a glide attack will cause Meta Knight to propel forward a further distance, with the momentum preventing him from being able to reach the edge, resulting in a SD. If a jump button if pressed, Meta Knight will simply drop down quickly. The move can also be cancelled by tilting the Control Stick back, though this cannot be performed quickly. A notable use of the move is that it can autocancel if Meta Knight uses it from below a soft platform at the right distance. This allows Meta Knight to execute any action immediately after he lands, including dropping through the platform without becoming helpless. Meta Knight can also perform this by using the move just below the lips of certain stages (such as Final Destination and Smashville) while facing the opposite direction of the stage (if facing the towards the stage, he will quickly grab the edge instead, sliding up the stage lips in the process).
Overall, it is not uncommon for Shuttle Loop to be considered one of the best moves in all of Brawl as a result of its high power, insane speed, distance, glide, offstage setups, and all-around versatility.
Hitboxes[edit]
Grounded[edit]
Aerial[edit]
Timing[edit]
Ground[edit]
| Intangible | 5-8 |
|---|---|
| Hit 1 (clean) | 8-9 |
| Hit 1 (late) | 10-12 |
| Hit 2 | 22-31 |
| Animation length | 31 |
Air[edit]
| Clean hit | 8-14 |
|---|---|
| Late hit | 15-37 |
| Animation length | 37 |
Lag time |
Hitbox |
Hitbox change |
|

