Yoshi (SSBU)/Down tilt: Difference between revisions
From SmashWiki, the Super Smash Bros. wiki
Jump to navigationJump to search
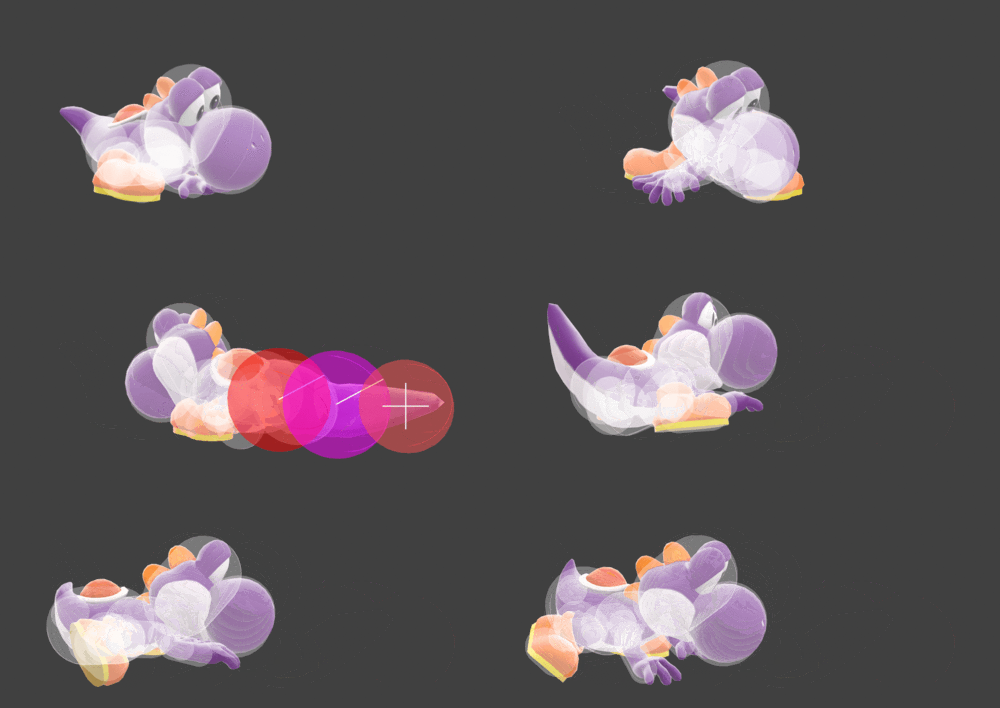
(New Page: {{ArticleIcons|ssbu=y}} thumb|500px|Hitbox visualization showing Yoshi's down tilt. {{competitive expertise}} ==Overview== ==Hitboxes== {{UltimateHitboxTable...) |
No edit summary |
||
| (One intermediate revision by one other user not shown) | |||
| Line 17: | Line 17: | ||
|ypos=0.0 | |ypos=0.0 | ||
|zpos=0.0 | |zpos=0.0 | ||
| | |trip=30 | ||
|type=Tail | |type=Tail | ||
|effect=Normal | |effect=Normal | ||
| Line 35: | Line 35: | ||
|ypos=0.0 | |ypos=0.0 | ||
|zpos=0.0 | |zpos=0.0 | ||
| | |trip=30 | ||
|type=Tail | |type=Tail | ||
|effect=Normal | |effect=Normal | ||
| Line 53: | Line 53: | ||
|ypos=0.0 | |ypos=0.0 | ||
|zpos=0.0 | |zpos=0.0 | ||
| | |trip=40 | ||
|type=Tail | |type=Tail | ||
|effect=Normal | |effect=Normal | ||
|sfx=Slap | |sfx=Slap | ||
|slvl= | |slvl=S | ||
}} | }} | ||
|} | |} | ||
| Line 66: | Line 66: | ||
|- | |- | ||
!Interruptible | !Interruptible | ||
| | |24 | ||
|- | |- | ||
!Animation length | !Animation length | ||
| | |37 | ||
|} | |} | ||
{{FrameStripStart}} | {{FrameStripStart}} | ||
{{FrameStrip|t=Lag|c=7}}{{FrameStrip|t=Hitbox|c=3}}{{FrameStrip|t=Lag|c= | {{FrameStrip|t=Lag|c=7}}{{FrameStrip|t=Hitbox|c=3}}{{FrameStrip|t=Lag|c=13}}{{FrameStrip|t=Interruptible|c=14}} | ||
{{FrameStripEnd}} | {{FrameStripEnd}} | ||
{{FrameIconLegend|lag=y|hitbox=y|interruptible=y}} | {{FrameIconLegend|lag=y|hitbox=y|interruptible=y}} | ||
==Trivia== | |||
*The move has a 30% [[trip]] chance with the sweetspot and middlespot, and a 40% trip chance with the sourspot. However, only the sourspot has a launch angle that can cause tripping without a slant, and due to the move's high base knockback, it can only cause tripping with knockback-reducing effects on the opponent (such as being [[giant]]). | |||
{{MvSubNavYoshi|g=SSBU}} | {{MvSubNavYoshi|g=SSBU}} | ||
[[Category:Yoshi (SSBU)]] | [[Category:Yoshi (SSBU)]] | ||
[[Category:Down tilts (SSBU)]] | [[Category:Down tilts (SSBU)]] | ||
Latest revision as of 11:26, May 11, 2022
Overview[edit]
Hitboxes[edit]
Timing[edit]
| Hitboxes | 8-10 |
|---|---|
| Interruptible | 24 |
| Animation length | 37 |
Lag time |
Hitbox |
Interruptible |
Trivia[edit]
- The move has a 30% trip chance with the sweetspot and middlespot, and a 40% trip chance with the sourspot. However, only the sourspot has a launch angle that can cause tripping without a slant, and due to the move's high base knockback, it can only cause tripping with knockback-reducing effects on the opponent (such as being giant).
|

