Super Smash Bros. Ultimate

Mario (SSBU)/Up aerial: Difference between revisions

From SmashWiki, the Super Smash Bros. wiki
Jump to navigationJump to search
mNo edit summary
Tags: Mobile edit Disambiguation links
 
(7 intermediate revisions by 5 users not shown)
Line 3: Line 3:
{{competitive expertise}}
==Overview==
==Overview==
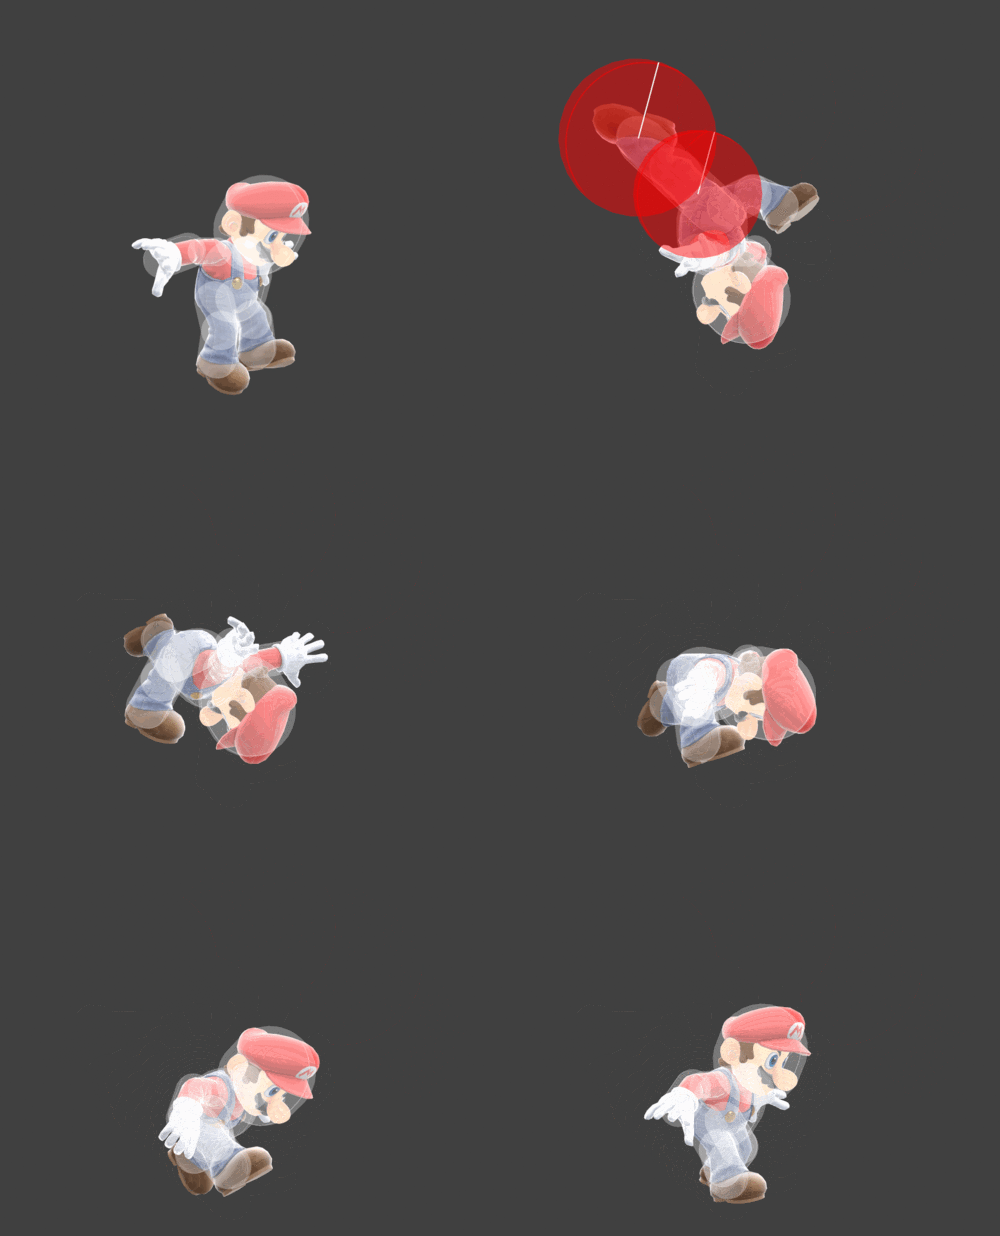
An overhead kick. It’s one of the fastest up aerials in the game, coming out at frame 4. It also launches opponents vertically, which combined with the move having little base knockback and no sourspots, gives it extreme combo and juggling capabilities. It is Mario’s most useful combo tool and his primary way to rack up damage and set up for early kills.
Additionally, the move can also be a situational KO move near the upper blast line at high percents, capable of killing middleweights at 165% from the second platform of [[battlefield]].
==Hitboxes==
==Hitboxes==
{{UltimateHitboxTableHeader}}
Line 69: Line 72:
===Landing lag===
===Landing lag===
{|class="wikitable"
{|class="wikitable"
!Interruptible
|7
|-
!Animation length
!Animation length
|6
|23
|}
|}


{{FrameStripStart}}
{{FrameStripStart}}
{{FrameStrip|t=Lag|c=6}}
{{FrameStrip|t=Lag|c=6}}{{FrameStrip|t=Interruptible|c=17}}
{{FrameStripEnd}}
{{FrameStripEnd}}
{{FrameIconLegend|lag=y|hitbox=y|autocancel=y|interruptible=y}}

Latest revision as of 18:39, July 6, 2024

Hitbox visualization showing Mario's up aerial.
Competitive.png This article or section may require competitive expertise.
You can discuss this issue on the talk page or edit this page to improve it.

Overview[edit]

An overhead kick. It’s one of the fastest up aerials in the game, coming out at frame 4. It also launches opponents vertically, which combined with the move having little base knockback and no sourspots, gives it extreme combo and juggling capabilities. It is Mario’s most useful combo tool and his primary way to rack up damage and set up for early kills. Additionally, the move can also be a situational KO move near the upper blast line at high percents, capable of killing middleweights at 165% from the second platform of battlefield.

Hitboxes[edit]

ID Part Rehit rate Damage SD Angle Angle type BK KS FKV Set weight Radius Bone Offset SDI× T% Clang Rebound Effect Type G A Sound Direct Hit bits Hit part Blockable Reflectable Absorbable Flinchless No GFX Heedless
0 0 0 7.0% 0 AngleIcon75.png Standard 10 135 0 HitboxTableIcon(False).png 4.4 legr 1.2 0.0 0.0 1.0× 1.0× 0% HitboxTableIcon(Clang).png HitboxTableIcon(Rebound).png Normal (effect) Foot (type) HitboxTableIcon(GroundedTrue).png HitboxTableIcon(AerialTrue).png M Kick SpecialsDirect.png All All HitboxTableIcon(Blockable).png HitboxTableIcon(Unreflectable).png HitboxTableIcon(Unabsorbable).png HitboxTableIcon(False).png HitboxTableIcon(False).png HitboxTableIcon(False).png
1 0 0 7.0% 0 AngleIcon75.png Standard 10 135 0 HitboxTableIcon(False).png 5.5 kneer 3.8 0.0 0.0 1.0× 1.0× 0% HitboxTableIcon(Clang).png HitboxTableIcon(Rebound).png Normal (effect) Foot (type) HitboxTableIcon(GroundedTrue).png HitboxTableIcon(AerialTrue).png M Kick SpecialsDirect.png All All HitboxTableIcon(Blockable).png HitboxTableIcon(Unreflectable).png HitboxTableIcon(Unabsorbable).png HitboxTableIcon(False).png HitboxTableIcon(False).png HitboxTableIcon(False).png

Timing[edit]

Attack[edit]

Initial autocancel 1
Hitboxes 4-7
Ending autocancel 17-
Interruptible 31
Animation length 39
FrameIcon(Lag).png FrameIcon(Lag).png FrameIcon(Lag).png FrameIcon(Hitbox).png FrameIcon(Hitbox).png FrameIcon(Hitbox).png FrameIcon(Hitbox).png FrameIcon(Lag).png FrameIcon(Lag).png FrameIcon(Lag).png FrameIcon(Lag).png FrameIcon(Lag).png FrameIcon(Lag).png FrameIcon(Lag).png FrameIcon(Lag).png FrameIcon(Lag).png FrameIcon(Lag).png FrameIcon(Lag).png FrameIcon(Lag).png FrameIcon(Lag).png FrameIcon(Lag).png FrameIcon(Lag).png FrameIcon(Lag).png FrameIcon(Lag).png FrameIcon(Lag).png FrameIcon(Lag).png FrameIcon(Lag).png FrameIcon(Lag).png FrameIcon(Lag).png FrameIcon(Lag).png FrameIcon(Interruptible).png FrameIcon(Interruptible).png FrameIcon(Interruptible).png FrameIcon(Interruptible).png FrameIcon(Interruptible).png FrameIcon(Interruptible).png FrameIcon(Interruptible).png FrameIcon(Interruptible).png FrameIcon(Interruptible).png
FrameIcon(Autocancel).png FrameIcon(Blank).png FrameIcon(Blank).png FrameIcon(Blank).png FrameIcon(Blank).png FrameIcon(Blank).png FrameIcon(Blank).png FrameIcon(Blank).png FrameIcon(Blank).png FrameIcon(Blank).png FrameIcon(Blank).png FrameIcon(Blank).png FrameIcon(Blank).png FrameIcon(Blank).png FrameIcon(Blank).png FrameIcon(Blank).png FrameIcon(Autocancel).png FrameIcon(Autocancel).png FrameIcon(Autocancel).png FrameIcon(Autocancel).png FrameIcon(Autocancel).png FrameIcon(Autocancel).png FrameIcon(Autocancel).png FrameIcon(Autocancel).png FrameIcon(Autocancel).png FrameIcon(Autocancel).png FrameIcon(Autocancel).png FrameIcon(Autocancel).png FrameIcon(Autocancel).png FrameIcon(Autocancel).png FrameIcon(Autocancel).png FrameIcon(Autocancel).png FrameIcon(Autocancel).png FrameIcon(Autocancel).png FrameIcon(Autocancel).png FrameIcon(Autocancel).png FrameIcon(Autocancel).png FrameIcon(Autocancel).png FrameIcon(Autocancel).png

Landing lag[edit]

Interruptible 7
Animation length 23
FrameIcon(Lag).png FrameIcon(Lag).png FrameIcon(Lag).png FrameIcon(Lag).png FrameIcon(Lag).png FrameIcon(Lag).png FrameIcon(Interruptible).png FrameIcon(Interruptible).png FrameIcon(Interruptible).png FrameIcon(Interruptible).png FrameIcon(Interruptible).png FrameIcon(Interruptible).png FrameIcon(Interruptible).png FrameIcon(Interruptible).png FrameIcon(Interruptible).png FrameIcon(Interruptible).png FrameIcon(Interruptible).png FrameIcon(Interruptible).png FrameIcon(Interruptible).png FrameIcon(Interruptible).png FrameIcon(Interruptible).png FrameIcon(Interruptible).png FrameIcon(Interruptible).png
Legend (1 square = 1 frame)
Lag
Lag time
Hitbox
Hitbox
Auto-canceling
Autocancel
Interruptibility
Interruptible