SSB4 Icon.png

Zero Suit Samus (SSB4)/Up special/Default: Difference between revisions

From SmashWiki, the Super Smash Bros. wiki
Jump to navigationJump to search
m (Text replacement - " " to " ")
No edit summary
Line 2: Line 2:
{{disambig2|the hitbox visualization in ''[[Super Smash Bros. 4]]''|the move itself|Boost Kick}}
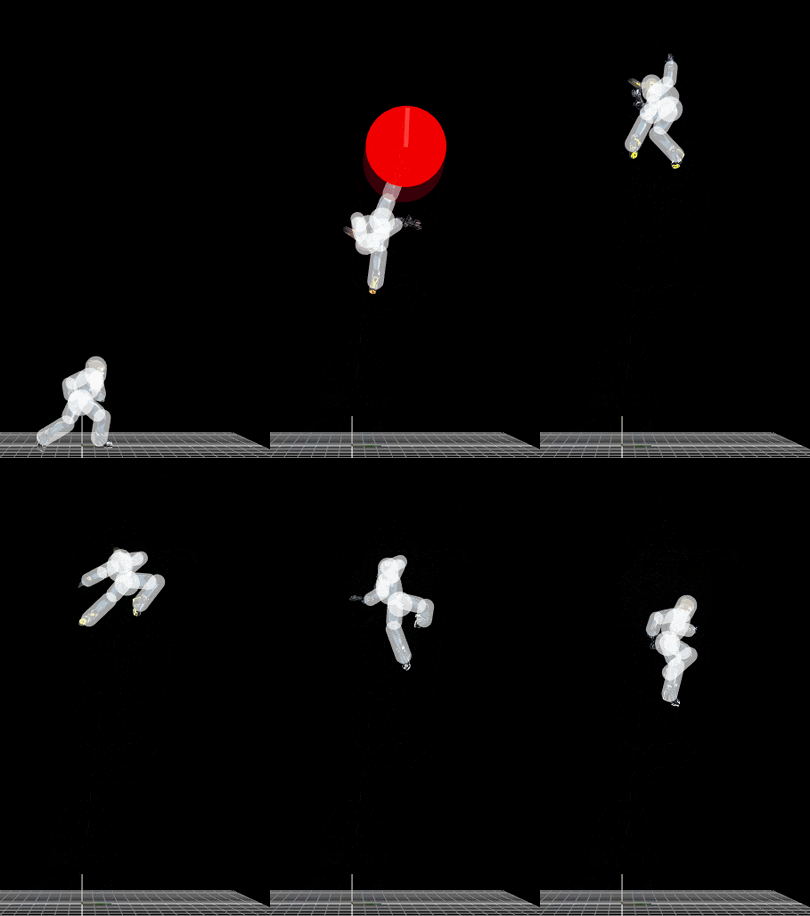
[[File:ZSSBoostKick.gif|thumb|270px|Hitbox visualization showing Zero Suit Samus's Boost Kick.]]
[[File:ZSSBoostKick.gif|thumb|270px|Hitbox visualization showing Zero Suit Samus's Boost Kick.]]
==Overview==
{{competitive expertise}}
{{technical data}}
 
==Update history==
'''{{GameIcon|ssb4}} [[1.1.4]]'''
*{{nerf|Knockback scaling (220 → 209).}}
*{{change|Angle (50° → 48°).}}


==Hitboxes==
==Hitboxes==
Line 174: Line 180:
}}
}}
|}
|}
{{technical data}}


{{MvSubNavZeroSuitSamus|g=SSB4}}

Revision as of 04:04, September 21, 2021

This article is about the hitbox visualization in Super Smash Bros. 4. For the move itself, see Boost Kick.
Hitbox visualization showing Zero Suit Samus's Boost Kick.

Overview

Competitive.png This article or section may require competitive expertise.
You can discuss this issue on the talk page or edit this page to improve it.

Update history

Super Smash Bros. 4 1.1.4

  • Nerf Knockback scaling (220 → 209).
  • Change Angle (50° → 48°).

Hitboxes

Looping hit rehits every 4 frames.

ID Part Damage SD Angle BK KS FKV Radius Bone Offset SDIx T% Clang Rebound Type Effect G A Sound Direct
Hit 1
0 0 5% 0 AngleIcon90.png 0 100 150 4.0 0 0.0 8.0 11.0 1.0x 1.0x 0% HitboxTableIcon(Clang).png HitboxTableIcon(Rebound).png TypeIcon(Foot).png EffectIcon(Normal).png HitboxTableIcon(GroundedTrue).png HitboxTableIcon(AerialTrue).png L Kick SpecialsDirect.png
1 0 5% 0 AngleIcon84.png 0 100 150 4.0 0 0.0 8.0 5.0 1.0x 1.0x 0% HitboxTableIcon(Clang).png HitboxTableIcon(Rebound).png TypeIcon(Foot).png EffectIcon(Normal).png HitboxTableIcon(GroundedTrue).png HitboxTableIcon(AerialTrue).png L Kick SpecialsDirect.png
Hit 2 (loop)
0 0 1.3% 0 AngleIcon87.png 0 100 110 7.0 0 0.0 19.0 5.5 0.0x 1.0x 0% HitboxTableIcon(Clang).png HitboxTableIcon(Rebound).png TypeIcon(Foot).png EffectIcon(Normal).png HitboxTableIcon(GroundedFalse).png HitboxTableIcon(AerialTrue).png M Kick SpecialsDirect.png
1 0 1.3% 0 AngleIcon87.png 0 100 110 7.0 0 0.0 19.0 5.5 0.0x 1.0x 0% HitboxTableIcon(Clang).png HitboxTableIcon(Rebound).png TypeIcon(Foot).png EffectIcon(Normal).png HitboxTableIcon(GroundedTrue).png HitboxTableIcon(AerialFalse).png M Kick SpecialsDirect.png
Hit 3
0 1 1.3% 0 Autolink angle (366) 0 100 40 7.0 0 0.0 19.0 5.5 0.0x 1.0x 0% HitboxTableIcon(Clang).png HitboxTableIcon(Rebound).png TypeIcon(Foot).png EffectIcon(Normal).png HitboxTableIcon(GroundedTrue).png HitboxTableIcon(AerialTrue).png M Kick SpecialsIndirect.png
Hit 4
0 1 1.3% 0 AngleIcon290.png 0 100 16 4.0 0 0.0 20.0 5.5 0.0x 1.0x 0% HitboxTableIcon(Clang).png HitboxTableIcon(Rebound).png TypeIcon(Foot).png EffectIcon(Normal).png HitboxTableIcon(GroundedTrue).png HitboxTableIcon(AerialTrue).png M Kick SpecialsIndirect.png
1 1 1.3% 0 AngleIcon90.png 0 100 12 7.0 0 0.0 12.0 10.0 0.0x 1.0x 0% HitboxTableIcon(Clang).png HitboxTableIcon(Rebound).png TypeIcon(Foot).png EffectIcon(Normal).png HitboxTableIcon(GroundedTrue).png HitboxTableIcon(AerialTrue).png M Kick SpecialsIndirect.png
Hit 5
0 0 4% 0 AngleIcon48.png 50 209 0 8.0 0 0.0 12.5 11.0 0.0x 2.5x 0% HitboxTableIcon(Clang).png HitboxTableIcon(Rebound).png TypeIcon(Foot).png EffectIcon(Normal).png HitboxTableIcon(GroundedTrue).png HitboxTableIcon(AerialTrue).png L Kick SpecialsDirect.png
Data.png This article or section may require additional technical data.
You can discuss this issue on the talk page or edit this page to improve it.