Bowser Jr. (SSB4)/Up tilt: Difference between revisions
From SmashWiki, the Super Smash Bros. wiki
Jump to navigationJump to search
No edit summary |
(added an overview for the move.) |
||
| Line 1: | Line 1: | ||
{{ArticleIcons|ssb4=y}} | {{ArticleIcons|ssb4=y}} | ||
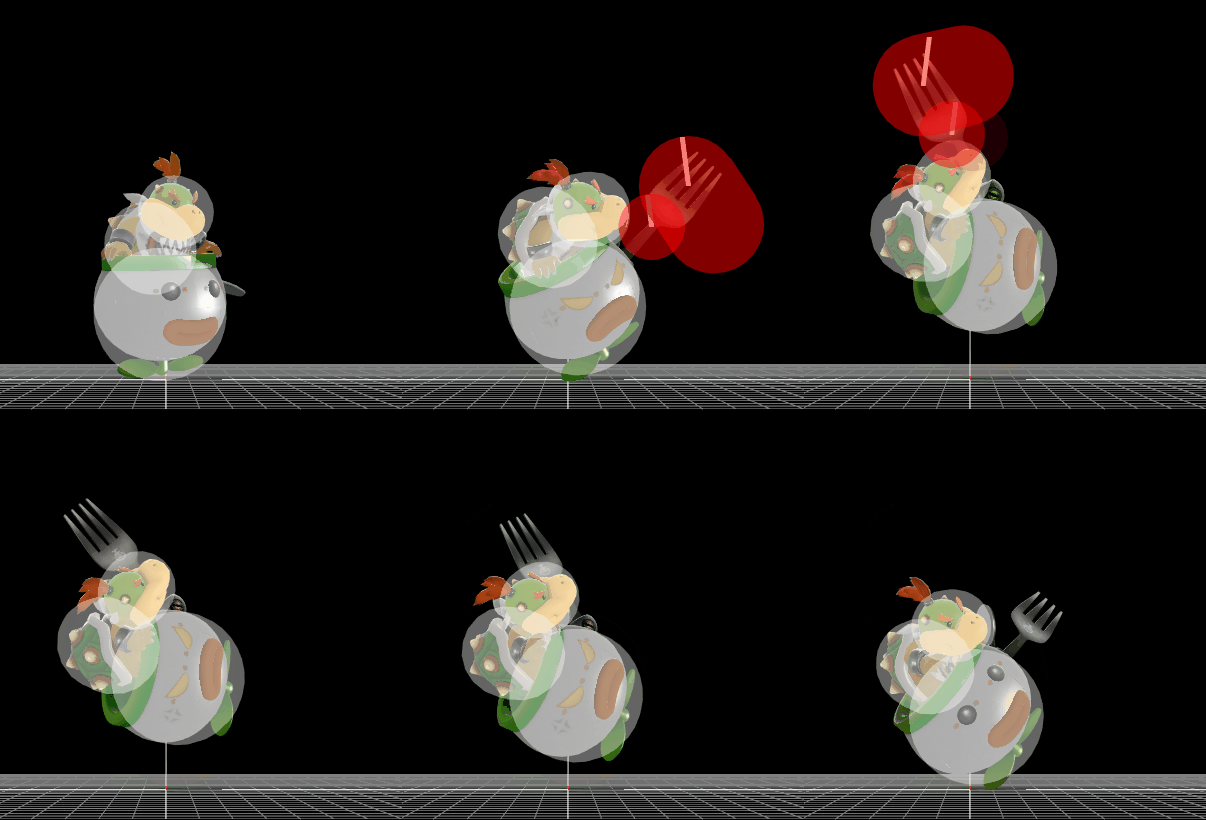
[[File:BowserJrUpTilt.gif|thumb|270px|Hitbox visualization showing Bowser Jr.'s up tilt.]] | [[File:BowserJrUpTilt.gif|thumb|270px|Hitbox visualization showing Bowser Jr.'s up tilt.]] | ||
{{technical data}} | {{technical data}} | ||
==Overview== | ==Overview== | ||
{{SSB4|Bowser Jr.}} leans back, swinging a large metal fork upwards. The attack deals 6% and | {{SSB4|Bowser Jr.}} leans back, swinging a large metal fork upwards. The attack deals 6% with low knockback, and combos into itself, up smash or up aerials. The attack, while disjointed, has notable trouble hitting smaller sized opponents, and makes for a bad [[out of shield]] option, as it fails to catch many landing animations. The disjoint makes it a decent anti air, although the weak damage and knockback doesn't allow the move to kill until very high percents. Thus, it is mainly used as a juggling tool or early percent combo tool, and not used quite often especially on grounded opponents due to its poor hitbox against them. | ||
==Hitboxes== | ==Hitboxes== | ||
| Line 33: | Line 32: | ||
{{FrameIconLegend|lag=y|hitbox=y|interruptible=y}} | {{FrameIconLegend|lag=y|hitbox=y|interruptible=y}} | ||
{{MvSubNavBowserJr|g=SSB4}} | {{MvSubNavBowserJr|g=SSB4}} | ||
Revision as of 02:26, November 10, 2018
Overview
Bowser Jr. leans back, swinging a large metal fork upwards. The attack deals 6% with low knockback, and combos into itself, up smash or up aerials. The attack, while disjointed, has notable trouble hitting smaller sized opponents, and makes for a bad out of shield option, as it fails to catch many landing animations. The disjoint makes it a decent anti air, although the weak damage and knockback doesn't allow the move to kill until very high percents. Thus, it is mainly used as a juggling tool or early percent combo tool, and not used quite often especially on grounded opponents due to its poor hitbox against them.
Hitboxes
| Hitbox Index | Originates From | Damage | Angle | Knockback Scaling | Fixed Knockback | Base Knockback | Radius | X-Offset | Y-Offset | Z-Offset | Effect | Tripping Chance | Freeze Frame Multiplier | SDI Multiplier | Shield Damage |
|---|---|---|---|---|---|---|---|---|---|---|---|---|---|---|---|
| 0 | Fork | 6% | 97 | 110 | 0 | 48 | 4.5 | 0 | 0 | 4 | Slash | None | 1 | 1 | 0 |
| 1 | Fork | 6% | 97 | 110 | 0 | 48 | 3 | 0 | 0 | -1 | Slash | None | 1 | 1 | 0 |
Timing
| Hitboxes | 7-14 |
|---|---|
| Interruptible | 33 |
| Animation length | 41 |
Lag time |
Hitbox |
Interruptible |
|

