From SmashWiki, the Super Smash Bros. wiki
Jump to navigationJump to search
- This article is about the hitbox visualization in Super Smash Bros. Ultimate. For the move itself, see Head-On Assault.
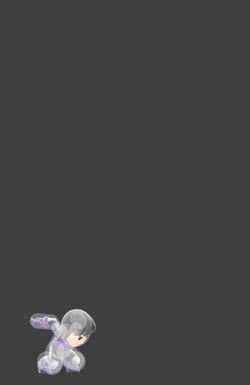
Hitbox visualization showing Mii Brawler's first down special, Head-On Assault, when used on the ground.
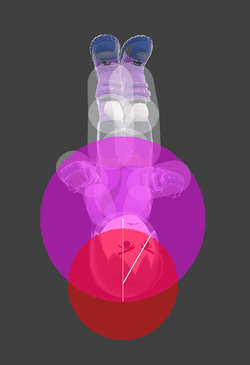
Hitbox visualization showing Mii Brawler's Head-On Assault when falling.
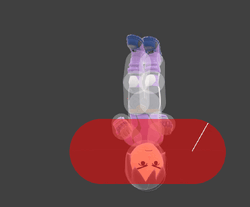
Hitbox visualization showing Mii Brawler's Head-On Assault when landing.
Overview[edit]

|
This article or section may require competitive expertise.
You can discuss this issue on the talk page or edit this page to improve it.
|
Hitboxes[edit]
| ID |
Part |
Rehit rate |
Damage |
SD |
Angle |
Angle type |
BK |
KS |
FKV |
Set weight |
Radius |
Bone |
Offset |
H× |
SDI× |
T% |
Clang |
Rebound |
Effect |
Type |
G |
A |
Sound |
Direct |
Hit bits |
Hit part |
Blockable |
Reflectable |
Absorbable |
Flinchless |
No GFX |
Heedless
|
| Early ascent
|
| 0 |
0 |
0 |
6.0% |
0 |
 |
Standard |
0 |
100 |
83 |
 |
3.0 |
top |
0.0 |
3.0 to 7.0 |
8.0 |
1.0× |
0.2× |
0% |
 |
 |
 |
 |
 |
 |
 Kick Kick |
 |
All |
All |
 |
 |
 |
 |
|
|
| 1 |
0 |
0 |
6.0% |
0 |
 |
Standard |
0 |
100 |
80 |
|
5.0 |
top |
0.0 |
5.0 |
9.0 to 12.0 |
1.0× |
0.2× |
0% |
|
|
|
|
|
|
Kick |
|
All |
All |
|
|
|
|
|
|
| 2 |
0 |
0 |
6.0% |
0 |
 |
Standard |
0 |
100 |
80 |
|
5.0 |
top |
0.0 |
5.0 |
9.0 to 15.0 |
1.0× |
0.2× |
0% |
|
|
|
|
|
|
Kick |
|
All |
All |
|
|
|
|
|
|
| Mid ascent
|
| 0 |
0 |
0 |
6.0% |
0 |
 |
Standard |
40 |
5 |
0 |
|
4.0 |
kneel |
4.0 |
-3.0 |
0.0 |
1.0× |
0.2× |
0% |
|
|
|
|
|
|
Kick |
|
All |
All |
|
|
|
|
|
|
| Late ascent
|
| 0 |
0 |
0 |
6.0% |
0 |
 |
Standard |
35 |
5 |
0 |
|
4.0 |
kneel |
4.0 |
-3.0 |
0.0 |
1.0× |
0.2× |
0% |
|
|
|
|
|
|
Kick |
|
All |
All |
|
|
|
|
|
|
| Early fall
|
| 0 |
0 |
0 |
16.0% |
5 |
 |
Standard |
120 |
51 |
0 |
|
4.0 |
top |
0.0 |
0.5 |
-0.5 |
0.9× |
1.0× |
0% |
 |
 |
|
 |
|
 |
 Kick Kick |
|
All |
All |
|
|
|
|
|
|
| 1 |
0 |
1 |
1.0% |
0 |
 |
Standard |
0 |
100 |
60 |
|
6.0 |
top |
0.0 |
5.2 |
-0.5 |
0.2× |
0.0× |
0% |
|
|
|
|
 |
|
 Kick Kick |
|
All |
All |
|
|
|
|
|
|
| Mid fall
|
| 0 |
0 |
0 |
16.0% |
5 |
|
Standard |
120 |
51 |
0 |
|
4.0 |
top |
0.0 |
0.5 |
-0.5 |
0.9× |
1.0× |
0% |
|
|
|
|
|
|
Kick |
|
All |
All |
|
|
|
|
|
|
| 1 |
0 |
1 |
1.0% |
0 |
|
Standard |
0 |
100 |
207 |
|
6.0 |
top |
0.0 |
5.2 |
-0.5 |
0.2× |
0.0× |
0% |
|
|
|
|
|
|
Kick |
|
All |
All |
|
|
|
|
|
|
| Late fall
|
| 0 |
0 |
0 |
16.0% |
5 |
|
Standard |
120 |
51 |
0 |
|
4.0 |
top |
0.0 |
0.5 |
-0.5 |
0.9× |
1.0× |
0% |
|
|
|
|
|
|
Kick |
|
All |
All |
|
|
|
|
|
|
| 1 |
0 |
2 |
1.0% |
0 |
|
Standard |
0 |
100 |
130 |
|
6.0 |
top |
0.0 |
5.2 |
-0.5 |
0.2× |
0.0× |
0% |
|
|
|
|
|
|
Kick |
|
All |
All |
|
|
|
|
|
|
| Latest fall
|
| 0 |
0 |
0 |
16.0% |
5 |
|
Standard |
120 |
51 |
0 |
|
4.0 |
top |
0.0 |
0.5 |
-0.5 |
0.9× |
1.0× |
0% |
|
|
|
|
|
|
Kick |
|
All |
All |
|
|
|
|
|
|
| 1 |
0 |
2 |
1.0% |
0 |
|
Standard |
0 |
100 |
240 |
|
6.0 |
top |
0.0 |
5.2 |
-0.5 |
0.2× |
0.0× |
0% |
|
|
|
|
|
|
Kick |
|
All |
All |
|
|
|
|
|
|
| Landing
|
| 1 |
0 |
0 |
14.0% |
0 |
|
Standard |
120 |
48 |
0 |
|
4.0 |
top |
0.0 |
4.0 |
5.0 to -6.0 |
1.1× |
1.0× |
0% |
|
|
|
|
|
|
Kick |
|
All |
All |
|
|
|
|
|
|
| Ascent hitboxes
|
8, 9-11, 12-15
|
| Falling hitboxes
|
31-32, 33, 34-35, 36+
|
| Falling hitboxes
|
23-24, 25, 26-27, 28+
|
Landing[edit]
| Hitboxes
|
1-4
|
| Interruptible
|
59
|
| Animation length
|
70
|
|
 |

|
Mii Brawler's moveset
|
|


