Peach (SSBM)/Down smash: Difference between revisions
mNo edit summary |
|||
| Line 4: | Line 4: | ||
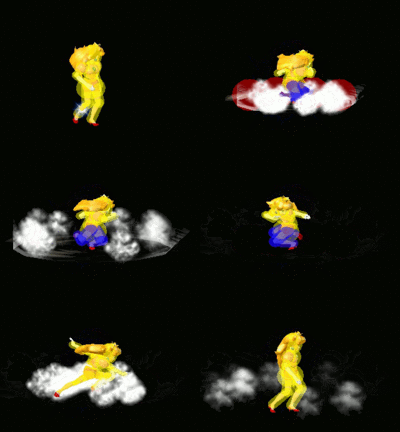
[[File:Peach Down Smash Hitbox Melee.gif|thumb|The hitbox of Peach's d-smash.]] | [[File:Peach Down Smash Hitbox Melee.gif|thumb|The hitbox of Peach's d-smash.]] | ||
Peach spins around on the ground with her dress, dealing damage. Despite consisting of five hits, the move is designed as a single-hit smash attack, with decent damage, above-average base knockback, and slightly reduced knockback scaling. As a result, if multiple hits land for whatever reason, the move can deal very high damage and knockback - if a foolish or outguessed opponent at low damage [[crouch cancel]]s, the attack can deal a theoretical {{ChargedSmashDmgSSBM|64.96}} damage if all the hits land (due to how ''Melee''{{'}}s [[stale]]ness works), and even three hits can outdamage {{mvsub|Ganondorf|SSBM|up smash|poss=y}}. While its 140 launch angle is not much different than the [[Sakurai angle]] (reversed), it can still act as a deadly move against fast-fallers, whom it can KO as low as 20% near the edge. With its ridiculous damage potential at low percentages and decent power at high ones, overall it could be considered the best [[down smash]] and one of the best moves in the game, next to Fox's [[Fox (SSBM)/Down special|Reflector]]. It is well-known among the competitive community and gained such a high notoriety that both commentators and competitors alike commonly nickname it "The blender", "The meat grinder" or "The washing machine". Another popular nickname for it is "The equalizer" for its ability to instantly bring back a large percentage deficit. <ref>http://youtu.be/veLdaZhprZc?t=7m12s</ref> | Peach spins around on the ground with her dress, dealing damage. Despite consisting of five hits, the move is designed as a single-hit smash attack, with decent damage, above-average base knockback, and slightly reduced knockback scaling. As a result, if multiple hits land for whatever reason, the move can deal very high damage and knockback - if a foolish or outguessed opponent at low damage [[crouch cancel]]s, the attack can deal a theoretical {{ChargedSmashDmgSSBM|64.96}} damage if all the hits land (due to how ''Melee''{{'}}s [[stale]]ness works), and even three hits can outdamage {{mvsub|Ganondorf|SSBM|up smash|poss=y}}. While its 140 launch angle is not much different than the [[Sakurai angle]] (reversed), it can still act as a deadly move against fast-fallers, whom it can KO as low as 20% near the edge. With its ridiculous damage potential at low percentages and decent power at high ones, overall it could be considered the best [[down smash]] and one of the best moves in the game, next to Fox's [[Fox (SSBM)/Down special|Reflector]]. It is well-known among the competitive community and gained such a high notoriety that both commentators and competitors alike commonly nickname it "The blender", "The meat grinder" or "The washing machine". Another popular nickname for it is "The equalizer" for its ability to instantly bring back a large percentage deficit. <ref>http://youtu.be/veLdaZhprZc?t=7m12s</ref> | ||
Because of the numerous hitboxes, the attack is very effective against characters with large hurtboxes as all five hits are guaranteed to connect with the opponent. Giga Bowser, having the largest hurtbox of all the characters in Melee, is extremely vulnerable to Peach's d-smash as his heavy weight will keep him from flying away at low percentages which allows all five hits to connect and inflict heavy damage in a very short amount of time. | |||
==Hitboxes== | ==Hitboxes== | ||
Revision as of 04:38, July 25, 2016
Overview
Peach spins around on the ground with her dress, dealing damage. Despite consisting of five hits, the move is designed as a single-hit smash attack, with decent damage, above-average base knockback, and slightly reduced knockback scaling. As a result, if multiple hits land for whatever reason, the move can deal very high damage and knockback - if a foolish or outguessed opponent at low damage crouch cancels, the attack can deal a theoretical 64.96% damage if all the hits land (due to how Melee's staleness works), and even three hits can outdamage Ganondorf's up smash. While its 140 launch angle is not much different than the Sakurai angle (reversed), it can still act as a deadly move against fast-fallers, whom it can KO as low as 20% near the edge. With its ridiculous damage potential at low percentages and decent power at high ones, overall it could be considered the best down smash and one of the best moves in the game, next to Fox's Reflector. It is well-known among the competitive community and gained such a high notoriety that both commentators and competitors alike commonly nickname it "The blender", "The meat grinder" or "The washing machine". Another popular nickname for it is "The equalizer" for its ability to instantly bring back a large percentage deficit. [1] Because of the numerous hitboxes, the attack is very effective against characters with large hurtboxes as all five hits are guaranteed to connect with the opponent. Giga Bowser, having the largest hurtbox of all the characters in Melee, is extremely vulnerable to Peach's d-smash as his heavy weight will keep him from flying away at low percentages which allows all five hits to connect and inflict heavy damage in a very short amount of time.
Hitboxes
Timing
| Legs intangible | 3-24 |
|---|---|
| Charge interval | 3-4 |
| Hitboxes | 5-6, 9-10, 13-14, 17-18, 21-22 |
| Animation length | 39 |
| Interruptible | 46 |
| Hitboxes | |||||||||||||||||||||||||||||||||||||||
| Legs |
Lag time |
Charge interval |
Hitbox |
Vulnerable |
Intangible |
References
|
