SSBU Icon.png

Mii Swordfighter (SSBU)/Down tilt: Difference between revisions

From SmashWiki, the Super Smash Bros. wiki
Jump to navigationJump to search
Line 4: Line 4:
==Overview==
==Overview==


Along with being a good ranged option, its fast startup and low endlag provide effective close-quarters pressure that conditions opponents to shield and synergizes with Swordfighter's damaging down throw combos. Down tilt's launch angle also makes it a decent damage racking tool, as it can combo into dash attack, grab, forward aerial, [[Hero's Spin|Hero's Spin,]] and [[Power Thrust]] at low percents. For these reasons, it's not only considered their most useful tilt, but also one of the best normals in their arsenal.
A swift downward stab. Along with being a good ranged option, its fast startup and low endlag provide effective close-quarters pressure that conditions opponents to shield and synergizes with Swordfighter's damaging down throw combos. Down tilt's launch angle also makes it a decent damage racking tool, as it can combo into dash attack, grab, forward aerial, [[Hero's Spin|Hero's Spin,]] and [[Power Thrust]] at low percents. For these reasons, it's not only considered their most useful tilt, but also one of the best normals in their arsenal.


==Hitboxes==
==Hitboxes==

Revision as of 18:57, August 11, 2023

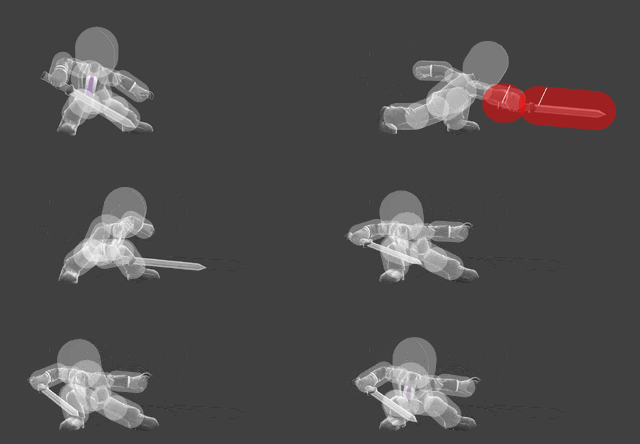
Hitbox visualization showing Mii Swordfighter's down tilt.
Competitive.png This article or section may require competitive expertise.
You can discuss this issue on the talk page or edit this page to improve it.

Overview

A swift downward stab. Along with being a good ranged option, its fast startup and low endlag provide effective close-quarters pressure that conditions opponents to shield and synergizes with Swordfighter's damaging down throw combos. Down tilt's launch angle also makes it a decent damage racking tool, as it can combo into dash attack, grab, forward aerial, Hero's Spin, and Power Thrust at low percents. For these reasons, it's not only considered their most useful tilt, but also one of the best normals in their arsenal.

Hitboxes

ID Part Rehit rate Damage SD Angle Angle type BK KS FKV Set weight Radius Bone Offset SDI× T% Clang Rebound Effect Type G A Sound Direct Hit bits Hit part Blockable Reflectable Absorbable Flinchless No GFX Heedless
0 0 0 8.0% 0 AngleIcon65.png Forward 50 80 0 HitboxTableIcon(False).png 2.4 top 0.0 3.3 to 2.7 13.0 to 20.0 1.0× 1.0× 30% HitboxTableIcon(Clang).png HitboxTableIcon(Rebound).png EffectIcon(Stab).png TypeIcon(Sword).png HitboxTableIcon(GroundedTrue).png HitboxTableIcon(AerialTrue).png M Slash SpecialsDirect.png All All HitboxTableIcon(Blockable).png HitboxTableIcon(Unreflectable).png HitboxTableIcon(Unabsorbable).png HitboxTableIcon(False).png HitboxTableIcon(False).png HitboxTableIcon(False).png
1 0 0 8.0% 0 AngleIcon65.png Forward 50 80 0 HitboxTableIcon(False).png 2.4 top 0.0 3.6 8.5 to 9.0 1.0× 1.0× 30% HitboxTableIcon(NoClang).png HitboxTableIcon(NoRebound).png EffectIcon(Stab).png TypeIcon(Sword).png HitboxTableIcon(GroundedTrue).png HitboxTableIcon(AerialTrue).png M Slash SpecialsDirect.png All All HitboxTableIcon(Blockable).png HitboxTableIcon(Unreflectable).png HitboxTableIcon(Unabsorbable).png HitboxTableIcon(False).png HitboxTableIcon(False).png HitboxTableIcon(False).png

Timing

Hitboxes 5-6
Interruptible 20
Animation length 33
FrameIcon(Lag).png FrameIcon(Lag).png FrameIcon(Lag).png FrameIcon(Lag).png FrameIcon(Hitbox).png FrameIcon(Hitbox).png FrameIcon(Lag).png FrameIcon(Lag).png FrameIcon(Lag).png FrameIcon(Lag).png FrameIcon(Lag).png FrameIcon(Lag).png FrameIcon(Lag).png FrameIcon(Lag).png FrameIcon(Lag).png FrameIcon(Lag).png FrameIcon(Lag).png FrameIcon(Lag).png FrameIcon(Lag).png FrameIcon(Interruptible).png FrameIcon(Interruptible).png FrameIcon(Interruptible).png FrameIcon(Interruptible).png FrameIcon(Interruptible).png FrameIcon(Interruptible).png FrameIcon(Interruptible).png FrameIcon(Interruptible).png FrameIcon(Interruptible).png FrameIcon(Interruptible).png FrameIcon(Interruptible).png FrameIcon(Interruptible).png FrameIcon(Interruptible).png FrameIcon(Interruptible).png
Legend (1 square = 1 frame)
FrameIcon(Lag).png
Lag time
FrameIcon(Hitbox).png
Hitbox
FrameIcon(Interruptible).png
Interruptible

Trivia

  • The move has a 30% trip chance that can never actually happen, due to its largely vertical launch angle.