Marth (SSBM)/Forward aerial: Difference between revisions
From SmashWiki, the Super Smash Bros. wiki
Jump to navigationJump to search
(→Overview: added an image displaying in-depth hitbox frame analysis.) |
m (sorry about that undo. Didn't think to check the talk page :/) |
||
| (10 intermediate revisions by 7 users not shown) | |||
| Line 4: | Line 4: | ||
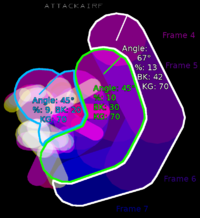
[[File:Marth_fair_hitbox_combination_with_frame_distinction.png|thumb|Hitbox range over time]] | [[File:Marth_fair_hitbox_combination_with_frame_distinction.png|thumb|Hitbox range over time]] | ||
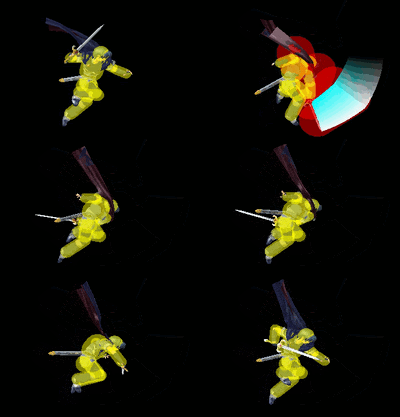
[[File:Marth Forward Aerial Hitbox Melee.gif|thumb|Hitbox duration of Marth's fair.]] | [[File:Marth Forward Aerial Hitbox Melee.gif|thumb|Hitbox duration of Marth's fair.]] | ||
Marth does a forward vertical slash | Marth does a forward vertical slash. One of the most versatile and commonly used moves in Marth's [[metagame]], it is considered to be his best aerial attack as well as one of the best forward aerials in the game. This move is very safe to use, having little [[lag]], being [[disjointed]] and excellent for [[spacing]]. Also, this move is a good [[edgeguarding]] move, as a few forward aerial hits on an opponent offstage can easily KO in addition to creating a wall that covers a great range in between Marth and his opponents, making it difficult for them to penetrate. With its low knockback, it also has a great [[combo]] ability, easily being able to chain into itself and other moves, and being used in many of Marth's combos, such as the famous [[Ken Combo]]. | ||
==Hitboxes== | ==Hitboxes== | ||
| Line 17: | Line 15: | ||
|ks=70 | |ks=70 | ||
|fkv=0 | |fkv=0 | ||
|r= | |r=1000 | ||
|bn=76 | |bn=76 | ||
|effect=Slash | |effect=Slash | ||
| Line 30: | Line 28: | ||
|ks=70 | |ks=70 | ||
|fkv=0 | |fkv=0 | ||
|r= | |r=1000 | ||
|bn=71 | |bn=71 | ||
|effect=Slash | |effect=Slash | ||
| Line 43: | Line 41: | ||
|ks=70 | |ks=70 | ||
|fkv=0 | |fkv=0 | ||
|r= | |r=1000 | ||
|bn=25 | |bn=25 | ||
|effect=Slash | |effect=Slash | ||
| Line 56: | Line 54: | ||
|ks=70 | |ks=70 | ||
|fkv=0 | |fkv=0 | ||
|r= | |r=1000 | ||
|bn=76 | |bn=76 | ||
|xpos= | |xpos=1200 | ||
|effect=Slash | |effect=Slash | ||
|slvl=L | |slvl=L | ||
| Line 86: | Line 84: | ||
|- | |- | ||
{{FrameStrip|t=Blank|c=26}}{{FrameStrip|t=Autocancel|c=6}} | {{FrameStrip|t=Blank|c=26}}{{FrameStrip|t=Autocancel|c=6}} | ||
{{FrameStripEnd}} | |||
===Landing lag=== | ===Landing lag=== | ||
| Line 102: | Line 100: | ||
|- | |- | ||
|L-cancelled {{FrameStrip|t=Lag|c=7}}{{FrameStrip|t=Blank|c=8}} | |L-cancelled {{FrameStrip|t=Lag|c=7}}{{FrameStrip|t=Blank|c=8}} | ||
{{FrameStripEnd}} | |||
{{FrameIconLegend|lag=y|hitbox=y|autocancel=y|interruptible=y}} | {{FrameIconLegend|lag=y|hitbox=y|autocancel=y|interruptible=y}} | ||
| Line 108: | Line 106: | ||
==Similar moves== | ==Similar moves== | ||
*[[Roy (SSBM)/Forward aerial]] | *[[Roy (SSBM)/Forward aerial]] | ||
{{MvSubNavMarth|g=SSBM}} | |||
[[Category:Marth (SSBM)]] | [[Category:Marth (SSBM)]] | ||
[[Category:Forward aerials]] | [[Category:Forward aerials (SSBM)]] | ||
Latest revision as of 18:23, July 11, 2017
Overview[edit]
Marth does a forward vertical slash. One of the most versatile and commonly used moves in Marth's metagame, it is considered to be his best aerial attack as well as one of the best forward aerials in the game. This move is very safe to use, having little lag, being disjointed and excellent for spacing. Also, this move is a good edgeguarding move, as a few forward aerial hits on an opponent offstage can easily KO in addition to creating a wall that covers a great range in between Marth and his opponents, making it difficult for them to penetrate. With its low knockback, it also has a great combo ability, easily being able to chain into itself and other moves, and being used in many of Marth's combos, such as the famous Ken Combo.
Hitboxes[edit]
Timing[edit]
Attack[edit]
| Hitboxes | 4-7 |
|---|---|
| Ending autocancel | 27- |
| Interruptible | 30 |
| Animation length | 33 |
Landing lag[edit]
| Animation length | 15 |
|---|---|
| L-cancelled animation length | 7 |
| Normal | |||||||||||||||
| L-cancelled |
Lag time |
Hitbox |
Autocancel |
Interruptible |
Similar moves[edit]
|

