SSB4 Icon.png

Mario (SSB4)/Side special/Custom 2: Difference between revisions

From SmashWiki, the Super Smash Bros. wiki
Jump to navigationJump to search
(Created page with "{{ArticleIcons|ssb4=y}} {{disambig2|the hitbox visualization in ''Super Smash Bros. 4''|the move itself|Shocking Cape}} ==Overview== {{competitive expertise}} ==Hitboxes== {...")
 
(→‎Overview: Describing what the gust cape custom move is meant for.)
 
(6 intermediate revisions by 3 users not shown)
Line 1: Line 1:
{{ArticleIcons|ssb4=y}}
{{disambig2|the hitbox visualization in ''Super Smash Bros. 4''|the move itself|Shocking Cape}}
{{disambig2|the hitbox visualization in ''Super Smash Bros. 4''|the move itself|Gust Cape}}


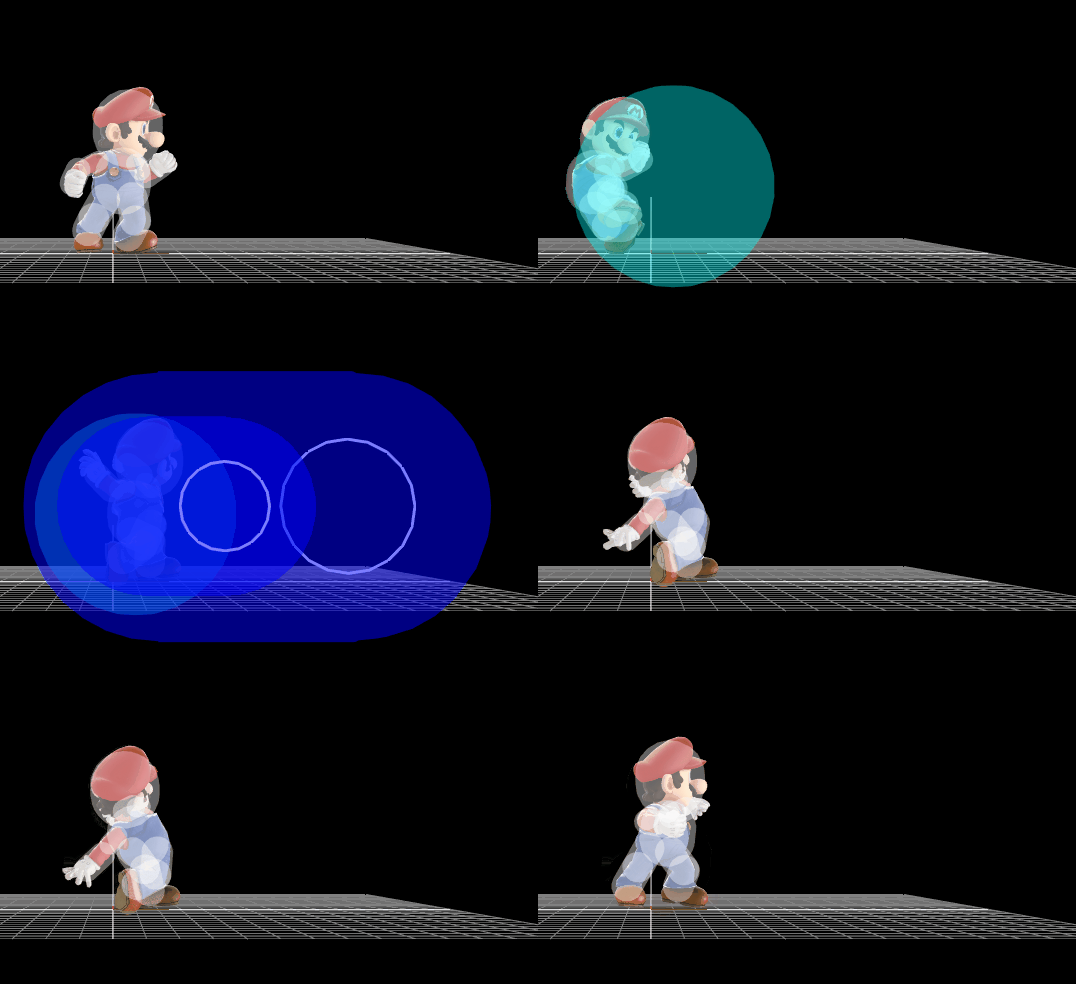
[[File:MarioGustCape.gif|270px|thumb|Hitbox visualization of Mario's Gust Cape.]]
==Overview==
==Overview==
{{competitive expertise}}
An especially defensive take on Mario's cape that deals less damage in return for a large windbox and additional air drift, making it useful as a gimping tool or mixing up his recovery.


==Hitboxes==
==Hitboxes==
Line 26: Line 27:
|trip=0.3
|trip=0.3
|ff=0.5
|ff=0.5
|direct=n
|slvl=L
|slvl=L
|sfx=Special
|sfx=Cape
}}
}}
{{SSB4HitboxTableRow
Line 48: Line 48:
|trip=0.3
|trip=0.3
|ff=0.5
|ff=0.5
|direct=n
|slvl=L
|slvl=L
|sfx=Special
|sfx=Cape
}}
}}
|}
|}
Line 114: Line 113:
|-
|-
!Reflection
!Reflection
|6-29
|6-20
|-
|-
!Hitboxes
!Hitboxes
|16-17
|16-18
|-
|-
!Windboxes
!Windboxes
|18-21
|19-22
|-
|-
!Interruptible
!Interruptible
Line 126: Line 125:
|-
|-
!Animation length
!Animation length
|53
|52
|}
|}


{{FrameStripStart}}
{{FrameStripStart}}
{{FrameStrip|t=Lag|c=15}}{{FrameStrip|t=Hitbox|c=2}}{{FrameStrip|t=FlinchlessHitbox|c=4}}{{FrameStrip|t=Lag|c=24}}{{FrameStrip|t=Interruptible|c=8}}
{{FrameStrip|t=Lag|c=15}}{{FrameStrip|t=Hitbox|c=3}}{{FrameStrip|t=FlinchlessHitbox|c=4}}{{FrameStrip|t=Lag|c=23}}{{FrameStrip|t=Interruptible|c=7}}
|-
|-
{{FrameStrip|t=Blank|c=5}}{{FrameStrip|t=Reflect|c=24}}{{FrameStrip|t=Blank|c=24}}
{{FrameStrip|t=Blank|c=5}}{{FrameStrip|t=Reflect|c=15}}{{FrameStrip|t=Blank|c=32}}
{{FrameStripEnd}}
{{FrameStripEnd}}


{{FrameIconLegend|lag=y|hitbox=y|interruptible=y}}
{{FrameIconLegend|lag=y|hitbox=y|flinchlesshitbox=y|reflect=y|interruptible=y}}
 
==Properties==
{|class="wikitable"
|-
!Reflection radius
|9
|-
!Reflection y position
|6
|-
!Reflection z position
|2
|-
!Reflection damage
|1.5x
|-
!Reflection speed
|1.0x
|-
!Reflection duration
|0.7x
|-
!Max reflectable damage
|50
|}


{{MvSubNavMario|g=SSB4}}

Latest revision as of 10:33, August 7, 2023

This article is about the hitbox visualization in Super Smash Bros. 4. For the move itself, see Gust Cape.
Hitbox visualization of Mario's Gust Cape.

Overview[edit]

An especially defensive take on Mario's cape that deals less damage in return for a large windbox and additional air drift, making it useful as a gimping tool or mixing up his recovery.

Hitboxes[edit]

ID Part Damage SD Angle BK KS FKV Radius Bone Offset SDIx T% Clang Rebound Type Effect G A Sound Direct
Hitboxes
0 0 5% 2 AngleIcon160.png 0 0 0 6.0 0 0.0 6.7 10.0 1.0x 0.5x 0.3% HitboxTableIcon(NoClang).png HitboxTableIcon(NoRebound).png TypeIcon(Typeless).png EffectIcon(Reverse).png HitboxTableIcon(GroundedTrue).png HitboxTableIcon(AerialTrue).png L Cape SpecialsDirect.png
1 0 5% 2 AngleIcon160.png 0 0 0 4.0 0 0.0 6.7 5.0 1.0x 0.5x 0.3% HitboxTableIcon(NoClang).png HitboxTableIcon(NoRebound).png TypeIcon(Typeless).png EffectIcon(Reverse).png HitboxTableIcon(GroundedTrue).png HitboxTableIcon(AerialTrue).png L Cape SpecialsDirect.png
ID Part Rehit rate Damage SD Angle BK KS FKV Radius Bone Offset SDIx T% Clang Rebound Type Effect G A Sound Direct Hit bits Blockable Reflectable Absorbable Piercing Heedless No GFX Flinchless Stretch
Windboxes
0 1 0 0% 0 Sakurai angle Standard 60 115 0 8.0 0 0.0 6.7 10.0 0x 0x 0% HitboxTableIcon(NoClang).png HitboxTableIcon(NoRebound).png TypeIcon(Typeless).png EffectIcon(Normal).png HitboxTableIcon(GroundedTrue).png HitboxTableIcon(AerialTrue).png L 0 SpecialsIndirect.png 63 HitboxTableIcon(Blockable).png HitboxTableIcon(Unreflectable).png HitboxTableIcon(Unabsorbable).png HitboxTableIcon(False).png HitboxTableIcon(False).png HitboxTableIcon(True).png HitboxTableIcon(True).png
1 1 0 0% 0 Sakurai angle Standard 36 115 0 12.0 0 0.0 6.7 21.0 0x 0x 0% HitboxTableIcon(NoClang).png HitboxTableIcon(NoRebound).png TypeIcon(Typeless).png EffectIcon(Normal).png HitboxTableIcon(GroundedTrue).png HitboxTableIcon(AerialTrue).png L 0 SpecialsIndirect.png 63 HitboxTableIcon(Blockable).png HitboxTableIcon(Unreflectable).png HitboxTableIcon(Unabsorbable).png HitboxTableIcon(False).png HitboxTableIcon(False).png HitboxTableIcon(True).png HitboxTableIcon(True).png

Timing[edit]

Reflection 6-20
Hitboxes 16-18
Windboxes 19-22
Interruptible 46
Animation length 52
FrameIcon(Lag).png FrameIcon(Lag).png FrameIcon(Lag).png FrameIcon(Lag).png FrameIcon(Lag).png FrameIcon(Lag).png FrameIcon(Lag).png FrameIcon(Lag).png FrameIcon(Lag).png FrameIcon(Lag).png FrameIcon(Lag).png FrameIcon(Lag).png FrameIcon(Lag).png FrameIcon(Lag).png FrameIcon(Lag).png FrameIcon(Hitbox).png FrameIcon(Hitbox).png FrameIcon(Hitbox).png Icon for non-damaging hitbox frames in frame strips. Icon for non-damaging hitbox frames in frame strips. Icon for non-damaging hitbox frames in frame strips. Icon for non-damaging hitbox frames in frame strips. FrameIcon(Lag).png FrameIcon(Lag).png FrameIcon(Lag).png FrameIcon(Lag).png FrameIcon(Lag).png FrameIcon(Lag).png FrameIcon(Lag).png FrameIcon(Lag).png FrameIcon(Lag).png FrameIcon(Lag).png FrameIcon(Lag).png FrameIcon(Lag).png FrameIcon(Lag).png FrameIcon(Lag).png FrameIcon(Lag).png FrameIcon(Lag).png FrameIcon(Lag).png FrameIcon(Lag).png FrameIcon(Lag).png FrameIcon(Lag).png FrameIcon(Lag).png FrameIcon(Lag).png FrameIcon(Lag).png FrameIcon(Interruptible).png FrameIcon(Interruptible).png FrameIcon(Interruptible).png FrameIcon(Interruptible).png FrameIcon(Interruptible).png FrameIcon(Interruptible).png FrameIcon(Interruptible).png
FrameIcon(Blank).png FrameIcon(Blank).png FrameIcon(Blank).png FrameIcon(Blank).png FrameIcon(Blank).png FrameIcon(Reflect).png FrameIcon(Reflect).png FrameIcon(Reflect).png FrameIcon(Reflect).png FrameIcon(Reflect).png FrameIcon(Reflect).png FrameIcon(Reflect).png FrameIcon(Reflect).png FrameIcon(Reflect).png FrameIcon(Reflect).png FrameIcon(Reflect).png FrameIcon(Reflect).png FrameIcon(Reflect).png FrameIcon(Reflect).png FrameIcon(Reflect).png FrameIcon(Blank).png FrameIcon(Blank).png FrameIcon(Blank).png FrameIcon(Blank).png FrameIcon(Blank).png FrameIcon(Blank).png FrameIcon(Blank).png FrameIcon(Blank).png FrameIcon(Blank).png FrameIcon(Blank).png FrameIcon(Blank).png FrameIcon(Blank).png FrameIcon(Blank).png FrameIcon(Blank).png FrameIcon(Blank).png FrameIcon(Blank).png FrameIcon(Blank).png FrameIcon(Blank).png FrameIcon(Blank).png FrameIcon(Blank).png FrameIcon(Blank).png FrameIcon(Blank).png FrameIcon(Blank).png FrameIcon(Blank).png FrameIcon(Blank).png FrameIcon(Blank).png FrameIcon(Blank).png FrameIcon(Blank).png FrameIcon(Blank).png FrameIcon(Blank).png FrameIcon(Blank).png FrameIcon(Blank).png
Legend (1 square = 1 frame)
FrameIcon(Lag).png
Lag time
FrameIcon(Hitbox).png
Hitbox
FrameIcon(Reflect).png
Reflect
Icon for non-damaging hitbox frames in frame strips.
Flinchless hitbox
FrameIcon(Interruptible).png
Interruptible

Properties[edit]

Reflection radius 9
Reflection y position 6
Reflection z position 2
Reflection damage 1.5x
Reflection speed 1.0x
Reflection duration 0.7x
Max reflectable damage 50