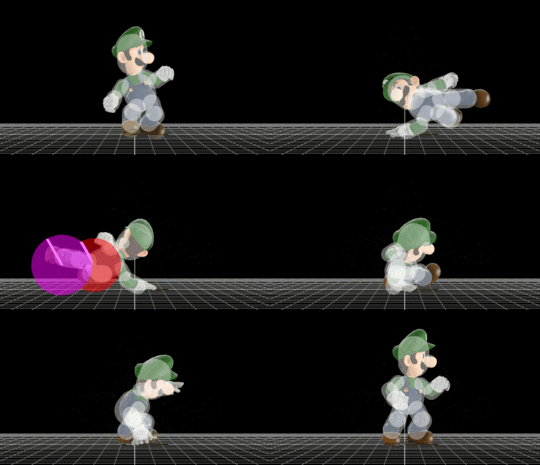
Luigi (SSB4)/Down smash: Difference between revisions
From SmashWiki, the Super Smash Bros. wiki
Jump to navigationJump to search
Serpent King (talk | contribs) (→Timing) |
SuperSqank (talk | contribs) |
||
| (3 intermediate revisions by 2 users not shown) | |||
| Line 5: | Line 5: | ||
Two sweeping kicks. It's {{SSB4|Luigi}}'s fastest [[smash attack]], coming out at frame 6. It has a [[sweetspot]] on Luigi's thighs and a [[sourspot]] on Luigi's feet. Down smash is used to cover rolls, punish whiffs with a fast move, stage spike recovering opponents and kill (with the second hit). The second hit is stronger than the first. Both hits send up and behind Luigi. Its startup is also allows Luigi to avoid high-hitting moves thanks to him crouching down. | Two sweeping kicks. It's {{SSB4|Luigi}}'s fastest [[smash attack]], coming out at frame 6. It has a [[sweetspot]] on Luigi's thighs and a [[sourspot]] on Luigi's feet. Down smash is used to cover rolls, punish whiffs with a fast move, stage spike recovering opponents and kill (with the second hit). The second hit is stronger than the first. Both hits send up and behind Luigi. Its startup is also allows Luigi to avoid high-hitting moves thanks to him crouching down. | ||
==Update history== | ==Update history== | ||
'''{{GameIcon|ssb4-3ds}} [[1.0.4]]''' | '''{{GameIcon|ssb4-3ds}} [[1.0.4]]/{{GameIcon|ssb4-wiiu}} 1.0.1''' | ||
*{{change|Hit 2 angle | *{{change|Hit 2 angle (70° → 60°).}} | ||
*{{buff|Hit 2 knockback scaling | *{{buff|Hit 2 knockback scaling (80 → 100).}} | ||
'''{{GameIcon|ssb4}} [[1.1.1]]''' | '''{{GameIcon|ssb4}} [[1.1.1]]''' | ||
*{{buff|Knockback scaling | *{{buff|Knockback scaling (80 (hit 1)/100 (hit 2) → 85/104).}} | ||
==Hitboxes== | ==Hitboxes== | ||
| Line 81: | Line 81: | ||
{|class="wikitable" | {|class="wikitable" | ||
!Charges between | !Charges between | ||
|3 | |2-3 | ||
|- | |- | ||
!Hitboxes | !Hitboxes | ||
|6-7, 14-15 | |6-7, 14-15 | ||
|- | |- | ||
!Animation length | !Animation length | ||
| | |37 | ||
|} | |} | ||
{{FrameStripStart}} | {{FrameStripStart}} | ||
{{FrameStrip|t=Lag|c= | {{FrameStrip|t=Lag|c=2|e=LagChargeS}}{{FrameStrip|t=Lag|c=3|s=LagChargeE}}{{FrameStrip|t=Hitbox|c=2}}{{FrameStrip|t=Lag|c=6}}{{FrameStrip|t=Hitbox|c=2}}{{FrameStrip|t=Lag|c=22}} | ||
{{FrameStripEnd}} | {{FrameStripEnd}} | ||
Latest revision as of 04:26, November 22, 2023
Overview[edit]
Two sweeping kicks. It's Luigi's fastest smash attack, coming out at frame 6. It has a sweetspot on Luigi's thighs and a sourspot on Luigi's feet. Down smash is used to cover rolls, punish whiffs with a fast move, stage spike recovering opponents and kill (with the second hit). The second hit is stronger than the first. Both hits send up and behind Luigi. Its startup is also allows Luigi to avoid high-hitting moves thanks to him crouching down.
Update history[edit]
![]() 1.0.4/
1.0.4/![]() 1.0.1
1.0.1
 Hit 2 angle (70° → 60°).
 Hit 2 knockback scaling (80 → 100).
 Knockback scaling (80 (hit 1)/100 (hit 2) → 85/104).
Hitboxes[edit]
Timing[edit]
| Charges between | 2-3 |
|---|---|
| Hitboxes | 6-7, 14-15 |
| Animation length | 37 |
Lag time |
Charge interval |
Hitbox |
Interruptible |
|
