Ken Combo: Difference between revisions
Serpent King (talk | contribs) (Undid edit by Gengarkun: I think we can tell) |
m (Text replacement - "|thumb|right" to "|thumb") |
||
| (14 intermediate revisions by 10 users not shown) | |||
| Line 1: | Line 1: | ||
{{ArticleIcons| | {{ArticleIcons|allgames=y|unofficial=y|competitive=y}} | ||
{{ | {{image|''SSB4'' and ''Ultimate''.}} | ||
{{incomplete|This page should cover other "aerial to meteor/spike" combos, while Melee Marth's is the most famous, it is not the only such combo that exists.}} | |||
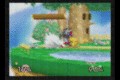
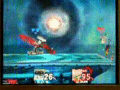
The | [[File:Kencombo.gif|200px|thumb|The Ken Combo performed in ''[[Melee]]''.]] | ||
The '''Ken Combo''' refers to a [[spike]] setup with {{SSBM|Marth}} discovered and popularized by professional Marth player, {{Sm|Ken}} and the name of the move was suggested from his friend, Max at the time. According to Ken, the Ken Combo was initially developed in the original ''[[Super Smash Bros.]]'' using {{SSB|Captain Falcon}}'s {{mvsub|Captain Falcon|SSB|up aerial}} followed with a {{mvsub|Captain Falcon|SSB|down aerial}} [[meteor smash]]. | |||
Marth | ==Overview== | ||
The combo itself is as follows: a [[jump]]; a {{mvsub|Marth|SSBM|forward aerial}}; [[midair jump]]; and finally, a {{mvsub|Marth|SSBM|down aerial}}. However, some players refer to the entire chain of [[neutral aerial]]s and forward aerials followed by the spike as a "Ken combo" due to its effectiveness in ''[[Melee]]'' [[competitive play]]. Despite having an arguably simple premise, the Ken Combo requires precise spacing to do it consistently, as the down aerial's spike can only be landed if the forward air is correctly spaced. Against fast-fallers, the tippered forward aerial must connect below the character, so that the opponent is sent upward and set to fall into the d-air after Marth jumps; if the tipper forward aerial is not landed, then Marth cannot land the down aerial spike after the jump. Conversely, against floaties, Marth must forward aerial the opponent from above so they are not sent out of his range. | |||
The precise spacing needed to execute the combo is a result of the [[Sakurai angle]] in it - in ''Melee'', attacks with the Sakurai angle initially send opponents at a 0 degree angle, but when knockback strength reaches a certain amount, the angle's size increases to 45 degrees. In addition to requiring Marth to properly know what angle the opponent will be sent, this also means that there is a window that Marth can perform the Ken Combo; outside of this window, the forward aerial either does too little knockback when the opponent is at too little [[damage]], or too much knockback when the Sakurai angle starts forcing opponents to be sent upwards at a 45 degree angle. | |||
==Variants== | ==Variants== | ||
Although difficult, it is possible to perform the Ken Combo without having to jump before using the down aerial, in what is known as the "jumpless Ken Combo." | |||
Another variant of the Ken Combo, called the '''Reverse Ken Combo''', can also be performed in ''Melee''. It involves hitting with the forward aerial's rear hitbox that produces weak knockback while keeping the opponent in place, then following up with the down aerial. | |||
In [[PAL]] regions, Marth's down aerial is a [[meteor smash]] instead of a spike, resulting in a slightly altered angle at which opponents are sent, as well as allowing the combo to be [[Meteor_smash#Meteor_canceling|meteor canceled]]. A common workaround is to replace the down aerial with a reverse [[Dolphin Slash]], in what is sometimes known as the European Ken Combo. A neutral aerial can also be used after the forward aerial, but opponents can potentially [[SDI]] out of the first hit. | |||
==In games after ''Melee''== | ==In games after ''Melee''== | ||
''Brawl'' changed the Sakurai angle so that, instead of immediately sending opponents upward at a 45 degree angle, it gradually sends them at higher degrees until it does reach 45 degrees. As a result, by the time knockback is sufficient to trigger the necessary angle for a Ken Combo, there is too much knockback for the move to properly combo, meaning Marth cannot perform a traditional Ken Combo in ''Brawl''. | |||
===Aerial to meteor/spike combo=== | |||
In ''Brawl'', several characters can perform their own versions of the Ken Combo, such as {{SSBB|Wolf}} and {{SSBB|R.O.B.}} and {{SSBB|Olimar}}. Due to having no widespread shorthand name, the technique is most often called the '''Aerial to meteor/spike combo'''. Much like the Ken Combo, the technique involves using an aerial move into a move with a meteor/spike effect as a kill move. The introduction of [[hitstun cancelling]], however, means that opponents can [[air dodge]] away from future hits or even hit back before the next attack can occur, drastically reducing their effectiveness compared to Marth's Ken Combo in ''Melee''; many of these combos also only work at narrow ranges due to the reworked Sakurai angle, making them less reliable than a true Ken Combo. These combos are also heavily [[DI]] dependant, forcing a player to read their opponents air dodge far in advance or simply be lucky, ultimately reducing its reliabilty and strategic potential. | |||
In ''Brawl'', several characters can perform their own versions of the Ken Combo, such as {{SSBB|Wolf}} and {{SSBB|R.O.B.}} The introduction of [[hitstun]] | |||
''SSB4'' introduced changes to hitstun cancelling that severly weakened its in-game effectiveness, such as significantly increasing the amount of required hitstun that cannot be canceled and having a tighter knockback window to activate the cancel, allowing for significantly more combo potential. This allows for not only more reliable aerial to meteor/spike combos for a wider selection of the roster, but also reintroduced a slightly modified version of the Ken Combo, albeit lacking the potency it had in ''Melee''. ''Ultimate'' indirectly changed hitstun canceling further by the engine changes like balloon knockback and airdodge properties mitigating its effectiveness. This further increased combo potential and made the psuedo Ken Combo easier to perform, giving it potency that is nearly comparable to its ''Melee'' counterpart, although reacting to DI is still a factor. | |||
==Gallery== | ==Gallery== | ||
<gallery> | <gallery> | ||
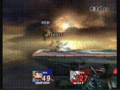
File:Reverse Ken Combo.gif|Reverse Ken Combo. | File:SSB64 Falcon Ken Combo.gif|A variation of the Ken Combo performed by Captain Falcon in ''Smash 64''. | ||
File:Reverse Ken Combo.gif|Reverse Ken Combo in ''Melee''. | |||
File:SSBM Advanced Combo ending with Ken Combo.gif|An advanced Marth combo in ''Melee'' ending with a Ken Combo. | File:SSBM Advanced Combo ending with Ken Combo.gif|An advanced Marth combo in ''Melee'' ending with a Ken Combo. | ||
File:SSBM Marth Fair Chain ending with Ken Combo.gif|Another Marth combo in ''Melee'', using some up throws, then a chain of forward aerials, leading into a Ken Combo. | File:SSBM Marth Fair Chain ending with Ken Combo.gif|Another Marth combo in ''Melee'', using some up throws, then a chain of forward aerials, leading into a Ken Combo. | ||
File:SSBB Wolf Ken Combo.gif|A variation of the Ken Combo performed by Wolf in ''Brawl'' | File:SSBB Wolf Ken Combo.gif|A variation of the Ken Combo performed by Wolf in ''Brawl'' | ||
File:SSBB ROB Ken Combo.gif|A variation of the Ken Combo performed by R.O.B. in ''Brawl'' | File:SSBB ROB Ken Combo.gif|A variation of the Ken Combo performed by R.O.B. in ''Brawl'' | ||
Latest revision as of 10:10, April 12, 2023


The Ken Combo refers to a spike setup with Marth discovered and popularized by professional Marth player, Ken and the name of the move was suggested from his friend, Max at the time. According to Ken, the Ken Combo was initially developed in the original Super Smash Bros. using Captain Falcon's up aerial followed with a down aerial meteor smash.
Overview[edit]
The combo itself is as follows: a jump; a forward aerial; midair jump; and finally, a down aerial. However, some players refer to the entire chain of neutral aerials and forward aerials followed by the spike as a "Ken combo" due to its effectiveness in Melee competitive play. Despite having an arguably simple premise, the Ken Combo requires precise spacing to do it consistently, as the down aerial's spike can only be landed if the forward air is correctly spaced. Against fast-fallers, the tippered forward aerial must connect below the character, so that the opponent is sent upward and set to fall into the d-air after Marth jumps; if the tipper forward aerial is not landed, then Marth cannot land the down aerial spike after the jump. Conversely, against floaties, Marth must forward aerial the opponent from above so they are not sent out of his range.
The precise spacing needed to execute the combo is a result of the Sakurai angle in it - in Melee, attacks with the Sakurai angle initially send opponents at a 0 degree angle, but when knockback strength reaches a certain amount, the angle's size increases to 45 degrees. In addition to requiring Marth to properly know what angle the opponent will be sent, this also means that there is a window that Marth can perform the Ken Combo; outside of this window, the forward aerial either does too little knockback when the opponent is at too little damage, or too much knockback when the Sakurai angle starts forcing opponents to be sent upwards at a 45 degree angle.
Variants[edit]
Although difficult, it is possible to perform the Ken Combo without having to jump before using the down aerial, in what is known as the "jumpless Ken Combo."
Another variant of the Ken Combo, called the Reverse Ken Combo, can also be performed in Melee. It involves hitting with the forward aerial's rear hitbox that produces weak knockback while keeping the opponent in place, then following up with the down aerial.
In PAL regions, Marth's down aerial is a meteor smash instead of a spike, resulting in a slightly altered angle at which opponents are sent, as well as allowing the combo to be meteor canceled. A common workaround is to replace the down aerial with a reverse Dolphin Slash, in what is sometimes known as the European Ken Combo. A neutral aerial can also be used after the forward aerial, but opponents can potentially SDI out of the first hit.
In games after Melee[edit]
Brawl changed the Sakurai angle so that, instead of immediately sending opponents upward at a 45 degree angle, it gradually sends them at higher degrees until it does reach 45 degrees. As a result, by the time knockback is sufficient to trigger the necessary angle for a Ken Combo, there is too much knockback for the move to properly combo, meaning Marth cannot perform a traditional Ken Combo in Brawl.
Aerial to meteor/spike combo[edit]
In Brawl, several characters can perform their own versions of the Ken Combo, such as Wolf and R.O.B. and Olimar. Due to having no widespread shorthand name, the technique is most often called the Aerial to meteor/spike combo. Much like the Ken Combo, the technique involves using an aerial move into a move with a meteor/spike effect as a kill move. The introduction of hitstun cancelling, however, means that opponents can air dodge away from future hits or even hit back before the next attack can occur, drastically reducing their effectiveness compared to Marth's Ken Combo in Melee; many of these combos also only work at narrow ranges due to the reworked Sakurai angle, making them less reliable than a true Ken Combo. These combos are also heavily DI dependant, forcing a player to read their opponents air dodge far in advance or simply be lucky, ultimately reducing its reliabilty and strategic potential.
SSB4 introduced changes to hitstun cancelling that severly weakened its in-game effectiveness, such as significantly increasing the amount of required hitstun that cannot be canceled and having a tighter knockback window to activate the cancel, allowing for significantly more combo potential. This allows for not only more reliable aerial to meteor/spike combos for a wider selection of the roster, but also reintroduced a slightly modified version of the Ken Combo, albeit lacking the potency it had in Melee. Ultimate indirectly changed hitstun canceling further by the engine changes like balloon knockback and airdodge properties mitigating its effectiveness. This further increased combo potential and made the psuedo Ken Combo easier to perform, giving it potency that is nearly comparable to its Melee counterpart, although reacting to DI is still a factor.
Gallery[edit]
A variation of the Ken Combo performed by Captain Falcon in Smash 64.
Reverse Ken Combo in Melee.
An advanced Marth combo in Melee ending with a Ken Combo.
Another Marth combo in Melee, using some up throws, then a chain of forward aerials, leading into a Ken Combo.
A variation of the Ken Combo performed by Wolf in Brawl

A variation of the Ken Combo performed by R.O.B. in Brawl
A variation of the Ken Combo performed by Olimar in Brawl


