SSBM Icon.png

Falco (SSBM)/Neutral special: Difference between revisions

From SmashWiki, the Super Smash Bros. wiki
Jump to navigationJump to search
(Spam info?)
m (I've been having writing block lately, someone check if that was decent enough)
Line 3: Line 3:
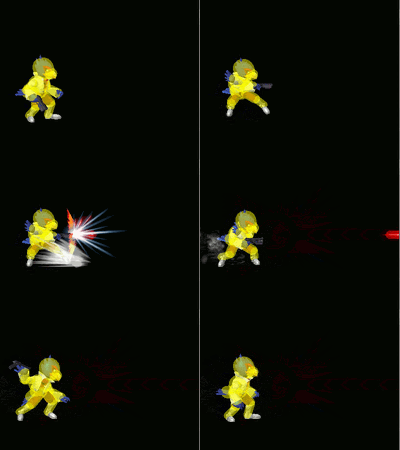
[[File:Falco Neutral Special Hitbox Melee.gif|thumb|The hitbox of Falco's Blaster, used on the ground.]]
[[File:Falco Neutral Special Hitbox Melee.gif|thumb|The hitbox of Falco's Blaster, used on the ground.]]
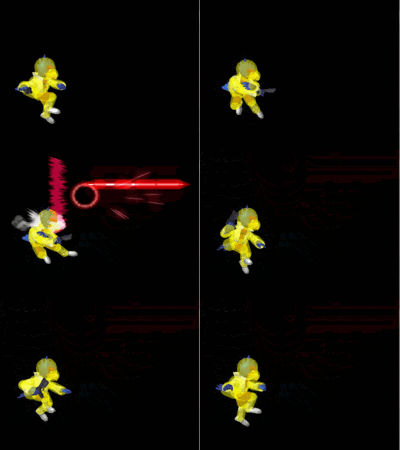
[[File:Falco Neutral Special Hitbox Aerial Melee.gif|thumb|The hitbox of Falco's Blaster, used in the air.]]
[[File:Falco Neutral Special Hitbox Aerial Melee.gif|thumb|The hitbox of Falco's Blaster, used in the air.]]
Compared to Fox's [[Blaster]], Falco's version is slower but causes the opponent to flinch like {{SSB|Fox}}'s {{mvsub|Fox|SSB|neutral special|alt=Blaster}} in the original ''Smash Bros.'' Because the lasers cause the opponent to flinch, they are extremely useful for disrupting their approach and camping. Falco can [[short hop laser]] while approaching to avoid lag. If he is close enough, the laser can stun the opponent so that Falco can follow up with a grab or a move like a {{mvsub|Falco|SSBM|down special|alt=shine}}, {{mvsub|Falco|SSBM|up tilt}}, or even a {{mvsub|Falco|SSBM|forward smash}}.
Compared to Fox's [[Blaster]], Falco's version is slower but causes the opponent to flinch like {{SSB|Fox}}'s {{mvsub|Fox|SSB|neutral special|alt=Blaster}} in the original ''Smash Bros.'' Because the lasers cause the opponent to flinch, they are extremely useful for disrupting their approach and camping. Falco can [[short hop laser]] while approaching to avoid lag. If he is close enough, the laser can stun the opponent so that Falco can follow up with a grab or a move like a {{mvsub|Falco|SSBM|down special|alt=shine}}, {{mvsub|Falco|SSBM|up tilt}}, or even a {{mvsub|Falco|SSBM|forward smash}}. Lasers greatly help Falco's neutral game because when used properly, they can cover several of the opponent's options and force them into bad positions, or even bait out a mistimed reaction for Falco to punish.
{{competitive expertise}}


Revision as of 15:34, June 30, 2014

Overview

The hitbox of Falco's Blaster on the ground in Melee.
The hitbox of Falco's Blaster, used on the ground.
The hitbox of Falco's Blaster in the air in Melee.
The hitbox of Falco's Blaster, used in the air.

Compared to Fox's Blaster, Falco's version is slower but causes the opponent to flinch like Fox's Blaster in the original Smash Bros. Because the lasers cause the opponent to flinch, they are extremely useful for disrupting their approach and camping. Falco can short hop laser while approaching to avoid lag. If he is close enough, the laser can stun the opponent so that Falco can follow up with a grab or a move like a shine, up tilt, or even a forward smash. Lasers greatly help Falco's neutral game because when used properly, they can cover several of the opponent's options and force them into bad positions, or even bait out a mistimed reaction for Falco to punish.

Competitive.png This article or section may require competitive expertise.
You can discuss this issue on the talk page or edit this page to improve it.

Hitboxes

ID Part Damage SD Angle BK KS FKV Radius Bone Offset Clang Rebound Effect G A Sound Blockable Reflectable Absorbable
0 0 3% 0 Sakurai angle 0 100 101 1.1718 0 0.0 0.0 -0.7812 HitboxTableIcon(NoClang).png HitboxTableIcon(NoRebound).png EffectIcon(Normal).png HitboxTableIcon(GroundedTrue).png HitboxTableIcon(AerialTrue).png S Punch HitboxTableIcon(Blockable).png HitboxTableIcon(Reflectable).png HitboxTableIcon(Absorbable).png
1 0 3% 0 Sakurai angle 0 100 101 1.1718 0 0.0 0.0 -3.644298 HitboxTableIcon(NoClang).png HitboxTableIcon(NoRebound).png EffectIcon(Normal).png HitboxTableIcon(GroundedTrue).png HitboxTableIcon(AerialTrue).png S Punch HitboxTableIcon(Blockable).png HitboxTableIcon(Reflectable).png HitboxTableIcon(Absorbable).png
2 0 3% 0 Sakurai angle 0 100 101 1.1718 0 0.0 0.0 -6.507396 HitboxTableIcon(NoClang).png HitboxTableIcon(NoRebound).png EffectIcon(Normal).png HitboxTableIcon(GroundedTrue).png HitboxTableIcon(AerialTrue).png S Punch HitboxTableIcon(Blockable).png HitboxTableIcon(Reflectable).png HitboxTableIcon(Absorbable).png
3 0 3% 0 Sakurai angle 0 100 101 1.1718 0 0.0 0.0 -9.3744 HitboxTableIcon(NoClang).png HitboxTableIcon(NoRebound).png EffectIcon(Normal).png HitboxTableIcon(GroundedTrue).png HitboxTableIcon(AerialTrue).png S Punch HitboxTableIcon(Blockable).png HitboxTableIcon(Reflectable).png HitboxTableIcon(Absorbable).png

Timing

Ground

First loop frame 7
Repeat window 15-28
Shot 23
Last loop frame 30
Animation length 57
FrameIcon(Lag).png FrameIcon(Lag).png FrameIcon(Lag).png FrameIcon(Lag).png FrameIcon(Lag).png FrameIcon(LagLoopS).png FrameIcon(LagLoopE).png FrameIcon(Lag).png FrameIcon(Lag).png FrameIcon(Lag).png FrameIcon(Lag).png FrameIcon(Lag).png FrameIcon(Lag).png FrameIcon(Lag).png FrameIcon(Lag).png FrameIcon(Lag).png FrameIcon(Lag).png FrameIcon(Lag).png FrameIcon(Lag).png FrameIcon(Lag).png FrameIcon(Lag).png FrameIcon(LagPropS).png FrameIcon(LagPropE).png FrameIcon(Lag).png FrameIcon(Lag).png FrameIcon(Lag).png FrameIcon(Lag).png FrameIcon(Lag).png FrameIcon(Lag).png FrameIcon(LagLoopS).png FrameIcon(LagLoopE).png FrameIcon(Lag).png FrameIcon(Lag).png FrameIcon(Lag).png FrameIcon(Lag).png FrameIcon(Lag).png FrameIcon(Lag).png FrameIcon(Lag).png FrameIcon(Lag).png FrameIcon(Lag).png FrameIcon(Lag).png FrameIcon(Lag).png FrameIcon(Lag).png FrameIcon(Lag).png FrameIcon(Lag).png FrameIcon(Lag).png FrameIcon(Lag).png FrameIcon(Lag).png FrameIcon(Lag).png FrameIcon(Lag).png FrameIcon(Lag).png FrameIcon(Lag).png FrameIcon(Lag).png FrameIcon(Lag).png FrameIcon(Lag).png FrameIcon(Lag).png FrameIcon(Lag).png
FrameIcon(Blank).png FrameIcon(Blank).png FrameIcon(Blank).png FrameIcon(Blank).png FrameIcon(Blank).png FrameIcon(BlankLoopS).png FrameIcon(BlankLoopE).png FrameIcon(Blank).png FrameIcon(Blank).png FrameIcon(Blank).png FrameIcon(Blank).png FrameIcon(Blank).png FrameIcon(Blank).png FrameIcon(Blank).png FrameIcon(Continuable).png FrameIcon(Continuable).png FrameIcon(Continuable).png FrameIcon(Continuable).png FrameIcon(Continuable).png FrameIcon(Continuable).png FrameIcon(Continuable).png FrameIcon(Continuable).png FrameIcon(Continuable).png FrameIcon(Continuable).png FrameIcon(Continuable).png FrameIcon(Continuable).png FrameIcon(Continuable).png FrameIcon(Continuable).png FrameIcon(Blank).png FrameIcon(BlankLoopS).png FrameIcon(BlankLoopE).png FrameIcon(Blank).png FrameIcon(Blank).png FrameIcon(Blank).png FrameIcon(Blank).png FrameIcon(Blank).png FrameIcon(Blank).png FrameIcon(Blank).png FrameIcon(Blank).png FrameIcon(Blank).png FrameIcon(Blank).png FrameIcon(Blank).png FrameIcon(Blank).png FrameIcon(Blank).png FrameIcon(Blank).png FrameIcon(Blank).png FrameIcon(Blank).png FrameIcon(Blank).png FrameIcon(Blank).png FrameIcon(Blank).png FrameIcon(Blank).png FrameIcon(Blank).png FrameIcon(Blank).png FrameIcon(Blank).png FrameIcon(Blank).png FrameIcon(Blank).png FrameIcon(Blank).png

Air

First loop frame 4
Repeat window 5-16
Shot 13
Last loop frame 20
Animation length 42
FrameIcon(Lag).png FrameIcon(Lag).png FrameIcon(Lag).png FrameIcon(LagLoopS).png FrameIcon(LagLoopE).png FrameIcon(Lag).png FrameIcon(Lag).png FrameIcon(Lag).png FrameIcon(Lag).png FrameIcon(Lag).png FrameIcon(Lag).png FrameIcon(LagPropS).png FrameIcon(LagPropE).png FrameIcon(Lag).png FrameIcon(Lag).png FrameIcon(Lag).png FrameIcon(Lag).png FrameIcon(Lag).png FrameIcon(Lag).png FrameIcon(LagLoopS).png FrameIcon(LagLoopE).png FrameIcon(Lag).png FrameIcon(Lag).png FrameIcon(Lag).png FrameIcon(Lag).png FrameIcon(Lag).png FrameIcon(Lag).png FrameIcon(Lag).png FrameIcon(Lag).png FrameIcon(Lag).png FrameIcon(Lag).png FrameIcon(Lag).png FrameIcon(Lag).png FrameIcon(Lag).png FrameIcon(Lag).png FrameIcon(Lag).png FrameIcon(Lag).png FrameIcon(Lag).png FrameIcon(Lag).png FrameIcon(Lag).png FrameIcon(Lag).png FrameIcon(Lag).png
FrameIcon(Blank).png FrameIcon(Blank).png FrameIcon(Blank).png FrameIcon(BlankLoopS).png FrameIcon(ContinuableLoopE).png FrameIcon(Continuable).png FrameIcon(Continuable).png FrameIcon(Continuable).png FrameIcon(Continuable).png FrameIcon(Continuable).png FrameIcon(Continuable).png FrameIcon(Continuable).png FrameIcon(Continuable).png FrameIcon(Continuable).png FrameIcon(Continuable).png FrameIcon(Continuable).png FrameIcon(Blank).png FrameIcon(Blank).png FrameIcon(Blank).png FrameIcon(BlankLoopS).png FrameIcon(BlankLoopE).png FrameIcon(Blank).png FrameIcon(Blank).png FrameIcon(Blank).png FrameIcon(Blank).png FrameIcon(Blank).png FrameIcon(Blank).png FrameIcon(Blank).png FrameIcon(Blank).png FrameIcon(Blank).png FrameIcon(Blank).png FrameIcon(Blank).png FrameIcon(Blank).png FrameIcon(Blank).png FrameIcon(Blank).png FrameIcon(Blank).png FrameIcon(Blank).png FrameIcon(Blank).png FrameIcon(Blank).png FrameIcon(Blank).png FrameIcon(Blank).png FrameIcon(Blank).png
Legend (1 square = 1 frame)
FrameIcon(Lag).png
Lag time
FrameIcon(BlankLoopS).pngFrameIcon(BlankLoopE).png
Loop point
FrameIcon(Continuable).png
Continuable
FrameIcon(BlankPropS).pngFrameIcon(BlankPropE).png
Prop event

Properties

Shot lifetime 99 frames

Similar Moves