SSB4 Icon.png

Charizard (SSB4)/Forward tilt: Difference between revisions

From SmashWiki, the Super Smash Bros. wiki
Jump to navigationJump to search
No edit summary
m (Text replacement - "== ([^=])" to "== $1")
 
(2 intermediate revisions by 2 users not shown)
Line 13: Line 13:
|}
|}
{{competitive expertise}}
{{technical data}}


==Hitboxes==
==Hitboxes==
This attack can be angled, but all three angles have the same properties.


Line 100: Line 98:
|}
|}


==Timing==
{|class="wikitable"
|-
!Hitbox
|11-13
|-
!Interruptible
|43
|-
!Animation length
|49
|}
{{FrameStripStart}}
{{FrameStrip|t=Lag|c=10}}{{FrameStrip|t=Hitbox|c=3}}{{FrameStrip|t=Lag|c=29}}{{FrameStrip|t=Interruptible|c=7}}
{{FrameStripEnd}}
{{FrameIconLegend|lag=y|hitbox=y|interruptible=y}}


{{MvSubNavCharizard|g=SSB4}}
[[Category:Charizard (SSB4)]]
[[Category:Charizard (SSB4)]]
[[Category:Forward tilts (SSB4)]]
[[Category:Forward tilts (SSB4)]]

Latest revision as of 21:50, April 12, 2022

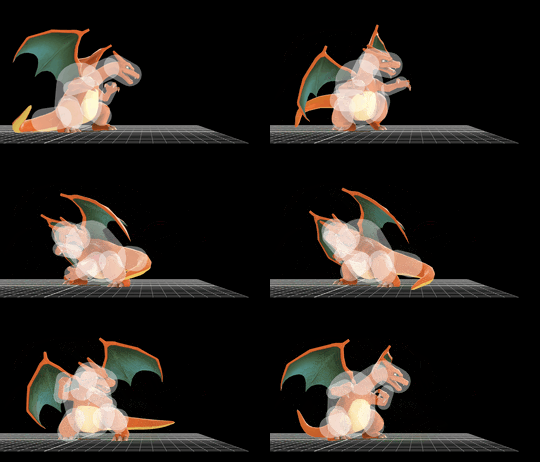
Charizard forward tilt hitbox visualization
CharizardFTiltUp.gif
CharizardFTilt.gif
CharizardFTiltDown.gif
Competitive.png This article or section may require competitive expertise.
You can discuss this issue on the talk page or edit this page to improve it.

Hitboxes[edit]

This attack can be angled, but all three angles have the same properties.

ID Part Damage SD Angle BK KS FKV Radius Bone Offset SDIx T% Clang Rebound Type Effect G A Sound Direct
0 0 11% 0 AngleIcon40.png 40 100 0 4.0 1006 0.0 0.0 0.0 1.0x 1.0x 0% HitboxTableIcon(Clang).png HitboxTableIcon(Rebound).png TypeIcon(Tail).png EffectIcon(Flame).png HitboxTableIcon(GroundedTrue).png HitboxTableIcon(AerialTrue).png L Burn SpecialsDirect.png
1 0 7% 0 Sakurai angle 40 100 0 4.0 1004 0.0 0.0 0.0 1.0x 1.0x 0% HitboxTableIcon(Clang).png HitboxTableIcon(Rebound).png TypeIcon(Tail).png EffectIcon(Normal).png HitboxTableIcon(GroundedTrue).png HitboxTableIcon(AerialTrue).png M Kick SpecialsDirect.png
2 0 11% 0 AngleIcon40.png 40 100 0 4.0 1005 0.0 0.0 0.0 1.0x 1.0x 0% HitboxTableIcon(Clang).png HitboxTableIcon(Rebound).png TypeIcon(Tail).png EffectIcon(Flame).png HitboxTableIcon(GroundedTrue).png HitboxTableIcon(AerialTrue).png L Burn SpecialsDirect.png
3 0 7% 0 Sakurai angle 40 100 0 4.0 1003 0.0 0.0 0.0 1.0x 1.0x 0% HitboxTableIcon(Clang).png HitboxTableIcon(Rebound).png TypeIcon(Tail).png EffectIcon(Normal).png HitboxTableIcon(GroundedTrue).png HitboxTableIcon(AerialTrue).png M Kick SpecialsDirect.png

Timing[edit]

Hitbox 11-13
Interruptible 43
Animation length 49
FrameIcon(Lag).png FrameIcon(Lag).png FrameIcon(Lag).png FrameIcon(Lag).png FrameIcon(Lag).png FrameIcon(Lag).png FrameIcon(Lag).png FrameIcon(Lag).png FrameIcon(Lag).png FrameIcon(Lag).png FrameIcon(Hitbox).png FrameIcon(Hitbox).png FrameIcon(Hitbox).png FrameIcon(Lag).png FrameIcon(Lag).png FrameIcon(Lag).png FrameIcon(Lag).png FrameIcon(Lag).png FrameIcon(Lag).png FrameIcon(Lag).png FrameIcon(Lag).png FrameIcon(Lag).png FrameIcon(Lag).png FrameIcon(Lag).png FrameIcon(Lag).png FrameIcon(Lag).png FrameIcon(Lag).png FrameIcon(Lag).png FrameIcon(Lag).png FrameIcon(Lag).png FrameIcon(Lag).png FrameIcon(Lag).png FrameIcon(Lag).png FrameIcon(Lag).png FrameIcon(Lag).png FrameIcon(Lag).png FrameIcon(Lag).png FrameIcon(Lag).png FrameIcon(Lag).png FrameIcon(Lag).png FrameIcon(Lag).png FrameIcon(Lag).png FrameIcon(Interruptible).png FrameIcon(Interruptible).png FrameIcon(Interruptible).png FrameIcon(Interruptible).png FrameIcon(Interruptible).png FrameIcon(Interruptible).png FrameIcon(Interruptible).png
Legend (1 square = 1 frame)
FrameIcon(Lag).png
Lag time
FrameIcon(Hitbox).png
Hitbox
FrameIcon(Interruptible).png
Interruptible