Captain Falcon (SSBM)/Forward smash: Difference between revisions
mNo edit summary |
m (Text replacement - "|thumb|right" to "|thumb") |
||
| (9 intermediate revisions by 5 users not shown) | |||
| Line 2: | Line 2: | ||
==Overview== | ==Overview== | ||
[[File: | [[File:CFalcon Forward Smash.gif|thumb|250px|Forward smash hitbox duration.]] | ||
Nicknamed '''The People's Elbow''', Captain Falcon rears back and thrusts his elbow in a fast-moving motion, dealing | Nicknamed '''The People's Elbow''', Captain Falcon rears back and thrusts his elbow in a fast-moving motion, dealing [[flame]] damage to anyone it connects with. This is one of the most powerful forward smashes in ''Melee'', being the third most powerful forward smash overall with especially high knockback scaling (while Ganondorf's produces slightly stronger knockback, the fact Ganondorf's hits vertically allows Falcon's to KO faster on [[fast faller]]s and stages with high ceilings). However, it is difficult to land, with slow start-up lag and rather small hitboxes (though since Falcon lunges far with it, it reaches far regardless). It is additionally very [[punish]]able, with a heavy 39 frames of ending lag. As such, despite its great power, the move is not seen much in competitive play, especially when Falcon has access to a much easier to land and much safer move with comparable power in his {{mvsub|Captain Falcon|SSBM|forward aerial|alt=Knee Smash}}. With a successful hard [[read]] though, it can potentially get a KO as early as 80% from center stage, and with its very high damage output, it can [[outprioritise]] up to moderate damage dealing ground attacks. | ||
==Hitboxes== | ==Hitboxes== | ||
{{MeleeHitboxTableHeader}} | {{MeleeHitboxTableHeader}} | ||
{{HitboxTableTitle|Angled up| | {{HitboxTableTitle|Angled up|19}} | ||
{{MeleeHitboxTableRow | {{MeleeHitboxTableRow | ||
|id=0 | |id=0 | ||
|damage={{ | |damage={{ChargedSmashDmgSSBM|21}} | ||
|angle=361 | |angle=361 | ||
|bk=24 | |bk=24 | ||
|ks=100 | |ks=100 | ||
|fkv=0 | |fkv=0 | ||
|r= | |r=900 | ||
|bn=23 | |bn=23 | ||
|clang=1 | |clang=1 | ||
| Line 24: | Line 24: | ||
{{MeleeHitboxTableRow | {{MeleeHitboxTableRow | ||
|id=1 | |id=1 | ||
|damage={{ | |damage={{ChargedSmashDmgSSBM|21}} | ||
|angle=361 | |angle=361 | ||
|bk=24 | |bk=24 | ||
|ks=100 | |ks=100 | ||
|fkv=0 | |fkv=0 | ||
|r= | |r=900 | ||
|bn=24 | |bn=24 | ||
|clang=1 | |clang=1 | ||
| Line 36: | Line 36: | ||
|sfx=Burn | |sfx=Burn | ||
}} | }} | ||
{{HitboxTableTitle|Angled side| | {{HitboxTableTitle|Angled side|19}} | ||
{{MeleeHitboxTableRow | {{MeleeHitboxTableRow | ||
|id=0 | |id=0 | ||
|damage={{ | |damage={{ChargedSmashDmgSSBM|20}} | ||
|angle=361 | |angle=361 | ||
|bk=24 | |bk=24 | ||
|ks=100 | |ks=100 | ||
|fkv=0 | |fkv=0 | ||
|r= | |r=900 | ||
|bn=23 | |bn=23 | ||
|clang=1 | |clang=1 | ||
| Line 53: | Line 53: | ||
{{MeleeHitboxTableRow | {{MeleeHitboxTableRow | ||
|id=1 | |id=1 | ||
|damage={{ | |damage={{ChargedSmashDmgSSBM|20}} | ||
|angle=361 | |angle=361 | ||
|bk=24 | |bk=24 | ||
|ks=100 | |ks=100 | ||
|fkv=0 | |fkv=0 | ||
|r= | |r=900 | ||
|bn=24 | |bn=24 | ||
|clang=1 | |clang=1 | ||
| Line 65: | Line 65: | ||
|sfx=Burn | |sfx=Burn | ||
}} | }} | ||
{{HitboxTableTitle|Angled down| | {{HitboxTableTitle|Angled down|19}} | ||
{{MeleeHitboxTableRow | {{MeleeHitboxTableRow | ||
|id=0 | |id=0 | ||
|damage={{ | |damage={{ChargedSmashDmgSSBM|19}} | ||
|angle=361 | |angle=361 | ||
|bk=24 | |bk=24 | ||
|ks=100 | |ks=100 | ||
|fkv=0 | |fkv=0 | ||
|r= | |r=900 | ||
|bn=23 | |bn=23 | ||
|clang=1 | |clang=1 | ||
| Line 82: | Line 82: | ||
{{MeleeHitboxTableRow | {{MeleeHitboxTableRow | ||
|id=1 | |id=1 | ||
|damage={{ | |damage={{ChargedSmashDmgSSBM|19}} | ||
|angle=361 | |angle=361 | ||
|bk=24 | |bk=24 | ||
|ks=100 | |ks=100 | ||
|fkv=0 | |fkv=0 | ||
|r= | |r=900 | ||
|bn=24 | |bn=24 | ||
|clang=1 | |clang=1 | ||
| Line 97: | Line 97: | ||
==Timing== | ==Timing== | ||
{|class="wikitable" | {|class="wikitable" | ||
|- | |- | ||
| Line 114: | Line 113: | ||
{{FrameStripStart}} | {{FrameStripStart}} | ||
{{FrameStrip|t=Lag|c=10|e=LagChargeS | {{FrameStrip|t=Lag|c=10|e=LagChargeS}}{{FrameStrip|t=Lag|c=7|s=LagChargeE}}{{FrameStrip|t=Hitbox|c=4}}{{FrameStrip|t=Lag|c=38}}{{FrameStrip|t=Interruptible|c=5}} | ||
{{FrameStripEnd}} | |||
{{FrameIconLegend|lag=y|hitbox=y|charge=y|interruptible=y}} | {{FrameIconLegend|lag=y|hitbox=y|charge=y|interruptible=y}} | ||
| Line 122: | Line 121: | ||
*[[Ganondorf (SSBM)/Forward smash]] | *[[Ganondorf (SSBM)/Forward smash]] | ||
[[Category:Captain Falcon]] | {{MvSubNavCaptainFalcon|g=SSBM}} | ||
[[Category:Forward smashes]] | |||
[[Category:Captain Falcon (SSBM)]] | |||
[[Category:Forward smashes (SSBM)]] | |||
Latest revision as of 10:29, April 12, 2023
Overview[edit]
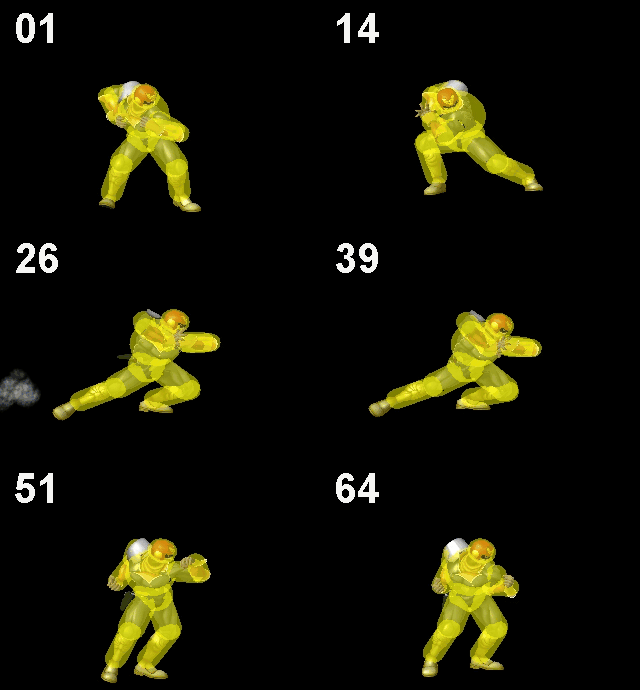
Nicknamed The People's Elbow, Captain Falcon rears back and thrusts his elbow in a fast-moving motion, dealing flame damage to anyone it connects with. This is one of the most powerful forward smashes in Melee, being the third most powerful forward smash overall with especially high knockback scaling (while Ganondorf's produces slightly stronger knockback, the fact Ganondorf's hits vertically allows Falcon's to KO faster on fast fallers and stages with high ceilings). However, it is difficult to land, with slow start-up lag and rather small hitboxes (though since Falcon lunges far with it, it reaches far regardless). It is additionally very punishable, with a heavy 39 frames of ending lag. As such, despite its great power, the move is not seen much in competitive play, especially when Falcon has access to a much easier to land and much safer move with comparable power in his Knee Smash. With a successful hard read though, it can potentially get a KO as early as 80% from center stage, and with its very high damage output, it can outprioritise up to moderate damage dealing ground attacks.
Hitboxes[edit]
Timing[edit]
| Charges between | 10-11 |
|---|---|
| Hitbox | 18-21 |
| Interruptible | 60 |
| Animation length | 64 |
Lag time |
Charge interval |
Hitbox |
Interruptible |
Similar moves[edit]
|
