SSBM Icon.png

Captain Falcon (SSBM)/Down aerial: Difference between revisions

From SmashWiki, the Super Smash Bros. wiki
Jump to navigationJump to search
m (Changed "u-throw" to "f-throw" on the description of the second combo example for the "Nipple Spike")
mNo edit summary
Line 3: Line 3:
==Overview==
==Overview==
[[File:Captain Falcon Down Aerial Hitbox Melee.gif|thumb|Hitboxes of Captain Falcon's dair]]
[[File:Captain Falcon Down Aerial Hitbox Melee.gif|thumb|Hitboxes of Captain Falcon's dair]]
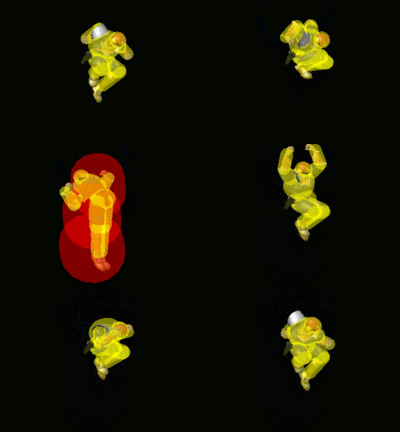
Captain Falcon does a [[stomp]] attack. This attack has three [[hitbox]]es - the lower two on the legs, and the upper one in the torso region. The lower hitboxes have powerful [[meteor smash]]ing properties (fourth strongest in the game) with some high [[hitstun]] as well, while the upper hitbox is an extremely powerful [[spike]] known as the '''[[Nipple Spike]]''' - it is the strongest spike in the game, but is also notoriously difficult to land (despite it also having a rather large hitbox). It can KO at low percentages, and can be combo'd into with moves such as a down aerial on a grounded opponent, {{mvsub|Captain Falcon|SSBM|side special|alt=Raptor Boost}}, a {{mvsub|Captain Falcon|SSBM|neutral aerial}}, or a {{mvsub|Captain Falcon|SSBM|down throw}}/{{mvsub|Captain Falcon|SSBM|up throw}} (depending on the [[falling speed]] of the opponent). When used on a grounded opponent, the move is also a great [[combo]] starter, being able to lead into an aerial, including a {{mvsub|Captain Falcon|SSBM|forward aerial|alt=Knee Smash}} as a finisher or another down aerial to get the opponent back onto the ground, with potential to start a [[tech-chase]].
Captain Falcon does a [[stomp]] attack. This attack has three [[hitbox]]es - the lower two on the legs, and the upper one in the torso region. The lower hitboxes have powerful [[meteor smash]]ing properties (fourth strongest in the game) with some high [[hitstun]] as well, while the upper hitbox is an extremely powerful [[spike]] known as the '''Nipple Spike''' - it is the strongest spike in the game, but is also notoriously difficult to land (despite it also having a rather large hitbox). It can KO at low percentages, and can be combo'd into with moves such as a down aerial on a grounded opponent, {{mvsub|Captain Falcon|SSBM|side special|alt=Raptor Boost}}, a {{mvsub|Captain Falcon|SSBM|neutral aerial}}, or a {{mvsub|Captain Falcon|SSBM|down throw}}/{{mvsub|Captain Falcon|SSBM|up throw}} (depending on the [[falling speed]] of the opponent). When used on a grounded opponent, the move is also a great [[combo]] starter, being able to lead into an aerial, including a {{mvsub|Captain Falcon|SSBM|forward aerial|alt=Knee Smash}} as a finisher or another down aerial to get the opponent back onto the ground, with potential to start a [[tech-chase]].


==Gallery==
==Gallery==

Revision as of 18:39, July 29, 2016

Overview

Hitboxes of Captain Falcon's dair in Melee.
Hitboxes of Captain Falcon's dair

Captain Falcon does a stomp attack. This attack has three hitboxes - the lower two on the legs, and the upper one in the torso region. The lower hitboxes have powerful meteor smashing properties (fourth strongest in the game) with some high hitstun as well, while the upper hitbox is an extremely powerful spike known as the Nipple Spike - it is the strongest spike in the game, but is also notoriously difficult to land (despite it also having a rather large hitbox). It can KO at low percentages, and can be combo'd into with moves such as a down aerial on a grounded opponent, Raptor Boost, a neutral aerial, or a down throw/up throw (depending on the falling speed of the opponent). When used on a grounded opponent, the move is also a great combo starter, being able to lead into an aerial, including a Knee Smash as a finisher or another down aerial to get the opponent back onto the ground, with potential to start a tech-chase.

Gallery

Hitboxes

ID Part Damage SD Angle BK KS FKV Radius Bone Offset Clang Rebound Effect G A Sound
0 0 16% 0 AngleIcon270.png 40 100 0 6.6402 14 5.4684 1.5624 0.0 HitboxTableIcon(Clang).png HitboxTableIcon(Rebound).png EffectIcon(Normal).png HitboxTableIcon(GroundedTrue).png HitboxTableIcon(AerialTrue).png L Kick
1 0 16% 0 AngleIcon270.png 40 100 0 5.859 13 4.2966 1.5624 0.0 HitboxTableIcon(Clang).png HitboxTableIcon(Rebound).png EffectIcon(Normal).png HitboxTableIcon(GroundedTrue).png HitboxTableIcon(AerialTrue).png L Kick
2 0 16% 0 AngleIcon290spk.png 40 100 0 5.4684 4 0.0 1.5624 0.0 HitboxTableIcon(Clang).png HitboxTableIcon(Rebound).png EffectIcon(Normal).png HitboxTableIcon(GroundedTrue).png HitboxTableIcon(AerialTrue).png L Kick

Timing

Attack

Initial autocancel 1-3
Hitboxes 16-20
Ending autocancel 36-
Interruptible 38
Animation length 44
FrameIcon(Lag).png FrameIcon(Lag).png FrameIcon(Lag).png FrameIcon(Lag).png FrameIcon(Lag).png FrameIcon(Lag).png FrameIcon(Lag).png FrameIcon(Lag).png FrameIcon(Lag).png FrameIcon(Lag).png FrameIcon(Lag).png FrameIcon(Lag).png FrameIcon(Lag).png FrameIcon(Lag).png FrameIcon(Lag).png FrameIcon(Hitbox).png FrameIcon(Hitbox).png FrameIcon(Hitbox).png FrameIcon(Hitbox).png FrameIcon(Hitbox).png FrameIcon(Lag).png FrameIcon(Lag).png FrameIcon(Lag).png FrameIcon(Lag).png FrameIcon(Lag).png FrameIcon(Lag).png FrameIcon(Lag).png FrameIcon(Lag).png FrameIcon(Lag).png FrameIcon(Lag).png FrameIcon(Lag).png FrameIcon(Lag).png FrameIcon(Lag).png FrameIcon(Lag).png FrameIcon(Lag).png FrameIcon(Lag).png FrameIcon(Lag).png FrameIcon(Interruptible).png FrameIcon(Interruptible).png FrameIcon(Interruptible).png FrameIcon(Interruptible).png FrameIcon(Interruptible).png FrameIcon(Interruptible).png FrameIcon(Interruptible).png
FrameIcon(Autocancel).png FrameIcon(Autocancel).png FrameIcon(Autocancel).png FrameIcon(Blank).png FrameIcon(Blank).png FrameIcon(Blank).png FrameIcon(Blank).png FrameIcon(Blank).png FrameIcon(Blank).png FrameIcon(Blank).png FrameIcon(Blank).png FrameIcon(Blank).png FrameIcon(Blank).png FrameIcon(Blank).png FrameIcon(Blank).png FrameIcon(Blank).png FrameIcon(Blank).png FrameIcon(Blank).png FrameIcon(Blank).png FrameIcon(Blank).png FrameIcon(Blank).png FrameIcon(Blank).png FrameIcon(Blank).png FrameIcon(Blank).png FrameIcon(Blank).png FrameIcon(Blank).png FrameIcon(Blank).png FrameIcon(Blank).png FrameIcon(Blank).png FrameIcon(Blank).png FrameIcon(Blank).png FrameIcon(Blank).png FrameIcon(Blank).png FrameIcon(Blank).png FrameIcon(Blank).png FrameIcon(Autocancel).png FrameIcon(Autocancel).png FrameIcon(Autocancel).png FrameIcon(Autocancel).png FrameIcon(Autocancel).png FrameIcon(Autocancel).png FrameIcon(Autocancel).png FrameIcon(Autocancel).png FrameIcon(Autocancel).png

Landing lag

Animation length 24
L-cancelled animation length 12
Normal  FrameIcon(Lag).png FrameIcon(Lag).png FrameIcon(Lag).png FrameIcon(Lag).png FrameIcon(Lag).png FrameIcon(Lag).png FrameIcon(Lag).png FrameIcon(Lag).png FrameIcon(Lag).png FrameIcon(Lag).png FrameIcon(Lag).png FrameIcon(Lag).png FrameIcon(Lag).png FrameIcon(Lag).png FrameIcon(Lag).png FrameIcon(Lag).png FrameIcon(Lag).png FrameIcon(Lag).png FrameIcon(Lag).png FrameIcon(Lag).png FrameIcon(Lag).png FrameIcon(Lag).png FrameIcon(Lag).png FrameIcon(Lag).png
L-cancelled  FrameIcon(Lag).png FrameIcon(Lag).png FrameIcon(Lag).png FrameIcon(Lag).png FrameIcon(Lag).png FrameIcon(Lag).png FrameIcon(Lag).png FrameIcon(Lag).png FrameIcon(Lag).png FrameIcon(Lag).png FrameIcon(Lag).png FrameIcon(Lag).png FrameIcon(Blank).png FrameIcon(Blank).png FrameIcon(Blank).png FrameIcon(Blank).png FrameIcon(Blank).png FrameIcon(Blank).png FrameIcon(Blank).png FrameIcon(Blank).png FrameIcon(Blank).png FrameIcon(Blank).png FrameIcon(Blank).png FrameIcon(Blank).png
Legend (1 square = 1 frame)
FrameIcon(Lag).png
Lag time
FrameIcon(Hitbox).png
Hitbox
FrameIcon(Autocancel).png
Autocancel
FrameIcon(Interruptible).png
Interruptible

Similar moves