Bowser (SSB4)/Forward aerial: Difference between revisions
(New Page: {{competitive expertise}} ==Hitboxes== {{SSB4HitboxTableHeader}} {{SSB4HitboxTableRow |id=0 |part=0 |damage=13% |angle=361 |bk=40 |ks=80 |fkv=0 |r=6.0 |bn=16 |xpos=4.4 |ypos=0.0 |zpos...) |
m (I think this is sufficient enough as competitive expertise) |
||
| (11 intermediate revisions by 7 users not shown) | |||
| Line 1: | Line 1: | ||
{{ | {{ArticleIcons|ssb4=y}} | ||
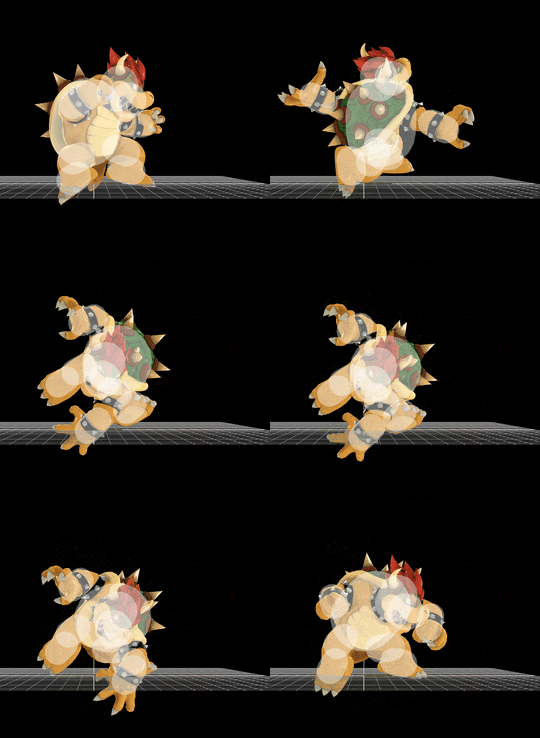
[[File:BowserFAir.gif|thumb|270px|Hitbox visualization showing Bowser's forward aerial.]] | |||
==Overview== | |||
Bowser slashes forward with his claws. The move is one of Bowser's best spacing options, and although not safe on shield, will [[auto-cancel]] upon using a short hop, making the aerial generally safe to throw out if faded out. The move quickly covers the area in front of him, and as aforementioned before, can auto-cancel. Along with this, his forward aerial can KO at higher percents, and with its long range, makes it practical for [[edgeguarding]] an opponent. | |||
His forward aerial can combo out of an up throw, or can chain into itself if the opponent's defensive options are accessed correctly. As it starts from above Bowser, it can be used to stuff higher approaches, and as it also has a backwards hitbox, it can catch some opponent's off-guard with their [[DI]] or can possibly combo into Bowser's powerful back aerial. | |||
==Hitboxes== | ==Hitboxes== | ||
{{SSB4HitboxTableHeader}} | {{SSB4HitboxTableHeader}} | ||
{{SSB4HitboxTableRow | {{SSB4HitboxTableRow | ||
|id=0 | |id=0 | ||
|damage=13% | |damage=13% | ||
|angle=361 | |angle=361 | ||
| Line 15: | Line 18: | ||
|bn=16 | |bn=16 | ||
|xpos=4.4 | |xpos=4.4 | ||
|zpos=-0.7 | |zpos=-0.7 | ||
|effect=Slash | |effect=Slash | ||
|type=Hand | |type=Hand | ||
|sfx=Slash | |sfx=Slash | ||
|slvl=L | |slvl=L | ||
| Line 26: | Line 26: | ||
{{SSB4HitboxTableRow | {{SSB4HitboxTableRow | ||
|id=1 | |id=1 | ||
|damage=12% | |damage=12% | ||
|angle=361 | |angle=361 | ||
| Line 34: | Line 33: | ||
|r=5.0 | |r=5.0 | ||
|bn=16 | |bn=16 | ||
|effect=Slash | |effect=Slash | ||
|type=Hand | |type=Hand | ||
|sfx=Slash | |sfx=Slash | ||
|slvl=L | |slvl=L | ||
| Line 46: | Line 40: | ||
{{SSB4HitboxTableRow | {{SSB4HitboxTableRow | ||
|id=2 | |id=2 | ||
|damage=11% | |damage=11% | ||
|angle=361 | |angle=361 | ||
| Line 54: | Line 47: | ||
|r=5.0 | |r=5.0 | ||
|bn=14 | |bn=14 | ||
|effect=Slash | |effect=Slash | ||
|type=Hand | |type=Hand | ||
|sfx=Slash | |sfx=Slash | ||
|slvl=L | |slvl=L | ||
| Line 66: | Line 54: | ||
|} | |} | ||
==Timing== | |||
{|class="wikitable" | |||
!Initial autocancel | |||
|1-3 | |||
|- | |||
!Hitboxes | |||
|11-14 | |||
|- | |||
!Ending autocancel | |||
|31- | |||
|- | |||
!Interruptibility | |||
|42 | |||
|- | |||
!Animation length | |||
|53 | |||
|} | |||
{{FrameStripStart}} | |||
{{FrameStrip|t=Lag|c=10}}{{FrameStrip|t=Hitbox|c=4}}{{FrameStrip|t=Lag|c=27}}{{FrameStrip|t=Interruptible|c=12}} | |||
|- | |||
{{FrameStrip|t=Autocancel|c=3}}{{FrameStrip|t=Blank|c=27}}{{FrameStrip|t=Autocancel|c=23}} | |||
{{FrameStripEnd}} | |||
===[[Landing lag]]=== | |||
{|class="wikitable" | |||
!Animation length | |||
|24 | |||
|} | |||
{{FrameStripStart}} | |||
{{FrameStrip|t=Lag|c=24}} | |||
{{FrameStripEnd}} | |||
{{FrameIconLegend|lag=y|hitbox=y|autocancel=y|interruptible=y}} | |||
{{MvSubNavBowser|g=SSB4}} | {{MvSubNavBowser|g=SSB4}} | ||
[[Category:Bowser (SSB4)]] | |||
[[Category:Forward aerials (SSB4)]] | |||
Latest revision as of 15:05, September 20, 2019
Overview[edit]
Bowser slashes forward with his claws. The move is one of Bowser's best spacing options, and although not safe on shield, will auto-cancel upon using a short hop, making the aerial generally safe to throw out if faded out. The move quickly covers the area in front of him, and as aforementioned before, can auto-cancel. Along with this, his forward aerial can KO at higher percents, and with its long range, makes it practical for edgeguarding an opponent. His forward aerial can combo out of an up throw, or can chain into itself if the opponent's defensive options are accessed correctly. As it starts from above Bowser, it can be used to stuff higher approaches, and as it also has a backwards hitbox, it can catch some opponent's off-guard with their DI or can possibly combo into Bowser's powerful back aerial.
Hitboxes[edit]
Timing[edit]
| Initial autocancel | 1-3 |
|---|---|
| Hitboxes | 11-14 |
| Ending autocancel | 31- |
| Interruptibility | 42 |
| Animation length | 53 |
Landing lag[edit]
| Animation length | 24 |
|---|
Lag time |
Hitbox |
Autocancel |
Interruptible |
|
