Falco (SSB4)/Up smash: Difference between revisions
From SmashWiki, the Super Smash Bros. wiki
Jump to navigationJump to search
No edit summary |
(added an overview for the move. also remove the 'see also' as i believed it to be unnecessary, considering how different fox and falco's up smashes are.) |
||
| Line 3: | Line 3: | ||
==Overview== | ==Overview== | ||
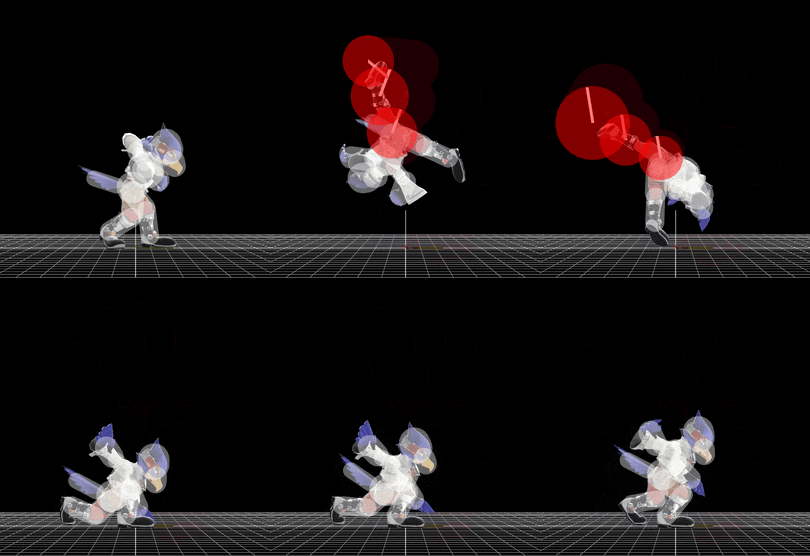
A double sideways-hitting kick. Falco's legs have intangibility during the [[hitbox]]es, and combined with the hitboxes extending from Falco's legs considerably, it is relatively disjointed and good for catching landings. It comes out relatively fast, but has notable endlag, and usually kills at around 120%, somewhat weak for a smash attack. Opponents may be hit out of the move if the first hit sends them too far for the second to connect, in similar vain to [[SSB4|Charizard]]'s up smash, giving it notable reliability issues as a result. The first kick is also able to hit certain characters hanging on the ledge and stage spike them, such as [[SSB4|Pikachu]]. | |||
A sideways- | |||
==Update history== | ==Update history== | ||
| Line 194: | Line 193: | ||
{{FrameIconLegend|lag=y|charge=y|hitbox=y|hitboxchange=y|interruptible=y}} | {{FrameIconLegend|lag=y|charge=y|hitbox=y|hitboxchange=y|interruptible=y}} | ||
{{MvSubNavFalco|g=SSB4}} | {{MvSubNavFalco|g=SSB4}} | ||
Revision as of 04:03, October 26, 2018
Overview
A double sideways-hitting kick. Falco's legs have intangibility during the hitboxes, and combined with the hitboxes extending from Falco's legs considerably, it is relatively disjointed and good for catching landings. It comes out relatively fast, but has notable endlag, and usually kills at around 120%, somewhat weak for a smash attack. Opponents may be hit out of the move if the first hit sends them too far for the second to connect, in similar vain to Charizard's up smash, giving it notable reliability issues as a result. The first kick is also able to hit certain characters hanging on the ledge and stage spike them, such as Pikachu.
Update history
 First kick gained leg intangibility: none → frames 7 - 12
 First kick startup: frame 8 → frame 7
 First kick base knockback: 60 (hitbox ID 0, 1) / 80 (hitbox ID 2) → 70
 First kick knockback scaling: 25 (hitbox ID 0, 1) / 30 (hitbox ID 2) → 18
 First kick (hitbox 0) X position: 1.5 → 2
 First kick (hitbox 2) X position: 5 → 7.7
 First kick (late hitbox 2) X position: 5 → 7
 Second kick startup: frame 13 → frame 12
 Second kick base knockback: 30 → 31
 Second kick knockback scaling: 98 → 104
 Second kick (hitbox 0) X position: 5 → 7
 Second kick (hitbox 1) X position: 1.5 → 2
Hitboxes
Timing
| Charges between | 2-3 |
|---|---|
| Hit 1 (clean) | 7-8 |
| Hit 1 (late) | 9-12 |
| Hit 2 | 13-20 |
| Interruptible | 50 |
| Animation length | 59 |
Lag time |
Charge interval |
Hitbox |
Hitbox change |
Interruptible |
|
