Super Smash Bros. Ultimate

Lucas (SSBU)/Down special: Difference between revisions

From SmashWiki, the Super Smash Bros. wiki
Jump to navigationJump to search
m (Added rehit rate. For some reason, the windbox has a rehit rate of 6, despite only being present for 1 frame and not reappearing.)
Line 5: Line 5:
==Hitboxes==
==Hitboxes==
{{UltimateHitboxTableHeader}}
{{HitboxTableTitle|Windbox|24}}
! {{rollover|Rehit rate|If not 0, hits again every X frames|y}}
{{HitboxTableTitle|Windbox|25}}
{{UltimateHitboxTableRow
|id=0
|id=0
Line 29: Line 30:
|rebound=f
|rebound=f
}}
}}
{{HitboxTableTitle|Hitbox|24}}
|6
{{HitboxTableTitle|Hitbox|25}}
{{UltimateHitboxTableRow
|rehit=10
|rehit=10
Line 52: Line 54:
|rebound=f
|rebound=f
}}
}}
|0
|}
|}


Revision as of 18:06, July 18, 2020

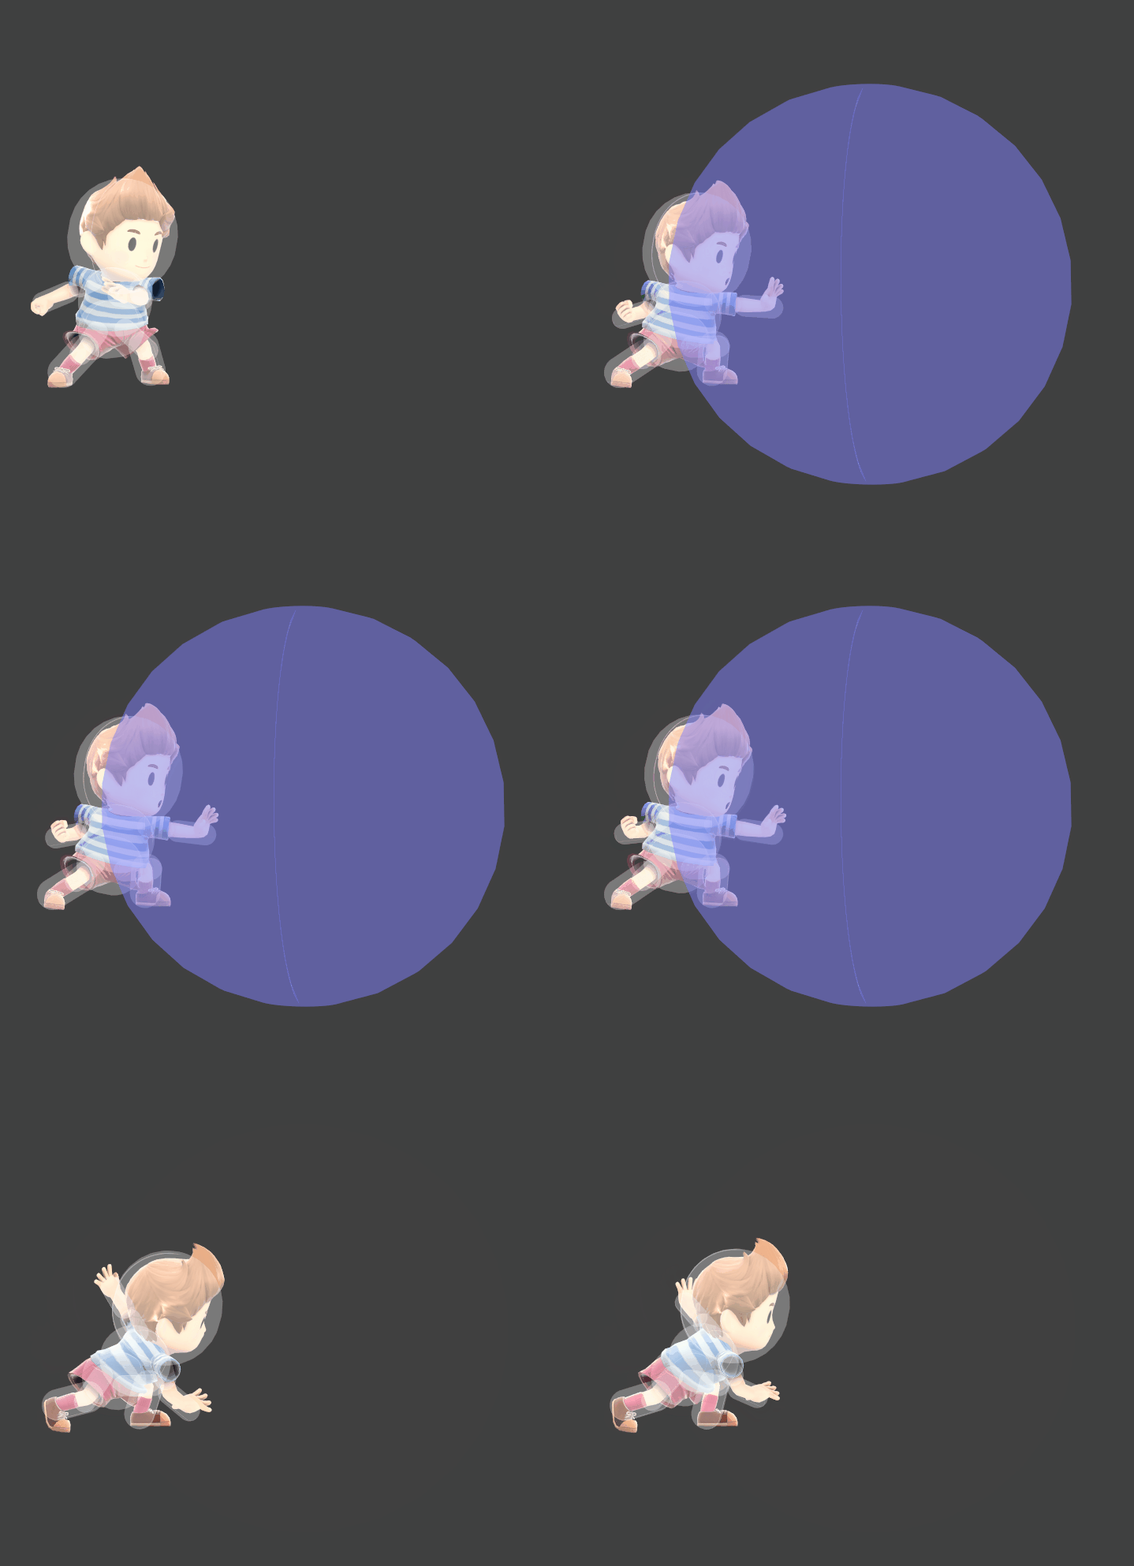
Hitbox visualization showing Lucas's down special, PSI Magnet.
Competitive.png This article or section may require competitive expertise.
You can discuss this issue on the talk page or edit this page to improve it.

Overview

Hitboxes

ID Part Rehit rate Damage SD Angle Angle type BK KS FKV Set weight Radius Bone Offset SDI× T% Clang Rebound Effect Type G A Sound Direct Hit bits Hit part Blockable Reflectable Absorbable Flinchless No GFX Heedless Rehit rate
Windbox
0 0 6 0.0% 0 AngleIcon180.png Standard 0 100 23 HitboxTableIcon(False).png 13.0 top 0.0 6.5 11.5 0.0× 0.0× 0% HitboxTableIcon(NoClang).png HitboxTableIcon(NoRebound).png Normal (effect) Typeless (type) HitboxTableIcon(GroundedTrue).png HitboxTableIcon(AerialTrue).png S None SpecialsIndirect.png All All HitboxTableIcon(Blockable).png HitboxTableIcon(Unreflectable).png HitboxTableIcon(Unabsorbable).png HitboxTableIcon(False).png HitboxTableIcon(False).png HitboxTableIcon(False).png 6
Hitbox
0 0 10 8.0% 0 AngleIcon25.png Standard 40 98 0 HitboxTableIcon(False).png 3.5 top 0.0 6.3 7.0 to 9.0 1.0× 1.0× 0% HitboxTableIcon(NoClang).png HitboxTableIcon(NoRebound).png Electric (effect) PK (type) HitboxTableIcon(GroundedTrue).png HitboxTableIcon(AerialTrue).png L Electric SpecialsIndirect.png All All HitboxTableIcon(Blockable).png HitboxTableIcon(Unreflectable).png HitboxTableIcon(Unabsorbable).png HitboxTableIcon(False).png HitboxTableIcon(False).png HitboxTableIcon(False).png 0

Timing

The data is for the respective animations, not overall. It absorbs starting on frame 7

Windbox 6
Hitbox 1
Interruptible (release) 11
Animation length (release) 26
FrameIcon(Lag).png FrameIcon(Lag).png FrameIcon(Lag).png FrameIcon(Lag).png FrameIcon(Lag).png Icon for non-damaging hitbox frames just before a loop point. Icon for absorption frames just after a loop point. FrameIcon(Absorb).png FrameIcon(Absorb).png FrameIcon(Absorb).png FrameIcon(Absorb).png FrameIcon(Absorb).png FrameIcon(Absorb).png FrameIcon(Absorb).png FrameIcon(Absorb).png FrameIcon(Absorb).png FrameIcon(Absorb).png FrameIcon(Absorb).png FrameIcon(Absorb).png FrameIcon(Absorb).png FrameIcon(Absorb).png FrameIcon(Absorb).png FrameIcon(Absorb).png FrameIcon(Absorb).png FrameIcon(Absorb).png FrameIcon(AbsorbLoopS).png FrameIcon(HitboxLoopE).png FrameIcon(Lag).png FrameIcon(Lag).png FrameIcon(Lag).png FrameIcon(Lag).png FrameIcon(Lag).png FrameIcon(Lag).png FrameIcon(Lag).png FrameIcon(Lag).png FrameIcon(Lag).png FrameIcon(Interruptible).png FrameIcon(Interruptible).png FrameIcon(Interruptible).png FrameIcon(Interruptible).png FrameIcon(Interruptible).png FrameIcon(Interruptible).png FrameIcon(Interruptible).png FrameIcon(Interruptible).png FrameIcon(Interruptible).png FrameIcon(Interruptible).png FrameIcon(Interruptible).png FrameIcon(Interruptible).png FrameIcon(Interruptible).png FrameIcon(Interruptible).png FrameIcon(Interruptible).png FrameIcon(Interruptible).png
Legend (1 square = 1 frame)
Lag
Lag time
Hitbox
Hitbox
FrameIcon(BlankLoopS).pngFrameIcon(BlankLoopE).png
Loop point
Absorption
Absorb
Icon for non-damaging hitbox frames in frame strips.
Flinchless hitbox