Wario (SSB4)/Down throw: Difference between revisions
From SmashWiki, the Super Smash Bros. wiki
Jump to navigationJump to search
m (Text replacement - " " to " ") |
SuperSqank (talk | contribs) m (→Throw) |
||
| (One intermediate revision by the same user not shown) | |||
| Line 5: | Line 5: | ||
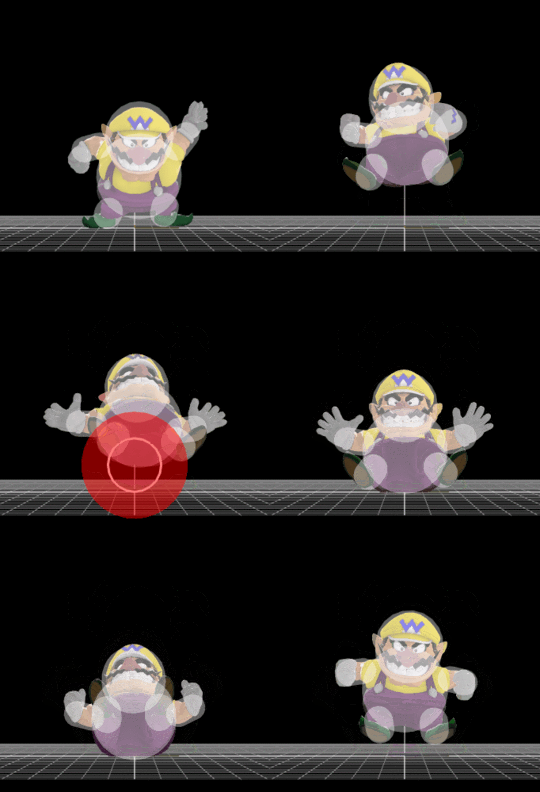
Throws the opponent onto the ground, then violently sits on top of them. While it has too much endlag to be used as a conventional combo throw, depending on the opponent's DI, it is possible to get some followups. If they DI down, Wario can do dash attack and lock them with the late hit. If they DI up and are a big character (like {{SSB4|Mewtwo}} or {{SSB4|Donkey Kong}}) then Wario can follow up into a back air and even kill with it. Should the opponent try to tech, he can buffer the bike, then punish all tech options except for teching in. Otherwise, the throw is actually unable to kill even at 999%, so it is completely unviable as a kill throw. | Throws the opponent onto the ground, then violently sits on top of them. While it has too much endlag to be used as a conventional combo throw, depending on the opponent's DI, it is possible to get some followups. If they DI down, Wario can do dash attack and lock them with the late hit. If they DI up and are a big character (like {{SSB4|Mewtwo}} or {{SSB4|Donkey Kong}}) then Wario can follow up into a back air and even kill with it. Should the opponent try to tech, he can buffer the bike, then punish all tech options except for teching in. Otherwise, the throw is actually unable to kill even at 999%, so it is completely unviable as a kill throw. | ||
== | ==Throw and Hitbox Data== | ||
=== | ===Hitbox=== | ||
{{SSB4HitboxTableHeader|special=y}} | |||
{{SSB4SpecialHitboxTableRow | |||
=== | |||
{{SSB4HitboxTableHeader}} | |||
{{ | |||
|id=0 | |id=0 | ||
|part=0 | |part=0 | ||
|damage=4% | |damage=4% | ||
|angle=361 | |angle=361 | ||
|af=3 | |||
|bk=30 | |bk=30 | ||
|ks=100 | |ks=100 | ||
| Line 39: | Line 31: | ||
}} | }} | ||
|} | |} | ||
===Throw=== | |||
{{SSB4ThrowTableHeader}} | |||
{{SSB4ThrowTableRow | |||
|id=0 | |||
|damage=4% | |||
|angle=130 | |||
|af=3 | |||
|bk=80 | |||
|ks=18 | |||
|fkv=0 | |||
|ff=0.0 | |||
|noff=f | |||
|bn=0 | |||
|type=Throwing | |||
|sfx=None | |||
|slvl=S | |||
}} | |||
{{SSB4ThrowTableRow | |||
|id=1 | |||
|damage=3% | |||
|angle=361 | |||
|af=3 | |||
|bk=60 | |||
|ks=100 | |||
|fkv=0 | |||
|noff=t | |||
|bn=0 | |||
|type=Throwing | |||
|sfx=None | |||
|slvl=S | |||
}} | |||
|} | |||
==Timing== | |||
{|class="wikitable" | |||
!Invincibility | |||
|1-18 | |||
|- | |||
!Hitbox | |||
|22-29 | |||
|- | |||
!Throw Release | |||
|30 | |||
|- | |||
!Interruptible | |||
|55 | |||
|- | |||
!Animation length | |||
|61 | |||
|} | |||
{{FrameStripStart}} | |||
{{FrameStrip|t=Lag|c=21}}{{FrameStrip|t=Hitbox|c=8|e=HitboxThrowS}}{{FrameStrip|t=Lag|c=25|s=LagThrowE}}{{FrameStrip|t=Interruptible|c=7}} | |||
|- | |||
{{FrameStrip|t=Invincible|c=18}}{{FrameStrip|t=Vulnerable|c=43}} | |||
{{FrameStripEnd}} | |||
{{FrameIconLegend|lag=y|hitbox=y|throw=y|interruptible=y|vulnerable=y|invincible=y}} | |||
{{MvSubNavWario|g=SSB4}} | {{MvSubNavWario|g=SSB4}} | ||
[[Category:Wario (SSB4)]] | [[Category:Wario (SSB4)]] | ||
[[Category:Down throws (SSB4)]] | [[Category:Down throws (SSB4)]] | ||
Latest revision as of 07:50, June 11, 2021
Overview[edit]
Throws the opponent onto the ground, then violently sits on top of them. While it has too much endlag to be used as a conventional combo throw, depending on the opponent's DI, it is possible to get some followups. If they DI down, Wario can do dash attack and lock them with the late hit. If they DI up and are a big character (like Mewtwo or Donkey Kong) then Wario can follow up into a back air and even kill with it. Should the opponent try to tech, he can buffer the bike, then punish all tech options except for teching in. Otherwise, the throw is actually unable to kill even at 999%, so it is completely unviable as a kill throw.
Throw and Hitbox Data[edit]
Hitbox[edit]
Throw[edit]
| ID | Damage | Angle | BK | KS | FKV | Bone | FFx | Type | Effect | Sound | |
|---|---|---|---|---|---|---|---|---|---|---|---|
| 0 | 4% | Forwards | 80 | 18 | 0 | 0 | 0.0x | ||||
| 1 | 3% | Forwards | 60 | 100 | 0 | 0 | None | ||||
Timing[edit]
| Invincibility | 1-18 |
|---|---|
| Hitbox | 22-29 |
| Throw Release | 30 |
| Interruptible | 55 |
| Animation length | 61 |
Lag time |
Hitbox |
Vulnerable |
Invincible |
Throw point |
Interruptible |
|
