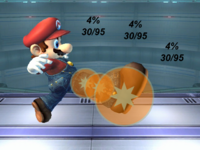
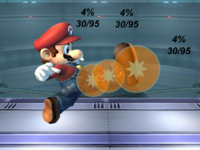
Mario (SSBB)/Neutral attack/Hit 3: Difference between revisions
From SmashWiki, the Super Smash Bros. wiki
Jump to navigationJump to search
Dr. Pain 99 (talk | contribs) m (The supporting arguments for the merge are bad. The moves differ greatly in data and function. Also, the project head opposes a merge, that is the majority opinion, and this has been bumped sufficiently.) |
SuperSqank (talk | contribs) No edit summary |
||
| (16 intermediate revisions by 8 users not shown) | |||
| Line 1: | Line 1: | ||
{{ArticleIcons|ssbb=y}} | {{ArticleIcons|ssbb=y}} | ||
:''For an overview of the overall natural combo, see [[Mario (SSBB)/Neutral attack|here]].'' | |||
[[File:MarioSSBBNeutral(hit3clean).png|thumb|Hitbox visualisation showing Mario's third jab.]] | |||
[[File:MarioSSBBNeutral(hit3late).png|thumb|Hitbox visualisation showing Mario's third jab.]] | |||
==Overview== | ==Overview== | ||
{{competitive expertise}} | |||
{ | |||
==Hitboxes== | ==Hitboxes== | ||
{{BrawlHitboxTableHeader}} | {{BrawlHitboxTableHeader}} | ||
{{HitboxTableTitle|Clean hit|24}} | |||
{{BrawlHitboxTableRow | {{BrawlHitboxTableRow | ||
|id=0 | |id=0 | ||
| Line 22: | Line 17: | ||
|ks=95 | |ks=95 | ||
|fkv=0 | |fkv=0 | ||
|r= | |r=300000 | ||
|bn=17 | |bn=17 | ||
|ypos= | |ypos=330000 | ||
| | |rawflags=00111001100000110000010001000000 | ||
}} | }} | ||
{{BrawlHitboxTableRow | {{BrawlHitboxTableRow | ||
| Line 38: | Line 29: | ||
|ks=95 | |ks=95 | ||
|fkv=0 | |fkv=0 | ||
|r= | |r=150000 | ||
|bn=17 | |bn=17 | ||
|ypos= | |ypos=60000 | ||
| | |rawflags=00111001100000110000010001000000 | ||
}} | }} | ||
{{BrawlHitboxTableRow | {{BrawlHitboxTableRow | ||
| Line 54: | Line 41: | ||
|ks=95 | |ks=95 | ||
|fkv=0 | |fkv=0 | ||
|r= | |r=150000 | ||
|bn=17 | |||
|ypos=-90000 | |||
|rawflags=00111001100000110000010001000000 | |||
}} | |||
{{HitboxTableTitle|Late hit hit|24}} | |||
{{BrawlHitboxTableRow | |||
|id=0 | |||
|damage=4% | |||
|angle=361 | |||
|bk=30 | |||
|ks=95 | |||
|fkv=0 | |||
|r=216000 | |||
|bn=17 | |bn=17 | ||
|ypos= | |ypos=330000 | ||
| | |rawflags=00111001100000110000010001000000 | ||
| | }} | ||
| | {{BrawlHitboxTableRow | ||
| | |id=1 | ||
| | |damage=4% | ||
|angle=361 | |||
|bk=30 | |||
|ks=95 | |||
|fkv=0 | |||
|r=150000 | |||
|bn=17 | |||
|ypos=60000 | |||
|rawflags=00111001100000110000010001000000 | |||
}} | |||
{{BrawlHitboxTableRow | |||
|id=2 | |||
|damage=4% | |||
|angle=361 | |||
|bk=30 | |||
|ks=95 | |||
|fkv=0 | |||
|r=150000 | |||
|bn=17 | |||
|ypos=-90000 | |||
|rawflags=00111001100000110000010001000000 | |||
}} | }} | ||
|} | |||
===Post hit data=== | |||
{|class="wikitable" | |||
|- | |||
!Hitbox||{{rollover|Base knockback|Knockback velocity on Mario at 0%|y}}||{{rollover|Knockback scaling|How much knockback velocity increases per percent on Mario|y}}||{{rollover|KO percent with poor DI|The percent the hitbox reaches 5750 in knockback velocity on Mario, which KOs from the center of FD with the standard horizontal trajectory when DI'd down|y}}||{{rollover|KO percent with no DI|The percent the hitbox reaches 6200 in knockback velocity on Mario, which KOs from the center of FD with the standard horizontal trajectory when not DI'd|y}}||{{rollover|KO percent with good DI|The percent the hitbox reaches 6825 in knockback velocity on Mario, which KOs from the center of FD with the standard horizontal trajectory when DI'd away|y}} | |||
|- | |||
|Any||1573||13.417||311.32%||344.86%||391.44% | |||
|} | |} | ||
| Line 68: | Line 96: | ||
{|class="wikitable" | {|class="wikitable" | ||
|- | |- | ||
! | !Clean hit | ||
|7-8 | |7-8 | ||
|- | |- | ||
! | !Late hit | ||
|9-10 | |9-10 | ||
|- | |- | ||
| Line 80: | Line 108: | ||
|39 | |39 | ||
|} | |} | ||
{{FrameStripStart}} | {{FrameStripStart}} | ||
{{FrameStrip|t=Lag|c=6}}{{FrameStrip|t=Hitbox|c=2|e=HitboxChangeS}}{{FrameStrip|t=Hitbox|c=2|s=HitboxChangeE}}{{FrameStrip|t=Lag|c=3}}{{FrameStrip|t=Lag|c=16}}{{FrameStrip|t=Interruptible|c=10}} | {{FrameStrip|t=Lag|c=6}}{{FrameStrip|t=Hitbox|c=2|e=HitboxChangeS}}{{FrameStrip|t=Hitbox|c=2|s=HitboxChangeE}}{{FrameStrip|t=Lag|c=3}}{{FrameStrip|t=Lag|c=16}}{{FrameStrip|t=Interruptible|c=10}} | ||
{{FrameStripEnd}} | |||
{{FrameIconLegend|lag=y|hitbox=y|hitboxchange=y|interruptible=y}} | {{FrameIconLegend|lag=y|hitbox=y|hitboxchange=y|interruptible=y}} | ||
[[Category: | {{MvSubNavMario|g=SSBB}} | ||
[[Category: | |||
[[Category:Mario (SSBB)]] | |||
[[Category:Neutral attacks (SSBB)]] | |||
Latest revision as of 14:19, June 6, 2021
- For an overview of the overall natural combo, see here.
Overview[edit]
Hitboxes[edit]
Post hit data[edit]
| Hitbox | Base knockback | Knockback scaling | KO percent with poor DI | KO percent with no DI | KO percent with good DI |
|---|---|---|---|---|---|
| Any | 1573 | 13.417 | 311.32% | 344.86% | 391.44% |
Timing[edit]
| Clean hit | 7-8 |
|---|---|
| Late hit | 9-10 |
| Interruptible | 30 |
| Animation length | 39 |
Lag time |
Hitbox |
Hitbox change |
Interruptible |
|


