SSBB Icon.png

Mario (SSBB)/Neutral attack/Hit 1: Difference between revisions

From SmashWiki, the Super Smash Bros. wiki
Jump to navigationJump to search
(simplification)
(Removed post hit data because it is not needed.)
Line 42: Line 42:
|rawflags=00111001000000110000001000000000
|rawflags=00111001000000110000001000000000
}}
}}
|}
===Post hit data===
{|class="wikitable"
|-
!Hitbox||{{rollover|Base knockback|Knockback velocity on Mario at 0%|y}}||{{rollover|Knockback scaling|How much knockback velocity increases per percent on Mario|y}}||{{rollover|KO percent with poor DI|The percent the hitbox reaches 5750 in knockback velocity on Mario, which KOs from the center of FD with the standard horizontal trajectory when DI'd down|y}}||{{rollover|KO percent with no DI|The percent the hitbox reaches 6200 in knockback velocity on Mario, which KOs from the center of FD with the standard horizontal trajectory when not DI'd|y}}||{{rollover|KO percent with good DI|The percent the hitbox reaches 6825 in knockback velocity on Mario, which KOs from the center of FD with the standard horizontal trajectory when DI'd away|y}}
|-
|Arm||853||0||NA||NA||NA
|-
|Body, fist||967||0||NA||NA||NA
|}
|}


Revision as of 12:11, March 21, 2020

For an overview of the overall natural combo, see here.

Hitboxes

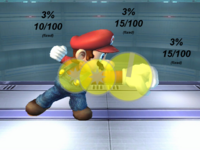
Hitbox of the move
ID Part Damage SD Angle BK KS FKV Radius Bone Offset SDIx T% Clang Rebound Type Effect G A Sound Direct
0 0 3% 0 Sakurai angle 0 100 15 3.0 Left upper arm 1.2 0.0 0.0 1.0x 1.0x 0% HitboxTableIcon(Clang).png HitboxTableIcon(Rebound).png TypeIcon(Hand).png EffectIcon(Normal).png HitboxTableIcon(GroundedTrue).png HitboxTableIcon(AerialTrue).png S Punch SpecialsDirect.png
1 0 3% 0 Sakurai angle 0 100 10 2.8 Chest 0.0 0.0 0.0 1.0x 1.0x 0% HitboxTableIcon(Clang).png HitboxTableIcon(Rebound).png TypeIcon(Hand).png EffectIcon(Normal).png HitboxTableIcon(GroundedTrue).png HitboxTableIcon(AerialTrue).png S Punch SpecialsDirect.png
2 0 3% 0 AngleIcon80.png 0 100 15 4.0 Left lower arm 3.3 0.0 0.0 1.0x 1.0x 0% HitboxTableIcon(Clang).png HitboxTableIcon(Rebound).png TypeIcon(Hand).png EffectIcon(Normal).png HitboxTableIcon(GroundedTrue).png HitboxTableIcon(AerialTrue).png S Punch SpecialsDirect.png

Timing

Hitbox 2-3
Continuation window 7-24
Auto-jab 10
Animation length 15
Interruptible 16
FrameIcon(Lag).png FrameIcon(Hitbox).png FrameIcon(Hitbox).png FrameIcon(Lag).png FrameIcon(Lag).png FrameIcon(Lag).png FrameIcon(Lag).png FrameIcon(Lag).png FrameIcon(LagLoopS).png FrameIcon(LagLoopE).png FrameIcon(Lag).png FrameIcon(Lag).png FrameIcon(Lag).png FrameIcon(Lag).png FrameIcon(Lag).png FrameIcon(Blank).png FrameIcon(Blank).png FrameIcon(Blank).png FrameIcon(Blank).png FrameIcon(Blank).png FrameIcon(Blank).png FrameIcon(Blank).png FrameIcon(Blank).png FrameIcon(Blank).png
FrameIcon(Blank).png FrameIcon(Blank).png FrameIcon(Blank).png FrameIcon(Blank).png FrameIcon(Blank).png FrameIcon(Blank).png FrameIcon(Continuable).png FrameIcon(Continuable).png FrameIcon(Continuable).png FrameIcon(Continuable).png FrameIcon(Continuable).png FrameIcon(Continuable).png FrameIcon(Continuable).png FrameIcon(Continuable).png FrameIcon(Continuable).png FrameIcon(Continuable).png FrameIcon(Continuable).png FrameIcon(Continuable).png FrameIcon(Continuable).png FrameIcon(Continuable).png FrameIcon(Continuable).png FrameIcon(Continuable).png FrameIcon(Continuable).png FrameIcon(Continuable).png
Legend (1 square = 1 frame)
FrameIcon(Lag).png
Lag time
FrameIcon(Hitbox).png
Hitbox
FrameIcon(BlankLoopS).pngFrameIcon(BlankLoopE).png
Loop point
FrameIcon(Continuable).png
Continuable