Mario (SSBB)/Forward tilt: Difference between revisions
From SmashWiki, the Super Smash Bros. wiki
Jump to navigationJump to search
No edit summary |
|||
| (27 intermediate revisions by 9 users not shown) | |||
| Line 1: | Line 1: | ||
{{ArticleIcons|ssbb=y}} | |||
==Overview== | ==Overview== | ||
[[File:MarioSSBBFTilt(angledside).png|thumb|Hitbox of Mario's f-tilt.]] | |||
While very fast in [[start-up]] and [[ending lag]], the move's poor [[reach]] limits its capability as a [[spacing]] move. It mainly serves as a quick [[punish]] attack, though with its low [[damage]] output and [[knockback]], and having no followup potential, it doesn't accomplish much when landed. It has slightly more base knockback when aimed down, though the move still won't have real KO potential under 200%, and the increase in base knockback is far from enough to make it useful for hitting opponents off the [[stage]]. Overall, while it's not a terrible move, it's not very useful, and it pales in comparison to most other [[forward tilt]]s. | |||
'' | ===Post hit data=== | ||
{|class="wikitable" | |||
|- | |||
!Hitbox||{{rollover|Base knockback|Knockback velocity on Mario at 0%|y}}||{{rollover|Knockback scaling|How much knockback velocity increases per percent on Mario|y}}||{{rollover|KO percent with poor DI|The percent the hitbox reaches 5750 in knockback velocity on Mario, which KOs from the center of FD with the standard horizontal trajectory when DI'd down|y}}||{{rollover|KO percent with no DI|The percent the hitbox reaches 6200 in knockback velocity on Mario, which KOs from the center of FD with the standard horizontal trajectory when not DI'd|y}}||{{rollover|KO percent with good DI|The percent the hitbox reaches 6825 in knockback velocity on Mario, which KOs from the center of FD with the standard horizontal trajectory when DI'd away|y}} | |||
|- | |||
|Angled side, angled up||1036||23.687||199.01%||218.01%||244.40% | |||
|- | |||
|Angled down||1197||23.687||192.22%||211.21%||237.60% | |||
|} | |||
==Hitboxes== | ==Hitboxes== | ||
{{BrawlHitboxTableHeader}} | {{BrawlHitboxTableHeader}} | ||
{{HitboxTableTitle|Angled up | {{HitboxTableTitle|Angled up / angled forward|24}} | ||
{{BrawlHitboxTableRow | {{BrawlHitboxTableRow | ||
|id=0 | |id=0 | ||
| Line 16: | Line 24: | ||
|ks=100 | |ks=100 | ||
|fkv=0 | |fkv=0 | ||
|r= | |r=300000 | ||
|bn=17 | |bn=17 | ||
|ypos= | |ypos=216000 | ||
| | |rawflags=00111001100000110000010001000000 | ||
}} | }} | ||
{{BrawlHitboxTableRow | {{BrawlHitboxTableRow | ||
| Line 31: | Line 36: | ||
|ks=100 | |ks=100 | ||
|fkv=0 | |fkv=0 | ||
|r= | |r=240000 | ||
|bn=16 | |bn=16 | ||
|ypos= | |ypos=72000 | ||
| | |rawflags=00111001100000110000010001000000 | ||
}} | }} | ||
{{BrawlHitboxTableRow | {{BrawlHitboxTableRow | ||
| Line 46: | Line 48: | ||
|ks=100 | |ks=100 | ||
|fkv=0 | |fkv=0 | ||
|r= | |r=180000 | ||
|bn=10 | |bn=10 | ||
|ypos= | |ypos=72000 | ||
|zpos=- | |zpos=-120000 | ||
| | |rawflags=00111001100000110000010001000000 | ||
}} | }} | ||
{{HitboxTableTitle|Angled down|24}} | {{HitboxTableTitle|Angled down|24}} | ||
| Line 63: | Line 62: | ||
|ks=100 | |ks=100 | ||
|fkv=0 | |fkv=0 | ||
|r= | |r=300000 | ||
|bn=17 | |bn=17 | ||
|ypos= | |ypos=216000 | ||
| | |rawflags=00111001100000110000010001000000 | ||
}} | }} | ||
{{BrawlHitboxTableRow | {{BrawlHitboxTableRow | ||
| Line 78: | Line 74: | ||
|ks=100 | |ks=100 | ||
|fkv=0 | |fkv=0 | ||
|r= | |r=240000 | ||
|bn=16 | |bn=16 | ||
|ypos= | |ypos=72000 | ||
| | |rawflags=00111001100000110000010001000000 | ||
}} | }} | ||
{{BrawlHitboxTableRow | {{BrawlHitboxTableRow | ||
| Line 93: | Line 86: | ||
|ks=100 | |ks=100 | ||
|fkv=0 | |fkv=0 | ||
|r= | |r=180000 | ||
|bn=10 | |bn=10 | ||
|ypos= | |ypos=72000 | ||
|zpos=- | |zpos=-120000 | ||
| | |rawflags=00111001100000110000010001000000 | ||
}} | }} | ||
|} | |} | ||
| Line 110: | Line 100: | ||
|5-7 | |5-7 | ||
|- | |- | ||
! | !Interruptible | ||
|25 | |25 | ||
|- | |- | ||
| Line 119: | Line 109: | ||
{{FrameStripStart}} | {{FrameStripStart}} | ||
{{FrameStrip|t=Lag|c=4}}{{FrameStrip|t=Hitbox|c=3}}{{FrameStrip|t=Lag|c=17}}{{FrameStrip|t=Interruptible|c=8}} | {{FrameStrip|t=Lag|c=4}}{{FrameStrip|t=Hitbox|c=3}}{{FrameStrip|t=Lag|c=17}}{{FrameStrip|t=Interruptible|c=8}} | ||
|} | {{FrameStripEnd}} | ||
{{FrameIconLegend|lag=y|hitbox=y|interruptible=y}} | |||
==Gallery== | |||
<center> | |||
<gallery> | |||
File:MarioSSBBFTilt(angledup).png|Hitbox of the move when angled up. | |||
File:MarioSSBBFTilt(angleddown).png|Hitbox of the move when angled down. | |||
</gallery> | |||
</center> | |||
{{MvSubNavMario|g=SSBB}} | |||
[[Category:Forward tilts]] | [[Category:Mario (SSBB)]] | ||
[[Category:Forward tilts (SSBB)]] | |||
Latest revision as of 13:41, April 16, 2021
Overview[edit]
.png)
While very fast in start-up and ending lag, the move's poor reach limits its capability as a spacing move. It mainly serves as a quick punish attack, though with its low damage output and knockback, and having no followup potential, it doesn't accomplish much when landed. It has slightly more base knockback when aimed down, though the move still won't have real KO potential under 200%, and the increase in base knockback is far from enough to make it useful for hitting opponents off the stage. Overall, while it's not a terrible move, it's not very useful, and it pales in comparison to most other forward tilts.
Post hit data[edit]
| Hitbox | Base knockback | Knockback scaling | KO percent with poor DI | KO percent with no DI | KO percent with good DI |
|---|---|---|---|---|---|
| Angled side, angled up | 1036 | 23.687 | 199.01% | 218.01% | 244.40% |
| Angled down | 1197 | 23.687 | 192.22% | 211.21% | 237.60% |
Hitboxes[edit]
| ID | Part | Damage | SD | Angle | BK | KS | FKV | Radius | Bone | Offset | SDIx | H× | T% | Clang | Rebound | Type | Effect | G | A | Sound | Direct | ||
|---|---|---|---|---|---|---|---|---|---|---|---|---|---|---|---|---|---|---|---|---|---|---|---|
| Angled up / angled forward | |||||||||||||||||||||||
| 0 | 0 | 8% | 0 | 8 | 100 | 0 | 5.0 | 17 | 0.0 | 3.6 | 0.0 | 1.0x | 1.0x | 0% | |||||||||
| 1 | 0 | 8% | 0 | 8 | 100 | 0 | 4.0 | 16 | 0.0 | 1.2 | 0.0 | 1.0x | 1.0x | 0% | |||||||||
| 2 | 0 | 8% | 0 | 8 | 100 | 0 | 3.0 | 10 | 0.0 | 1.2 | -2.0 | 1.0x | 1.0x | 0% | |||||||||
| Angled down | |||||||||||||||||||||||
| 0 | 0 | 8% | 0 | 13 | 100 | 0 | 5.0 | 17 | 0.0 | 3.6 | 0.0 | 1.0x | 1.0x | 0% | |||||||||
| 1 | 0 | 8% | 0 | 13 | 100 | 0 | 4.0 | 16 | 0.0 | 1.2 | 0.0 | 1.0x | 1.0x | 0% | |||||||||
| 2 | 0 | 8% | 0 | 13 | 100 | 0 | 3.0 | 10 | 0.0 | 1.2 | -2.0 | 1.0x | 1.0x | 0% | |||||||||
Timing[edit]
| Hitbox | 5-7 |
|---|---|
| Interruptible | 25 |
| Animation length | 32 |
Lag time |
Hitbox |
Interruptible |
Gallery[edit]
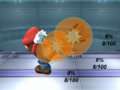
Hitbox of the move when angled up.
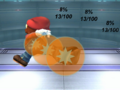
Hitbox of the move when angled down.
.png)
.png)
|