SSBU Icon.png

Link (SSBU)/Dash attack: Difference between revisions

From SmashWiki, the Super Smash Bros. wiki
Jump to navigationJump to search
No edit summary
Line 2: Line 2:
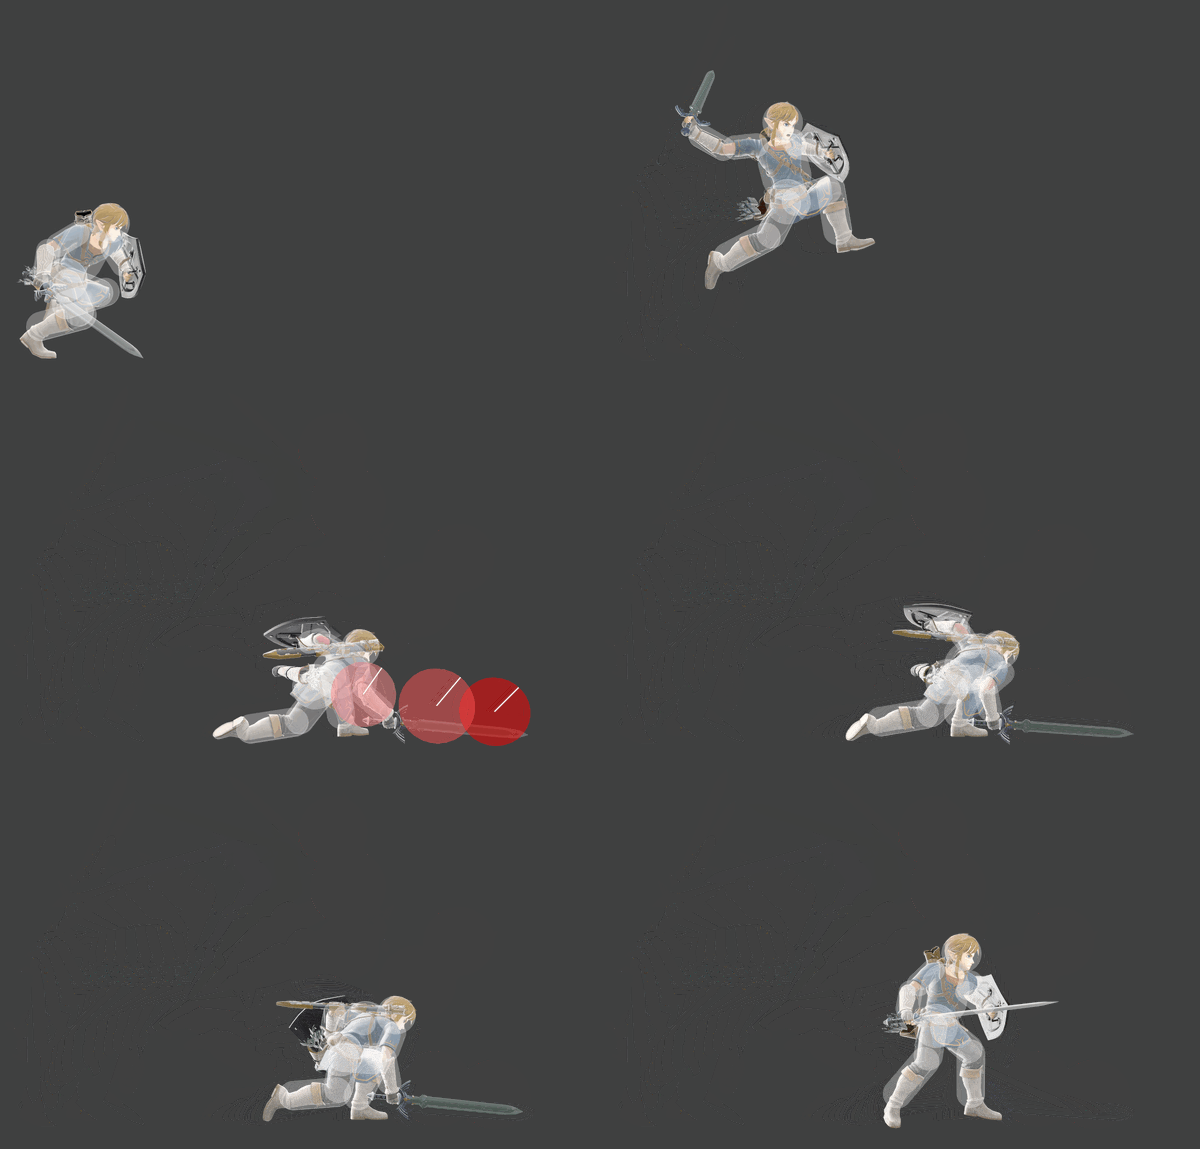
[[File:LinkDashAttackSSBU.gif|thumb|600px|Hitbox visualization showing Link's dash attack.]]
[[File:LinkDashAttackSSBU.gif|thumb|600px|Hitbox visualization showing Link's dash attack.]]
{{competitive expertise}}
==Overview==D
==Overview==
Hops into the air and performs a jumping downward slash, otherwise known as the Jump Attack or {{iw|zeldawiki|Jump Slash}}. Deals 12% up close along the arm, 13% along the blade and 14% at the tip of the blade, dealing a considerable amount of knockback in addition.  
While plagued with a slow startup, it benefits from a unique 'high profile' aspect, the brief hop allows you to avoid low to the ground attacks such as [[Ness]]' [[PK Fire]] and catch them off guard. It can also be used to [[edgeguard]] high to mid recoveries from the ledge, and potentially 2-frame the opponent, yet the speed of the move leaves that possibility something to be desired. It serves as a strong tool for hard reading opponents and catching rolls, however due to it's aforementioned slow startup and high ending lag, it is a risky option even then, and should be seldom used in neutral other than in specific circumstances.

Revision as of 11:16, January 25, 2022

Hitbox visualization showing Link's dash attack.
Competitive.png This article or section may require competitive expertise.
You can discuss this issue on the talk page or edit this page to improve it.

Overview

Hops into the air and performs a jumping downward slash, otherwise known as the Jump Attack or Jump Slash. Deals 12% up close along the arm, 13% along the blade and 14% at the tip of the blade, dealing a considerable amount of knockback in addition. While plagued with a slow startup, it benefits from a unique 'high profile' aspect, the brief hop allows you to avoid low to the ground attacks such as Ness' PK Fire and catch them off guard. It can also be used to edgeguard high to mid recoveries from the ledge, and potentially 2-frame the opponent, yet the speed of the move leaves that possibility something to be desired. It serves as a strong tool for hard reading opponents and catching rolls, however due to it's aforementioned slow startup and high ending lag, it is a risky option even then, and should be seldom used in neutral other than in specific circumstances.

Hitboxes

ID Part Rehit rate Damage SD Angle Angle type BK KS FKV Set weight Radius Bone Offset SDI× T% Clang Rebound Effect Type G A Sound Direct Hit bits Hit part Blockable Reflectable Absorbable Flinchless No GFX Heedless Shieldstun
0 0 0 14.0% 0 AngleIcon45.png Forward 70 85 0 HitboxTableIcon(False).png 3.2 sword2 8.5 0.0 -2.0 1.2× 1.0× 0% HitboxTableIcon(Clang).png HitboxTableIcon(Rebound).png EffectIcon(Slash).png TypeIcon(Sword).png HitboxTableIcon(GroundedTrue).png HitboxTableIcon(AerialTrue).png L Slash SpecialsDirect.png All All HitboxTableIcon(Blockable).png HitboxTableIcon(Unreflectable).png HitboxTableIcon(Unabsorbable).png HitboxTableIcon(False).png HitboxTableIcon(False).png HitboxTableIcon(False).png 1.4×
1 0 0 13.0% 0 AngleIcon50.png Forward 85 85 0 HitboxTableIcon(False).png 3.5 sword2 3.0 0.0 -2.0 1.0× 1.0× 0% HitboxTableIcon(Clang).png HitboxTableIcon(Rebound).png EffectIcon(Slash).png TypeIcon(Sword).png HitboxTableIcon(GroundedTrue).png HitboxTableIcon(AerialTrue).png L Slash SpecialsDirect.png All All HitboxTableIcon(Blockable).png HitboxTableIcon(Unreflectable).png HitboxTableIcon(Unabsorbable).png HitboxTableIcon(False).png HitboxTableIcon(False).png HitboxTableIcon(False).png 1.4×
2 0 0 12.0% 0 AngleIcon55.png Forward 85 77 0 HitboxTableIcon(False).png 3.0 armr 0.0 0.0 0.0 1.0× 1.0× 0% HitboxTableIcon(NoClang).png HitboxTableIcon(NoRebound).png EffectIcon(Slash).png TypeIcon(Sword).png HitboxTableIcon(GroundedTrue).png HitboxTableIcon(AerialTrue).png L Slash SpecialsDirect.png All All HitboxTableIcon(Blockable).png HitboxTableIcon(Unreflectable).png HitboxTableIcon(Unabsorbable).png HitboxTableIcon(False).png HitboxTableIcon(False).png HitboxTableIcon(False).png 1.4×

Timing

Hitboxes 20-23
Interruptible 57
Animation length 67
FrameIcon(Lag).png FrameIcon(Lag).png FrameIcon(Lag).png FrameIcon(Lag).png FrameIcon(Lag).png FrameIcon(Lag).png FrameIcon(Lag).png FrameIcon(Lag).png FrameIcon(Lag).png FrameIcon(Lag).png FrameIcon(Lag).png FrameIcon(Lag).png FrameIcon(Lag).png FrameIcon(Lag).png FrameIcon(Lag).png FrameIcon(Lag).png FrameIcon(Lag).png FrameIcon(Lag).png FrameIcon(Lag).png FrameIcon(Hitbox).png FrameIcon(Hitbox).png FrameIcon(Hitbox).png FrameIcon(Hitbox).png FrameIcon(Lag).png FrameIcon(Lag).png FrameIcon(Lag).png FrameIcon(Lag).png FrameIcon(Lag).png FrameIcon(Lag).png FrameIcon(Lag).png FrameIcon(Lag).png FrameIcon(Lag).png FrameIcon(Lag).png FrameIcon(Lag).png FrameIcon(Lag).png FrameIcon(Lag).png FrameIcon(Lag).png FrameIcon(Lag).png FrameIcon(Lag).png FrameIcon(Lag).png FrameIcon(Lag).png FrameIcon(Lag).png FrameIcon(Lag).png FrameIcon(Lag).png FrameIcon(Lag).png FrameIcon(Lag).png FrameIcon(Lag).png FrameIcon(Lag).png FrameIcon(Lag).png FrameIcon(Lag).png FrameIcon(Lag).png FrameIcon(Lag).png FrameIcon(Lag).png FrameIcon(Lag).png FrameIcon(Lag).png FrameIcon(Lag).png FrameIcon(Interruptible).png FrameIcon(Interruptible).png FrameIcon(Interruptible).png FrameIcon(Interruptible).png FrameIcon(Interruptible).png FrameIcon(Interruptible).png FrameIcon(Interruptible).png FrameIcon(Interruptible).png FrameIcon(Interruptible).png FrameIcon(Interruptible).png FrameIcon(Interruptible).png
Legend (1 square = 1 frame)
FrameIcon(Lag).png
Lag time
FrameIcon(Hitbox).png
Hitbox
FrameIcon(Interruptible).png
Interruptible