SSB4 Icon.png

Jigglypuff (SSB4)/Up tilt: Difference between revisions

From SmashWiki, the Super Smash Bros. wiki
Jump to navigationJump to search
(added an overview for the move.)
No edit summary
Line 3: Line 3:


==Overview==
==Overview==
Jigglypuff performs a scorpion kick. It has slow startup, but somewhat little endlag, and is Jigglypuff's strongest tilt in kill power, being able to kill usually in the 120%-140% ranges. At very low percents, it can combo into itself on most characters, or other aerials, potentially into rest. The move is held back greatly however by its very poor range, as any character with a slightly disjointed move is likely to outrange it, and it is very hard to hit opponents in front of Jigglypuff. The damage output is also low, being a mere 9% at strongest.
Jigglypuff performs a scorpion kick. It has slow startup and low endlag. It is Jigglypuff's strongest tilt in kill power, typically killing in the 120%-140% range. At low percents, it can combo into itself on most characters, as well as aerials and [[Rest]] at percents higher than this. However, the move is held back greatly by its very poor range; any character with a slightly disjointed move can outright beat it and the move is very hard to hit opponents in front of Jigglypuff with. The damage output is also low, being a mere 9% at strongest.


==Hitboxes==
==Hitboxes==

Revision as of 21:09, November 6, 2018

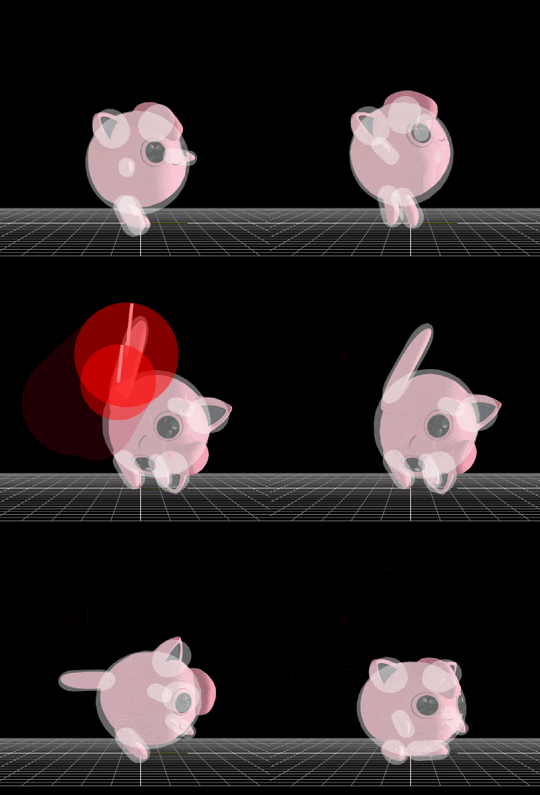
Hitbox visualization showing Jigglypuff's up tilt.

Overview

Jigglypuff performs a scorpion kick. It has slow startup and low endlag. It is Jigglypuff's strongest tilt in kill power, typically killing in the 120%-140% range. At low percents, it can combo into itself on most characters, as well as aerials and Rest at percents higher than this. However, the move is held back greatly by its very poor range; any character with a slightly disjointed move can outright beat it and the move is very hard to hit opponents in front of Jigglypuff with. The damage output is also low, being a mere 9% at strongest.

Hitboxes

ID Part Damage SD Angle BK KS FKV Radius Bone Offset SDIx T% Clang Rebound Type Effect G A Sound Direct
Clean hit
0 0 9% 0 AngleIcon96.png 40 120 0 4.0 10 0.0 0.0 0.0 1.0x 1.0x 0% HitboxTableIcon(Clang).png HitboxTableIcon(Rebound).png TypeIcon(Foot).png EffectIcon(Normal).png HitboxTableIcon(GroundedTrue).png HitboxTableIcon(AerialTrue).png L Kick SpecialsDirect.png
1 0 9% 0 AngleIcon96.png 40 120 0 5.5 10 0.0 -3.0 0.0 1.0x 1.0x 0% HitboxTableIcon(Clang).png HitboxTableIcon(Rebound).png TypeIcon(Foot).png EffectIcon(Normal).png HitboxTableIcon(GroundedTrue).png HitboxTableIcon(AerialTrue).png L Kick SpecialsDirect.png
Late hit
0 0 8% 0 AngleIcon88.png 40 120 0 4.0 10 0.0 0.0 0.0 1.0x 1.0x 0% HitboxTableIcon(Clang).png HitboxTableIcon(Rebound).png TypeIcon(Foot).png EffectIcon(Normal).png HitboxTableIcon(GroundedTrue).png HitboxTableIcon(AerialTrue).png M Kick SpecialsDirect.png
1 0 8% 0 AngleIcon88.png 40 120 0 5.5 10 0.0 -3.0 0.0 1.0x 1.0x 0% HitboxTableIcon(Clang).png HitboxTableIcon(Rebound).png TypeIcon(Foot).png EffectIcon(Normal).png HitboxTableIcon(GroundedTrue).png HitboxTableIcon(AerialTrue).png M Kick SpecialsDirect.png

Timing

Clean hit 9-10
Late hit 11-13
Animation length 23
FrameIcon(Lag).png FrameIcon(Lag).png FrameIcon(Lag).png FrameIcon(Lag).png FrameIcon(Lag).png FrameIcon(Lag).png FrameIcon(Lag).png FrameIcon(Lag).png FrameIcon(Hitbox).png FrameIcon(HitboxChangeS).png FrameIcon(HitboxChangeE).png FrameIcon(Hitbox).png FrameIcon(Hitbox).png FrameIcon(Lag).png FrameIcon(Lag).png FrameIcon(Lag).png FrameIcon(Lag).png FrameIcon(Lag).png FrameIcon(Lag).png FrameIcon(Lag).png FrameIcon(Lag).png FrameIcon(Lag).png FrameIcon(Lag).png
Legend (1 square = 1 frame)
FrameIcon(Lag).png
Lag time
FrameIcon(Hitbox).png
Hitbox
FrameIcon(HitboxChangeS).pngFrameIcon(HitboxChangeE).png
Hitbox change