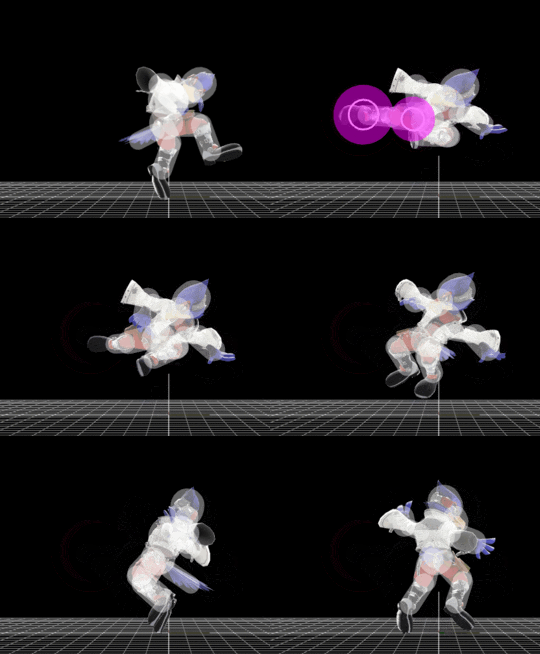
Falco (SSB4)/Back aerial: Difference between revisions
m (→Overview) |
m (→Overview) |
||
| (3 intermediate revisions by 3 users not shown) | |||
| Line 1: | Line 1: | ||
{{ArticleIcons|ssb4=y}} | {{ArticleIcons|ssb4=y}} | ||
[[File: | [[File:FalcoBAir.gif|thumb|270px|Hitbox visualization showing Falco's back aerial.]] | ||
==Overview== | ==Overview== | ||
Falco performs a back kick that recovers into a turn. | Falco performs a back kick that recovers into a turn. This is one of Falco's most commonly used moves, with the main reason being its extreme speed. It has very quick startup and decently low ending lag, as well as the ability to autocancel in a [[SHFF]], making it very useful for [[spacing]] opponents out. It also has very high power, with its extremely high knockback scaling making it stronger than even {{SSB4|Ness}}'s back throw. As such, it is one of the strongest back aerials in the game and can reliably KO anyone at 130% from center stage. However, its range is mediocre and its duration low, meaning that its use as an [[approach]] is very limited. Due to these flaws, it's also difficult to use in [[edgeguarding]] (also tied in with Falco's fast falling speed and slow air speed). Nevertheless, the unique combination of speed and power make it a dangerous aerial, with many players considering it Falco's most resilient aerial attack. | ||
This is one of Falco's most commonly used moves, with the main reason being its extreme speed. It has very quick startup and decently low ending lag, as well as the ability to autocancel in a [[SHFF]], making it very useful for [[spacing]] opponents out. It also has very high power, with its extremely high knockback scaling making it stronger than even {{SSB4|Ness}}'s back throw. As such, it is one of the strongest back aerials in the game and can reliably KO anyone at 130% from center stage. However, its range is mediocre and its duration low, meaning that its use as an [[approach]] is very limited. Due to these flaws, it's also difficult to use in [[edgeguarding]]. Nevertheless, the unique combination of speed and power make it a dangerous aerial, with many players considering it Falco's most resilient aerial attack. | |||
==Hitboxes== | ==Hitboxes== | ||
| Line 110: | Line 109: | ||
|- | |- | ||
!Ending autocancel | !Ending autocancel | ||
|15 | |15- | ||
|- | |- | ||
!Interruptible | !Interruptible | ||
| Line 116: | Line 115: | ||
|- | |- | ||
!Animation length | !Animation length | ||
| | |41 | ||
|} | |} | ||
{{FrameStripStart}} | {{FrameStripStart}} | ||
{{FrameStrip|t=Lag|c=3}}{{FrameStrip|t=Hitbox|c=2|e=HitboxChangeS}}{{FrameStrip|t=Hitbox|c=6|s=HitboxChangeE}}{{FrameStrip|t=Lag|c=26}}{{FrameStrip|t=Interruptible|c= | {{FrameStrip|t=Lag|c=3}}{{FrameStrip|t=Hitbox|c=2|e=HitboxChangeS}}{{FrameStrip|t=Hitbox|c=6|s=HitboxChangeE}}{{FrameStrip|t=Lag|c=26}}{{FrameStrip|t=Interruptible|c=4}} | ||
|- | |- | ||
{{FrameStrip|t=Autocancel|c=3}}{{FrameStrip|t=Blank|c=11}}{{FrameStrip|t=Autocancel|c= | {{FrameStrip|t=Autocancel|c=3}}{{FrameStrip|t=Blank|c=11}}{{FrameStrip|t=Autocancel|c=27}} | ||
{{FrameStripEnd}} | {{FrameStripEnd}} | ||
Latest revision as of 06:38, October 21, 2018
Overview[edit]
Falco performs a back kick that recovers into a turn. This is one of Falco's most commonly used moves, with the main reason being its extreme speed. It has very quick startup and decently low ending lag, as well as the ability to autocancel in a SHFF, making it very useful for spacing opponents out. It also has very high power, with its extremely high knockback scaling making it stronger than even Ness's back throw. As such, it is one of the strongest back aerials in the game and can reliably KO anyone at 130% from center stage. However, its range is mediocre and its duration low, meaning that its use as an approach is very limited. Due to these flaws, it's also difficult to use in edgeguarding (also tied in with Falco's fast falling speed and slow air speed). Nevertheless, the unique combination of speed and power make it a dangerous aerial, with many players considering it Falco's most resilient aerial attack.
Hitboxes[edit]
Timing[edit]
Attack[edit]
| Initial autocancel | 1-3 |
|---|---|
| Clean hit | 4-5 |
| Late hit | 6-11 |
| Ending autocancel | 15- |
| Interruptible | 38 |
| Animation length | 41 |
Landing lag[edit]
| Animation length | 15 |
|---|
Lag time |
Hitbox |
Hitbox change |
Autocancel |
Interruptible |
|
