SSBU Icon.png

Ice Climbers (SSBU)/Down throw: Difference between revisions

From SmashWiki, the Super Smash Bros. wiki
Jump to navigationJump to search
(→‎Overview: Stuff about Icies' down throw. Will elaborate more later on...)
Line 9: Line 9:


==Overview==
==Overview==
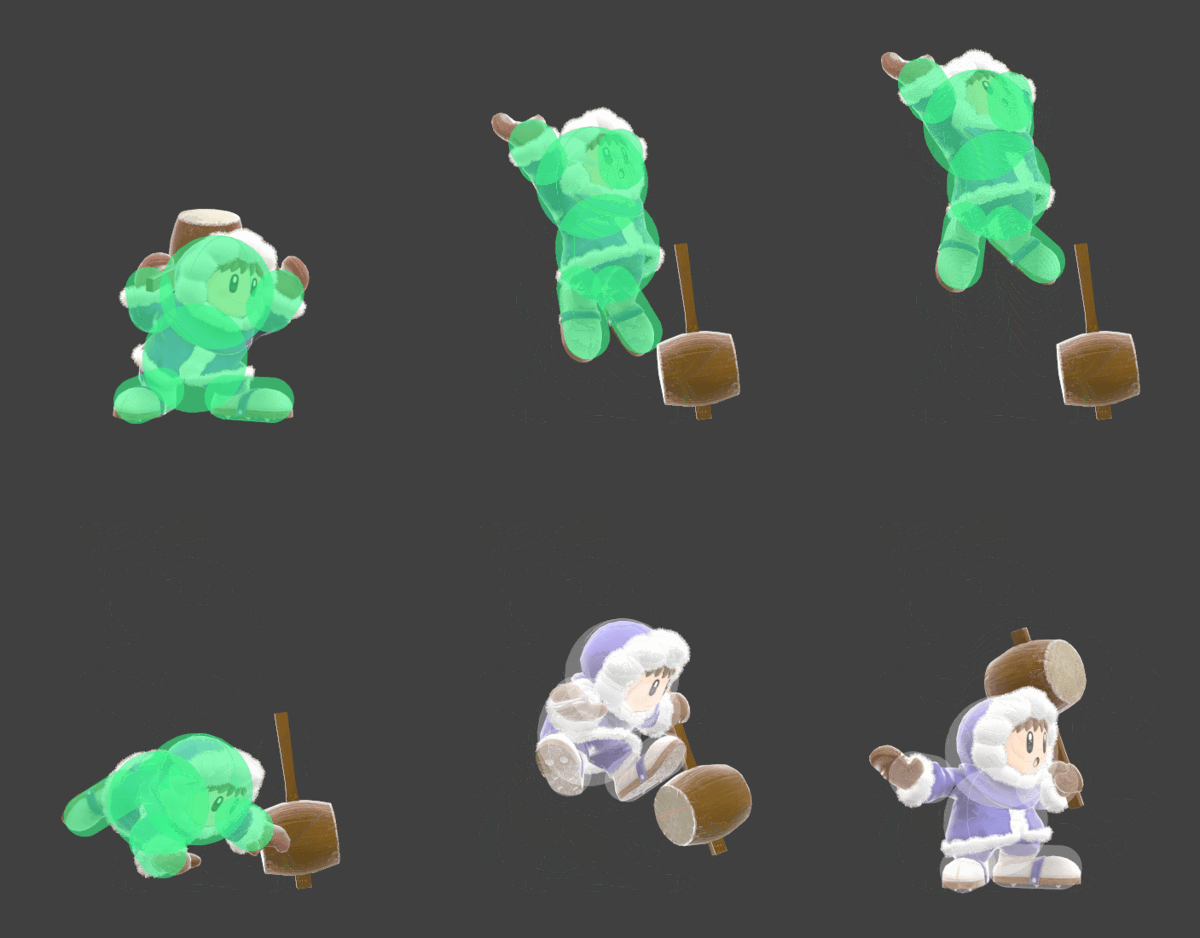
The leader of the duo hoists the target overhead, jumping into the air for a moment and slamming the target into the ground. Despite being made for starting combos, it's also got the best raw KO potential of their throws. (But even then, it won't take a stock until about 215%)
When landing a grab while desynced, the partner can be made to buffer a smash attack as the leader throws the opponent, greatly enhancing their damage and launch power. Combining a down throw with a down smash turns the otherwise combo-oriented throw into a kill move. However, it is rarely chosen over the other variants due to being one of the toughest to time and having inconsistent killpower, with a lackluster launch angle that's highly susceptible to DI.
==Throw Data==
==Throw Data==
{{UltimateThrowTableHeader}}

Revision as of 11:26, May 22, 2024

Competitive.png This article or section may require competitive expertise.
You can discuss this issue on the talk page or edit this page to improve it.
Ice Climbers down throw hurtbox visualization
PopoDThrowSSBU.gif

Overview

The leader of the duo hoists the target overhead, jumping into the air for a moment and slamming the target into the ground. Despite being made for starting combos, it's also got the best raw KO potential of their throws. (But even then, it won't take a stock until about 215%)

When landing a grab while desynced, the partner can be made to buffer a smash attack as the leader throws the opponent, greatly enhancing their damage and launch power. Combining a down throw with a down smash turns the otherwise combo-oriented throw into a kill move. However, it is rarely chosen over the other variants due to being one of the toughest to time and having inconsistent killpower, with a lackluster launch angle that's highly susceptible to DI.

Throw Data

Kind ID Damage Angle Angle type BK KS FKV Effect Type Sound
Throw 0 6.0% AngleIcon80.png Forward 30 116 0 0.0× EffectIcon(Normal).png TypeIcon(Throwing).png S None
Break 0 3.0% Sakurai angle Forward 40 100 0 0.0× EffectIcon(Normal).png TypeIcon(Throwing).png S None

Timing

Invincibility 1-37
Throw Release 37
Interruptible 50
Animation length 68
FrameIcon(Lag).png FrameIcon(Lag).png FrameIcon(Lag).png FrameIcon(Lag).png FrameIcon(Lag).png FrameIcon(Lag).png FrameIcon(Lag).png FrameIcon(Lag).png FrameIcon(Lag).png FrameIcon(Lag).png FrameIcon(Lag).png FrameIcon(Lag).png FrameIcon(Lag).png FrameIcon(Lag).png FrameIcon(Lag).png FrameIcon(Lag).png FrameIcon(Lag).png FrameIcon(Lag).png FrameIcon(Lag).png FrameIcon(Lag).png FrameIcon(Lag).png FrameIcon(Lag).png FrameIcon(Lag).png FrameIcon(Lag).png FrameIcon(Lag).png FrameIcon(Lag).png FrameIcon(Lag).png FrameIcon(Lag).png FrameIcon(Lag).png FrameIcon(Lag).png FrameIcon(Lag).png FrameIcon(Lag).png FrameIcon(Lag).png FrameIcon(Lag).png FrameIcon(Lag).png FrameIcon(LagThrowS).png FrameIcon(LagThrowE).png FrameIcon(Lag).png FrameIcon(Lag).png FrameIcon(Lag).png FrameIcon(Lag).png FrameIcon(Lag).png FrameIcon(Lag).png FrameIcon(Lag).png FrameIcon(Lag).png FrameIcon(Lag).png FrameIcon(Lag).png FrameIcon(Lag).png FrameIcon(Lag).png FrameIcon(Interruptible).png FrameIcon(Interruptible).png FrameIcon(Interruptible).png FrameIcon(Interruptible).png FrameIcon(Interruptible).png FrameIcon(Interruptible).png FrameIcon(Interruptible).png FrameIcon(Interruptible).png FrameIcon(Interruptible).png FrameIcon(Interruptible).png FrameIcon(Interruptible).png FrameIcon(Interruptible).png FrameIcon(Interruptible).png FrameIcon(Interruptible).png FrameIcon(Interruptible).png FrameIcon(Interruptible).png FrameIcon(Interruptible).png FrameIcon(Interruptible).png FrameIcon(Interruptible).png
FrameIcon(Invincible).png FrameIcon(Invincible).png FrameIcon(Invincible).png FrameIcon(Invincible).png FrameIcon(Invincible).png FrameIcon(Invincible).png FrameIcon(Invincible).png FrameIcon(Invincible).png FrameIcon(Invincible).png FrameIcon(Invincible).png FrameIcon(Invincible).png FrameIcon(Invincible).png FrameIcon(Invincible).png FrameIcon(Invincible).png FrameIcon(Invincible).png FrameIcon(Invincible).png FrameIcon(Invincible).png FrameIcon(Invincible).png FrameIcon(Invincible).png FrameIcon(Invincible).png FrameIcon(Invincible).png FrameIcon(Invincible).png FrameIcon(Invincible).png FrameIcon(Invincible).png FrameIcon(Invincible).png FrameIcon(Invincible).png FrameIcon(Invincible).png FrameIcon(Invincible).png FrameIcon(Invincible).png FrameIcon(Invincible).png FrameIcon(Invincible).png FrameIcon(Invincible).png FrameIcon(Invincible).png FrameIcon(Invincible).png FrameIcon(Invincible).png FrameIcon(Invincible).png FrameIcon(Invincible).png FrameIcon(Vulnerable).png FrameIcon(Vulnerable).png FrameIcon(Vulnerable).png FrameIcon(Vulnerable).png FrameIcon(Vulnerable).png FrameIcon(Vulnerable).png FrameIcon(Vulnerable).png FrameIcon(Vulnerable).png FrameIcon(Vulnerable).png FrameIcon(Vulnerable).png FrameIcon(Vulnerable).png FrameIcon(Vulnerable).png FrameIcon(Vulnerable).png FrameIcon(Vulnerable).png FrameIcon(Vulnerable).png FrameIcon(Vulnerable).png FrameIcon(Vulnerable).png FrameIcon(Vulnerable).png FrameIcon(Vulnerable).png FrameIcon(Vulnerable).png FrameIcon(Vulnerable).png FrameIcon(Vulnerable).png FrameIcon(Vulnerable).png FrameIcon(Vulnerable).png FrameIcon(Vulnerable).png FrameIcon(Vulnerable).png FrameIcon(Vulnerable).png FrameIcon(Vulnerable).png FrameIcon(Vulnerable).png FrameIcon(Vulnerable).png FrameIcon(Vulnerable).png
Legend (1 square = 1 frame)
FrameIcon(Lag).png
Lag time
FrameIcon(Vulnerable).png
Vulnerable
FrameIcon(Invincible).png
Invincible
FrameIcon(BlankThrowS).pngFrameIcon(BlankThrowE).png
Throw point
FrameIcon(Interruptible).png
Interruptible