Super Smash Bros. Ultimate

Ivysaur (SSBU)/Down aerial

From SmashWiki, the Super Smash Bros. wiki
Jump to navigationJump to search
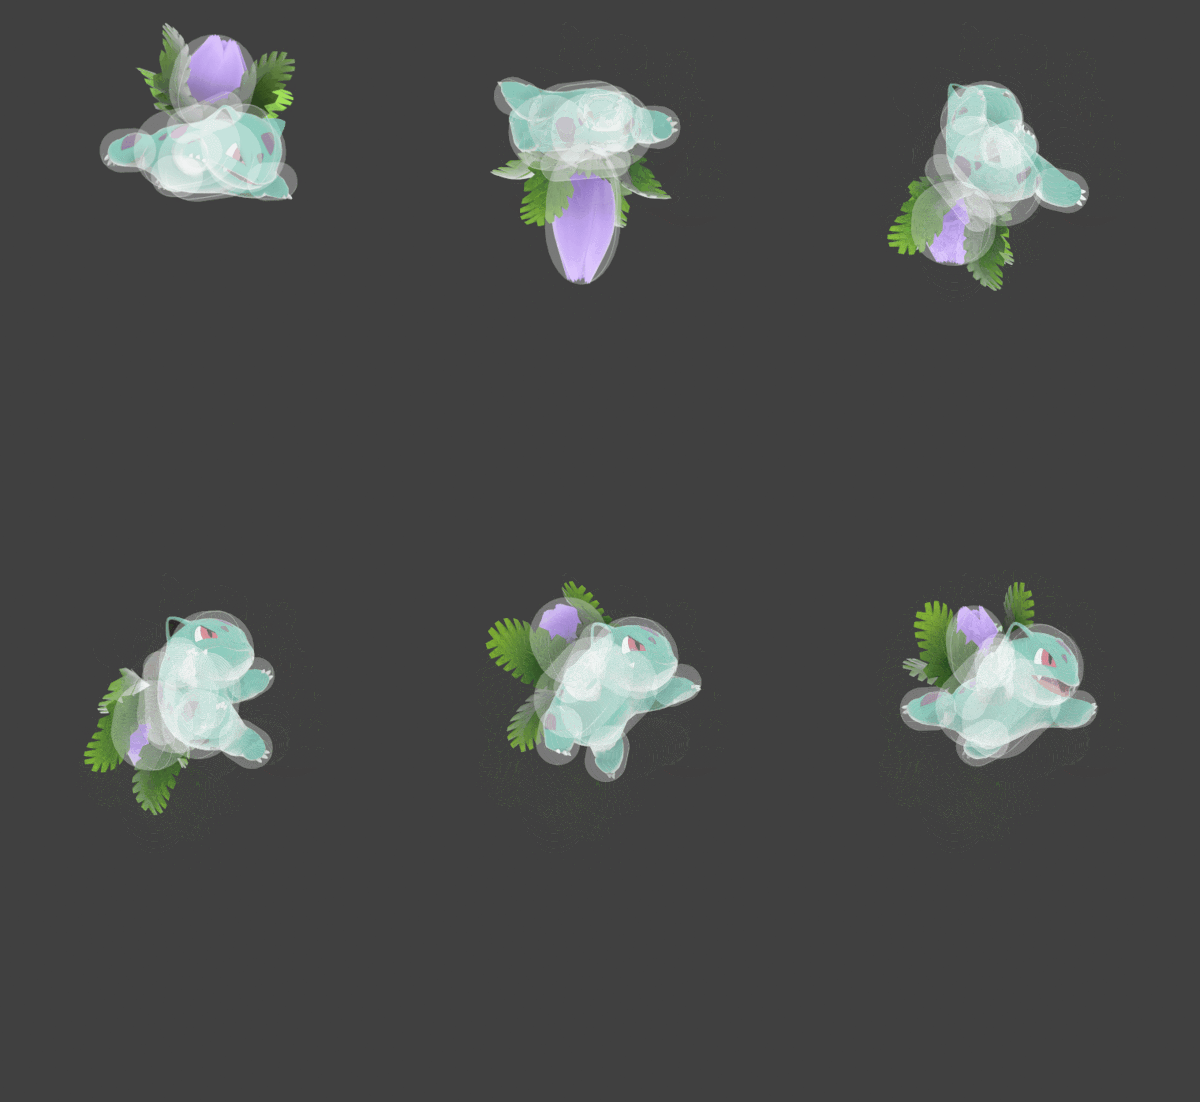
Hitbox visualization showing Ivysaur's down aerial.
Competitive.png This article or section may require competitive expertise.
You can discuss this issue on the talk page or edit this page to improve it.

Overview[edit]

Ivysaur's down aerial has it turn itself upside down and unleash a large downward blast of pollen from its bud, not unlike its up smash and up aerial. This move is a meteor smash that inflicts 10% damage and comes out on frame 11, which is fast for an attack of its type. It has a large and highly disjointed hitbox, especially underneath Ivysaur. Ivysaur briefly stalls in midair as soon as the hitbox comes out when the move is performed; unlike in Brawl, Ivysaur can control its horizontal momentum while the move is active, and the move has a little over half the landing lag it has in Brawl. However, the move's hitbox is only active for two frames, and the move suffers from high ending lag, especially if Ivysaur whiffs it.

The move consists of two hitboxes, both of which deal 10% damage and function as meteor smashes working against both grounded and aerial opponents: a larger hitbox with lower priority that deals less knockback, and a smaller hitbox with higher priority that deals more knockback. The latter hitbox is larger than the meteor smash hitbox of Ivysaur's down aerial in Brawl and farther away from Ivysaur's body, though the sweetspot in Ultimate notoriously used to be even larger prior to update 4.0.0, contributing to the move's historical notoriety.

Against grounded opponents, the move inflicts stronger base knockback than it does against aerial opponents, though generally the sweetspot hitbox (which is harder to land, especially after 4.0.0) is better for combos on grounded foes. Against grounded opponents, the sweetspot has a guaranteed KO confirm into up aerial at high percentages if timed and landed correctly.

Update 4.0.0 not only nerfed the size of the higher-knockback sweetspot (though not to the exact same extent as in Brawl), but also reduced the knockback of the lower-knockback sourspot against airborne opponents, weakening the previously notorious move's utility (though the move is still a meteor smash with a large hitbox nevertheless) and making it harder to combo grounded opponents on-stage with the sweetspot.

Update history[edit]

Super Smash Bros. Ultimate 4.0.0

  • Nerf Down aerial's sweetspot is smaller (7u → 4u).
    • Nerf This not only makes it harder to get early KOs off-stage with the move in conjunction with the sourspot's knockback against airborne opponents being reduced, but also hinders the move's utility as an on-stage combo starter, as the sweetspot is better for combos.
  • Nerf Down aerial's sourspot deals less knockback against airborne opponents (9 base/68 scaling → 8/62), weakening its utility as an off-stage meteor smash.

Hitboxes[edit]

ID Part Rehit rate Damage SD Angle Angle type BK KS FKV Set weight Radius Bone Offset SDI× T% Clang Rebound Effect Type G A Sound Direct Hit bits Hit part Blockable Reflectable Absorbable Flinchless No GFX Heedless
0 0 0 10.0% 0 AngleIcon270.png Standard 27 80 0 HitboxTableIcon(False).png 4.0 top 0.0 -13.5 0.0 1.0× 1.0× 0% HitboxTableIcon(Clang).png HitboxTableIcon(Rebound).png Normal (effect) Explosive (type) HitboxTableIcon(GroundedTrue).png HitboxTableIcon(AerialFalse).png L Fire SpecialsDirect.png All All HitboxTableIcon(Blockable).png HitboxTableIcon(Unreflectable).png HitboxTableIcon(Unabsorbable).png HitboxTableIcon(False).png HitboxTableIcon(False).png HitboxTableIcon(False).png
1 0 0 10.0% 0 AngleIcon270.png Standard 17 62 0 HitboxTableIcon(False).png 13.0 top 0.0 -14.0 0.0 1.0× 1.0× 0% HitboxTableIcon(Clang).png HitboxTableIcon(Rebound).png Normal (effect) Explosive (type) HitboxTableIcon(GroundedTrue).png HitboxTableIcon(AerialFalse).png L Fire SpecialsDirect.png All All HitboxTableIcon(Blockable).png HitboxTableIcon(Unreflectable).png HitboxTableIcon(Unabsorbable).png HitboxTableIcon(False).png HitboxTableIcon(False).png HitboxTableIcon(False).png
2 0 0 10.0% 0 AngleIcon270.png Standard 9 98 0 HitboxTableIcon(False).png 4.0 top 0.0 -13.5 0.0 1.0× 1.0× 0% HitboxTableIcon(Clang).png HitboxTableIcon(Rebound).png Normal (effect) Explosive (type) HitboxTableIcon(GroundedFalse).png HitboxTableIcon(AerialTrue).png L Fire SpecialsDirect.png All All HitboxTableIcon(Blockable).png HitboxTableIcon(Unreflectable).png HitboxTableIcon(Unabsorbable).png HitboxTableIcon(False).png HitboxTableIcon(False).png HitboxTableIcon(False).png
3 0 0 10.0% 0 AngleIcon270.png Standard 8 62 0 HitboxTableIcon(False).png 13.0 top 0.0 -14.0 0.0 1.0× 1.0× 0% HitboxTableIcon(Clang).png HitboxTableIcon(Rebound).png Normal (effect) Explosive (type) HitboxTableIcon(GroundedFalse).png HitboxTableIcon(AerialTrue).png L Fire SpecialsDirect.png All All HitboxTableIcon(Blockable).png HitboxTableIcon(Unreflectable).png HitboxTableIcon(Unabsorbable).png HitboxTableIcon(False).png HitboxTableIcon(False).png HitboxTableIcon(False).png

Timing[edit]

Attack[edit]

On frame 11, the move resets Ivysaur's horizontal momentum, and sets its vertical speed to 0.3 if it is not already moving upward.

Initial autocancel 1-2
Hitboxes 11-12
Ending autocancel 52-
Interruptible 64
Animation length 63
FrameIcon(Lag).png FrameIcon(Lag).png FrameIcon(Lag).png FrameIcon(Lag).png FrameIcon(Lag).png FrameIcon(Lag).png FrameIcon(Lag).png FrameIcon(Lag).png FrameIcon(Lag).png FrameIcon(Lag).png FrameIcon(Hitbox).png FrameIcon(Hitbox).png FrameIcon(Lag).png FrameIcon(Lag).png FrameIcon(Lag).png FrameIcon(Lag).png FrameIcon(Lag).png FrameIcon(Lag).png FrameIcon(Lag).png FrameIcon(Lag).png FrameIcon(Lag).png FrameIcon(Lag).png FrameIcon(Lag).png FrameIcon(Lag).png FrameIcon(Lag).png FrameIcon(Lag).png FrameIcon(Lag).png FrameIcon(Lag).png FrameIcon(Lag).png FrameIcon(Lag).png FrameIcon(Lag).png FrameIcon(Lag).png FrameIcon(Lag).png FrameIcon(Lag).png FrameIcon(Lag).png FrameIcon(Lag).png FrameIcon(Lag).png FrameIcon(Lag).png FrameIcon(Lag).png FrameIcon(Lag).png FrameIcon(Lag).png FrameIcon(Lag).png FrameIcon(Lag).png FrameIcon(Lag).png FrameIcon(Lag).png FrameIcon(Lag).png FrameIcon(Lag).png FrameIcon(Lag).png FrameIcon(Lag).png FrameIcon(Lag).png FrameIcon(Lag).png FrameIcon(Lag).png FrameIcon(Lag).png FrameIcon(Lag).png FrameIcon(Lag).png FrameIcon(Lag).png FrameIcon(Lag).png FrameIcon(Lag).png FrameIcon(Lag).png FrameIcon(Lag).png FrameIcon(Lag).png FrameIcon(Lag).png FrameIcon(Lag).png
FrameIcon(Autocancel).png FrameIcon(Autocancel).png FrameIcon(Blank).png FrameIcon(Blank).png FrameIcon(Blank).png FrameIcon(Blank).png FrameIcon(Blank).png FrameIcon(Blank).png FrameIcon(Blank).png FrameIcon(Blank).png FrameIcon(Blank).png FrameIcon(Blank).png FrameIcon(Blank).png FrameIcon(Blank).png FrameIcon(Blank).png FrameIcon(Blank).png FrameIcon(Blank).png FrameIcon(Blank).png FrameIcon(Blank).png FrameIcon(Blank).png FrameIcon(Blank).png FrameIcon(Blank).png FrameIcon(Blank).png FrameIcon(Blank).png FrameIcon(Blank).png FrameIcon(Blank).png FrameIcon(Blank).png FrameIcon(Blank).png FrameIcon(Blank).png FrameIcon(Blank).png FrameIcon(Blank).png FrameIcon(Blank).png FrameIcon(Blank).png FrameIcon(Blank).png FrameIcon(Blank).png FrameIcon(Blank).png FrameIcon(Blank).png FrameIcon(Blank).png FrameIcon(Blank).png FrameIcon(Blank).png FrameIcon(Blank).png FrameIcon(Blank).png FrameIcon(Blank).png FrameIcon(Blank).png FrameIcon(Blank).png FrameIcon(Blank).png FrameIcon(Blank).png FrameIcon(Blank).png FrameIcon(Blank).png FrameIcon(Blank).png FrameIcon(Blank).png FrameIcon(Autocancel).png FrameIcon(Autocancel).png FrameIcon(Autocancel).png FrameIcon(Autocancel).png FrameIcon(Autocancel).png FrameIcon(Autocancel).png FrameIcon(Autocancel).png FrameIcon(Autocancel).png FrameIcon(Autocancel).png FrameIcon(Autocancel).png FrameIcon(Autocancel).png FrameIcon(Autocancel).png

Landing lag[edit]

Interruptible 14
Animation length 21
FrameIcon(Lag).png FrameIcon(Lag).png FrameIcon(Lag).png FrameIcon(Lag).png FrameIcon(Lag).png FrameIcon(Lag).png FrameIcon(Lag).png FrameIcon(Lag).png FrameIcon(Lag).png FrameIcon(Lag).png FrameIcon(Lag).png FrameIcon(Lag).png FrameIcon(Lag).png FrameIcon(Interruptible).png FrameIcon(Interruptible).png FrameIcon(Interruptible).png FrameIcon(Interruptible).png FrameIcon(Interruptible).png FrameIcon(Interruptible).png FrameIcon(Interruptible).png FrameIcon(Interruptible).png
Legend (1 square = 1 frame)
Lag
Lag time
Hitbox
Hitbox
Auto-canceling
Autocancel
Interruptibility
Interruptible