Toon Link (SSB4)/Down smash: Difference between revisions
From SmashWiki, the Super Smash Bros. wiki
Jump to navigationJump to search
Baefeather (talk | contribs) No edit summary |
m (Text replacement - "== ([^=])" to "== $1") |
||
| (10 intermediate revisions by 5 users not shown) | |||
| Line 1: | Line 1: | ||
{{ArticleIcons|ssb4=y}} | |||
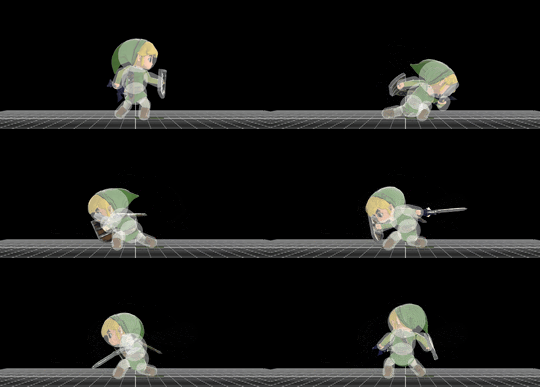
[[File:ToonLinkDSmash.gif|thumb|270px|Hitbox visualization showing Toon Link's down smash.]] | |||
{{competitive expertise}} | {{competitive expertise}} | ||
{{ | |||
==Update history== | |||
{{GameIcon|ssb4}} [[1.0.6]] | |||
*{{change|Down smash's first hit's weight-based knockback decreased|80/150|60/120. This makes it connect together better with its second hit, but removes its KO potential against aerial opponents.}} | |||
==Hitboxes== | ==Hitboxes== | ||
{{SSB4HitboxTableHeader}} | {{SSB4HitboxTableHeader}} | ||
{{HitboxTableTitle|Hit 1|42}} | {{HitboxTableTitle|Hit 1|42}} | ||
| Line 17: | Line 21: | ||
|bn=0 | |bn=0 | ||
|xpos=0.0 | |xpos=0.0 | ||
|ypos=2.0 | |ypos=2.0 to 2.8 | ||
|zpos=15.5 | |zpos=15.5 to 8.0 | ||
|effect=Slash | |effect=Slash | ||
|type=Sword | |type=Sword | ||
| Line 38: | Line 42: | ||
|bn=0 | |bn=0 | ||
|xpos=0.0 | |xpos=0.0 | ||
|ypos=2.6 | |ypos=2.6 to 2.8 | ||
|zpos=9.5 | |zpos=9.5 to 8.0 | ||
|effect=Slash | |effect=Slash | ||
|type=Sword | |type=Sword | ||
| Line 56: | Line 60: | ||
|ks=100 | |ks=100 | ||
|fkv=120 | |fkv=120 | ||
|r= | |r=3.5 | ||
|bn=0 | |bn=0 | ||
|xpos=0.0 | |xpos=0.0 | ||
|ypos=2.0 | |ypos=2.0 to 2.8 | ||
|zpos=15.5 | |zpos=15.5 to 8 | ||
|effect=Slash | |effect=Slash | ||
|type=Sword | |type=Sword | ||
| Line 82: | Line 86: | ||
|xpos=0.0 | |xpos=0.0 | ||
|ypos=4.5 | |ypos=4.5 | ||
|zpos=-17.0 | |zpos=-17.0 to -7.0 | ||
|type=Sword | |type=Sword | ||
|sdi=0.0 | |sdi=0.0 | ||
| Line 101: | Line 105: | ||
|bn=0 | |bn=0 | ||
|xpos=0.0 | |xpos=0.0 | ||
|ypos=5.8 | |ypos=5.8 to 4.5 | ||
|zpos=-2.0 | |zpos=-2.0 | ||
|type=Sword | |type=Sword | ||
| Line 114: | Line 118: | ||
==Timing== | ==Timing== | ||
{|class="wikitable" | {|class="wikitable" | ||
!Charges between | |||
|3-4 | |||
|- | |- | ||
! | !Hit 1 | ||
|9-10 | |9-10 | ||
|- | |- | ||
! | !Hit 2 | ||
| | |17-18 | ||
|- | |- | ||
! | !Interruptible | ||
|50 | |50 | ||
|- | |||
!Animation length | |||
|57 | |||
|} | |} | ||
{{FrameStripStart}} | {{FrameStripStart}} | ||
{{FrameStrip|t=Lag|c= | {{FrameStrip|t=Lag|c=3|e=LagChargeS}}{{FrameStrip|t=Lag|c=5|s=LagChargeE}}{{FrameStrip|t=Hitbox|c=2}}{{FrameStrip|t=Lag|c=6}}{{FrameStrip|t=Hitbox|c=2}}{{FrameStrip|t=Lag|c=31}}{{FrameStrip|t=Interruptible|c=8}} | ||
{{FrameStripEnd}} | {{FrameStripEnd}} | ||
{{FrameIconLegend|lag=y|hitbox=y|interruptible=y}} | {{FrameIconLegend|lag=y|charge=y|hitbox=y|interruptible=y}} | ||
{{MvSubNavToonLink|g=SSB4}} | {{MvSubNavToonLink|g=SSB4}} | ||
[[Category:Toon Link (SSB4)]] | |||
[[Category:Down smashes (SSB4)]] | |||
Latest revision as of 02:29, April 13, 2022
Update history[edit]
 Down smash's first hit's weight-based knockback decreased: 80/150 → 60/120. This makes it connect together better with its second hit, but removes its KO potential against aerial opponents.
Hitboxes[edit]
Timing[edit]
| Charges between | 3-4 |
|---|---|
| Hit 1 | 9-10 |
| Hit 2 | 17-18 |
| Interruptible | 50 |
| Animation length | 57 |
Lag time |
Charge interval |
Hitbox |
Interruptible |
|

