SSBU Icon.png

Robin (SSBU)/Neutral attack/Hit 2: Difference between revisions

From SmashWiki, the Super Smash Bros. wiki
Jump to navigationJump to search
No edit summary
 
Line 3: Line 3:
{{competitive expertise}}
==Overview==
==Overview==
==Hitboxes==
==Hitboxes==
The scripts only specify a hitstun modifier for the ID 2 hitbox, but it applies to all hitboxes [[Hitstun#List of moves with hitstun modifiers|due to a glitch]].
{{UltimateHitboxTableHeader}}
! Hitstun
! Hitstun
Line 10: Line 12:
|damage=1.5%
|damage=1.5%
|angle=361
|angle=361
|af=3
|bk=25
|bk=25
|ks=25
|ks=25
Line 29: Line 32:
|damage=1.5%
|damage=1.5%
|angle=361
|angle=361
|af=3
|bk=25
|bk=25
|ks=25
|ks=25
Line 48: Line 52:
|damage=1.5%
|damage=1.5%
|angle=180
|angle=180
|af=3
|bk=20
|bk=20
|ks=20
|ks=20
Line 61: Line 66:
|sfx=Slash
|sfx=Slash
|slvl=S
|slvl=S
|hitbits=Fighter only
}}
}}
|'''+2''' frames
|'''+2''' frames
Line 67: Line 73:
|damage=1.5%
|damage=1.5%
|angle=361
|angle=361
|af=3
|bk=20
|bk=20
|ks=20
|ks=20
Line 85: Line 92:


==Timing==
==Timing==
The third jab and rapid jab have different continuability windows, with the latter being shorter and taking priority. The move transitions into the rapid jab if, since the start of the first jab and before the end of the rapid jab window, the attack button has been pressed at least 3 times and released at least 2 times. Otherwise, it transitions into the third jab.
The move cannot transition into the third jab if Robin's Fire tome has no durability left, and cannot transition into the rapid jab if the Wind tome has no durability left.
{|class="wikitable"
{|class="wikitable"
!Hitboxes
!colspan=2|Hitboxes
|5-6
|5-6
|-
|-
!Earliest continuable (rapid jab, jab 3)
!rowspan=2|Continuability!!Rapid jab
|8, 9
|7-9
|-
!Jab 3
|9-30
|-
|-
!Interruptible
!colspan=2|Interruptible
|35
|35
|-
|-
!Animation length
!colspan=2|Animation length
|42
|42
|}
|}


{{FrameStripStart}}
{{FrameStripStart}}
{{FrameStrip|t=Lag|c=4}}{{FrameStrip|t=Hitbox|c=2}}{{FrameStrip|t=Lag|c=1|e=LagContinuableS}}{{FrameStrip|t=Lag|c=27|s=LagContinuableE}}{{FrameStrip|t=Interruptible|c=8}}
!Hitboxes {{FrameStrip|t=Lag|c=4}}{{FrameStrip|t=Hitbox|c=2|e=HitboxContinuableS}}{{FrameStrip|t=Lag|c=2|s=LagContinuableE|e=LagContinuableS}}{{FrameStrip|t=Lag|c=26|s=LagContinuableE}}{{FrameStrip|t=Interruptible|c=8}}
|-
!Rapid jab {{FrameStrip|t=Blank|c=6}}{{FrameStrip|t=Continuable|c=3}}{{FrameStrip|t=Blank|c=33}}
|-
!Jab 3 {{FrameStrip|t=Blank|c=8}}{{FrameStrip|t=Continuable|c=22}}{{FrameStrip|t=Blank|c=12}}
{{FrameStripEnd}}
{{FrameStripEnd}}


{{FrameIconLegend|lag=y|hitbox=y|earliestcontinuable=y|interruptible=y}}
{{FrameIconLegend|lag=y|hitbox=y|earliestcontinuable=y|continuable=y|interruptible=y}}


{{MvSubNavRobin|g=SSBU}}
[[Category:Robin (SSBU)]]
[[Category:Robin (SSBU)]]
[[Category:Neutral attacks (SSBU)]]
[[Category:Neutral attacks (SSBU)]]

Latest revision as of 18:09, July 29, 2022

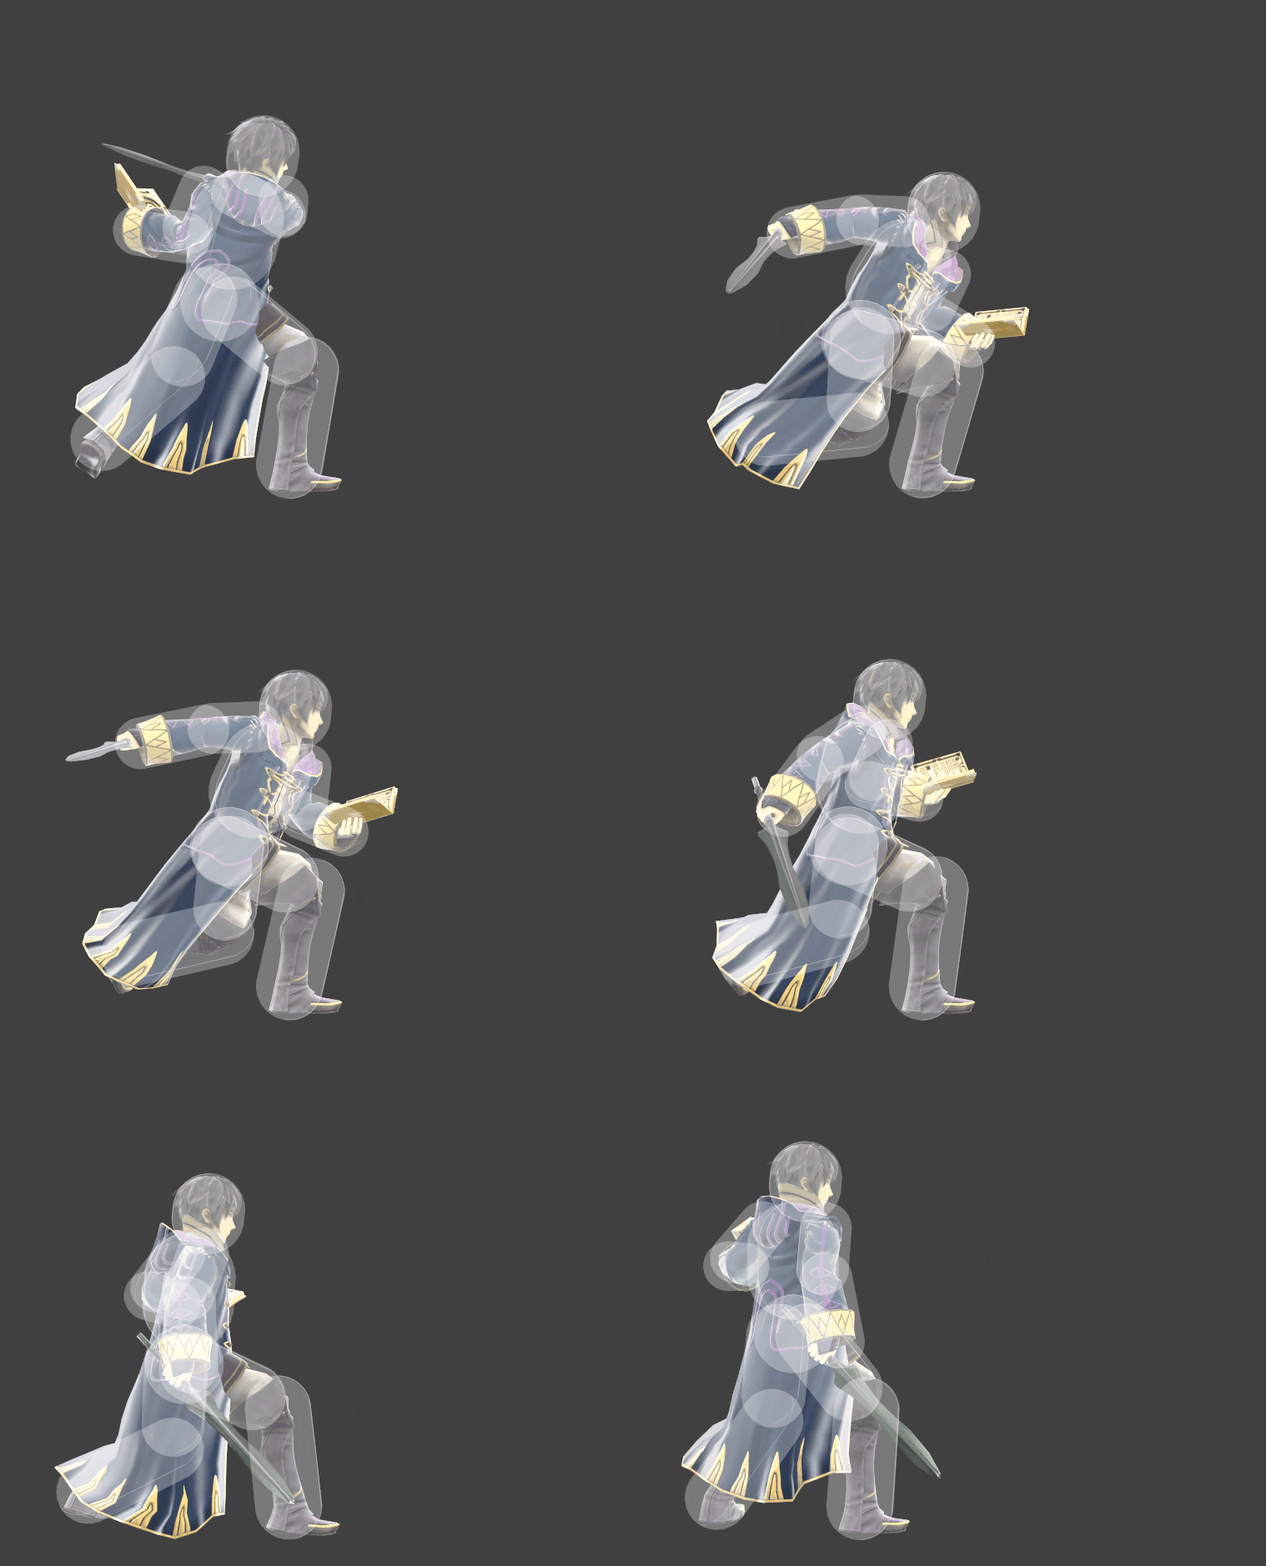
Hitbox visualization showing Robin's second jab.
Competitive.png This article or section may require competitive expertise.
You can discuss this issue on the talk page or edit this page to improve it.

Overview[edit]

Hitboxes[edit]

The scripts only specify a hitstun modifier for the ID 2 hitbox, but it applies to all hitboxes due to a glitch.

ID Part Rehit rate Damage SD Angle Angle type BK KS FKV Set weight Radius Bone Offset SDI× T% Clang Rebound Effect Type G A Sound Direct Hit bits Hit part Blockable Reflectable Absorbable Flinchless No GFX Heedless Hitstun
0 0 0 1.5% 0 Sakurai angle Forward 25 25 0 HitboxTableIcon(False).png 2.8 top 0.0 8.5 8.0 to 7.0 1.2× 1.0× 0% HitboxTableIcon(Clang).png HitboxTableIcon(Rebound).png EffectIcon(Slash).png TypeIcon(Sword).png HitboxTableIcon(GroundedTrue).png HitboxTableIcon(AerialTrue).png S Slash SpecialsDirect.png All All HitboxTableIcon(Blockable).png HitboxTableIcon(Unreflectable).png HitboxTableIcon(Unabsorbable).png HitboxTableIcon(False).png HitboxTableIcon(False).png HitboxTableIcon(False).png
1 0 0 1.5% 0 Sakurai angle Forward 25 25 0 HitboxTableIcon(False).png 3.5 top 0.0 8.5 12.0 to 7.0 1.2× 1.0× 0% HitboxTableIcon(Clang).png HitboxTableIcon(Rebound).png EffectIcon(Slash).png TypeIcon(Sword).png HitboxTableIcon(GroundedTrue).png HitboxTableIcon(AerialTrue).png S Slash SpecialsDirect.png All All HitboxTableIcon(Blockable).png HitboxTableIcon(Unreflectable).png HitboxTableIcon(Unabsorbable).png HitboxTableIcon(False).png HitboxTableIcon(False).png HitboxTableIcon(False).png
2 0 0 1.5% 0 AngleIcon180.png Forward 20 20 0 HitboxTableIcon(False).png 3.5 top 0.0 8.5 14.5 to 7.0 1.2× 1.0× 0% HitboxTableIcon(Clang).png HitboxTableIcon(Rebound).png EffectIcon(Slash).png TypeIcon(Sword).png HitboxTableIcon(GroundedTrue).png HitboxTableIcon(AerialTrue).png S Slash SpecialsDirect.png Fighter only All HitboxTableIcon(Blockable).png HitboxTableIcon(Unreflectable).png HitboxTableIcon(Unabsorbable).png HitboxTableIcon(False).png HitboxTableIcon(False).png HitboxTableIcon(False).png +2 frames
3 0 0 1.5% 0 Sakurai angle Forward 20 20 0 HitboxTableIcon(False).png 3.5 top 0.0 8.5 14.5 to 7.0 1.2× 1.0× 0% HitboxTableIcon(Clang).png HitboxTableIcon(Rebound).png EffectIcon(Slash).png TypeIcon(Sword).png HitboxTableIcon(GroundedTrue).png HitboxTableIcon(AerialTrue).png S Slash SpecialsDirect.png All All HitboxTableIcon(Blockable).png HitboxTableIcon(Unreflectable).png HitboxTableIcon(Unabsorbable).png HitboxTableIcon(False).png HitboxTableIcon(False).png HitboxTableIcon(False).png

Timing[edit]

The third jab and rapid jab have different continuability windows, with the latter being shorter and taking priority. The move transitions into the rapid jab if, since the start of the first jab and before the end of the rapid jab window, the attack button has been pressed at least 3 times and released at least 2 times. Otherwise, it transitions into the third jab.

The move cannot transition into the third jab if Robin's Fire tome has no durability left, and cannot transition into the rapid jab if the Wind tome has no durability left.

Hitboxes 5-6
Continuability Rapid jab 7-9
Jab 3 9-30
Interruptible 35
Animation length 42
Hitboxes  FrameIcon(Lag).png FrameIcon(Lag).png FrameIcon(Lag).png FrameIcon(Lag).png FrameIcon(Hitbox).png FrameIcon(HitboxContinuableS).png FrameIcon(LagContinuableE).png FrameIcon(LagContinuableS).png FrameIcon(LagContinuableE).png FrameIcon(Lag).png FrameIcon(Lag).png FrameIcon(Lag).png FrameIcon(Lag).png FrameIcon(Lag).png FrameIcon(Lag).png FrameIcon(Lag).png FrameIcon(Lag).png FrameIcon(Lag).png FrameIcon(Lag).png FrameIcon(Lag).png FrameIcon(Lag).png FrameIcon(Lag).png FrameIcon(Lag).png FrameIcon(Lag).png FrameIcon(Lag).png FrameIcon(Lag).png FrameIcon(Lag).png FrameIcon(Lag).png FrameIcon(Lag).png FrameIcon(Lag).png FrameIcon(Lag).png FrameIcon(Lag).png FrameIcon(Lag).png FrameIcon(Lag).png FrameIcon(Interruptible).png FrameIcon(Interruptible).png FrameIcon(Interruptible).png FrameIcon(Interruptible).png FrameIcon(Interruptible).png FrameIcon(Interruptible).png FrameIcon(Interruptible).png FrameIcon(Interruptible).png
Rapid jab  FrameIcon(Blank).png FrameIcon(Blank).png FrameIcon(Blank).png FrameIcon(Blank).png FrameIcon(Blank).png FrameIcon(Blank).png FrameIcon(Continuable).png FrameIcon(Continuable).png FrameIcon(Continuable).png FrameIcon(Blank).png FrameIcon(Blank).png FrameIcon(Blank).png FrameIcon(Blank).png FrameIcon(Blank).png FrameIcon(Blank).png FrameIcon(Blank).png FrameIcon(Blank).png FrameIcon(Blank).png FrameIcon(Blank).png FrameIcon(Blank).png FrameIcon(Blank).png FrameIcon(Blank).png FrameIcon(Blank).png FrameIcon(Blank).png FrameIcon(Blank).png FrameIcon(Blank).png FrameIcon(Blank).png FrameIcon(Blank).png FrameIcon(Blank).png FrameIcon(Blank).png FrameIcon(Blank).png FrameIcon(Blank).png FrameIcon(Blank).png FrameIcon(Blank).png FrameIcon(Blank).png FrameIcon(Blank).png FrameIcon(Blank).png FrameIcon(Blank).png FrameIcon(Blank).png FrameIcon(Blank).png FrameIcon(Blank).png FrameIcon(Blank).png
Jab 3  FrameIcon(Blank).png FrameIcon(Blank).png FrameIcon(Blank).png FrameIcon(Blank).png FrameIcon(Blank).png FrameIcon(Blank).png FrameIcon(Blank).png FrameIcon(Blank).png FrameIcon(Continuable).png FrameIcon(Continuable).png FrameIcon(Continuable).png FrameIcon(Continuable).png FrameIcon(Continuable).png FrameIcon(Continuable).png FrameIcon(Continuable).png FrameIcon(Continuable).png FrameIcon(Continuable).png FrameIcon(Continuable).png FrameIcon(Continuable).png FrameIcon(Continuable).png FrameIcon(Continuable).png FrameIcon(Continuable).png FrameIcon(Continuable).png FrameIcon(Continuable).png FrameIcon(Continuable).png FrameIcon(Continuable).png FrameIcon(Continuable).png FrameIcon(Continuable).png FrameIcon(Continuable).png FrameIcon(Continuable).png FrameIcon(Blank).png FrameIcon(Blank).png FrameIcon(Blank).png FrameIcon(Blank).png FrameIcon(Blank).png FrameIcon(Blank).png FrameIcon(Blank).png FrameIcon(Blank).png FrameIcon(Blank).png FrameIcon(Blank).png FrameIcon(Blank).png FrameIcon(Blank).png
Legend (1 square = 1 frame)
FrameIcon(Lag).png
Lag time
FrameIcon(Hitbox).png
Hitbox
FrameIcon(Continuable).png
Continuable
FrameIcon(BlankContinuableS).pngFrameIcon(BlankContinuableE).png
Earliest continuable point
FrameIcon(Interruptible).png
Interruptible